Find Wasted Space with Storage Management
Between photos, videos, music, and downloads, it’s easy to fill up your Mac’s drive, particularly if it has fast but small flash storage. A MacBook Air might have only 128 GB of drive space, and that goes quickly. Numerous utilities exist to help you find and delete unnecessary files, like GrandPerspective, OmniDiskSweeper, and WhatSize, but as of macOS 10.12 Sierra, Apple provides a built-in tool to clean house: the Storage Management window.
Storage Management is hidden inside the System Information app and is most easily accessed by choosing > About This Mac, clicking the Storage button, and then clicking Manage…but wait! Before you click Manage, look at the About This Mac window’s Storage view.
storage-management-about-this-mac

Hover over each colored bar to see how much space is taken up by a particular type of data. The white space at the end of the bar is what’s still available. You can’t do much here, but the view gives you a quick overview of your drive usage.
When you click Manage, System Information launches, and the Storage Management window appears. (You can also open System Information manually and choose Window > Storage Management.) In the sidebar at the left, ignore Recommendations and look at the rest of the categories. They will vary a bit between Macs, depending on what apps you use, but they correspond to the colored bars you saw in the About This Mac window’s Storage view.

For some, mostly app-specific categories, like Mail and Photos, Storage Management merely tells you how much space the app’s data occupies and lets you either enable space optimization (downloading only recent attachments for Mail, and keeping only optimized photos on the Mac) or if that has been done already, open the app. To save more space, you must delete unnecessary data from within the app itself.
More interesting are the Applications, Documents, and iOS Files categories, all of which may contain gigabytes of unnecessary data. iOS Files, for instance, shows any device backups and software updates that are stored on your Mac’s drive. It’s worth keeping the latest backup of devices you still use, but many people have older backups and unnecessary updates kicking around.
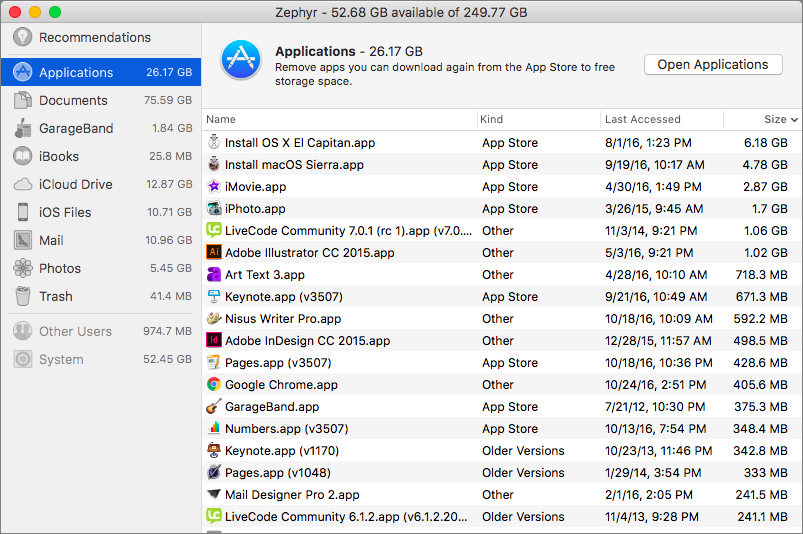
The Applications category shown above lists your apps and is sorted by size by default. But try clicking the column header for Kind and scrolling down. You can probably delete most apps tagged as Duplicates or Older Versions. Similarly, click the Last Accessed column header to see which apps you haven’t launched in years. Many of them can probably go too. Plus, you can redownload anything tagged as coming from the App Store, so you can toss those apps if you want.
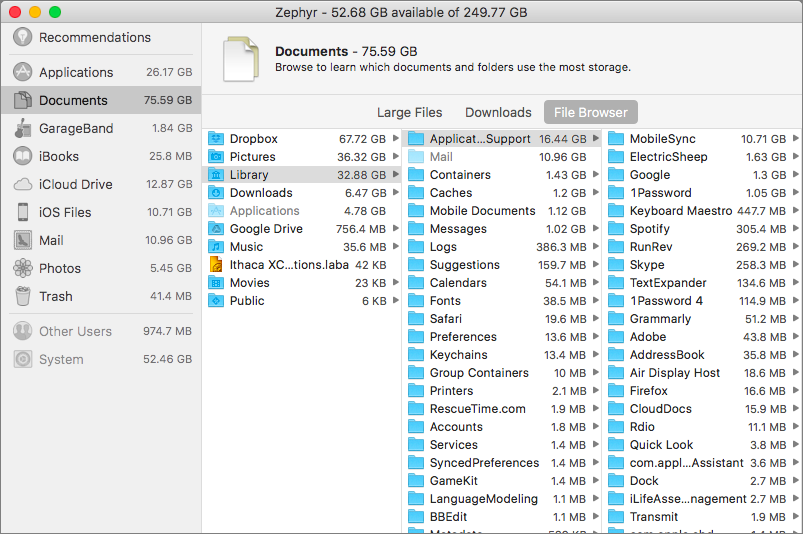
In Documents, you’ll see three buttons: Large Files, Downloads, and File Browser. Large Files focuses on files over 50 MB in size, Downloads shows you the contents of your Downloads folder (much of which you likely don’t need), and File Browser gives you a column view that’s sorted by file size and shows sizes next to each item. It’s great for trawling through your drive to find see what’s consuming all that space.
storage-management-documents

In any of these views other than File Browser, hover over any item and you see an X button for deleting the file and a magnifying glass button that reveals the file in the Finder. To delete multiple files at once, just Command-click or Shift-click to select them and then press the Delete key to remove them all at once. Storage Management gives you the combined size of all the selected files and warns you before deleting the files, so you can use this technique to preview how much space a multi-file deletion will save. In File Browser, select one or more files and either drag them to the Trash icon in the Dock, or press Command-Delete.
If your Mac’s drive is filling up—if it has less than 10 percent free space—consider using the Storage Management window’s tools to search out and delete files that are just wasting space.
All-Time most popular tips!
More great tips from the archives…
- Two Secret Key Combos for Forward Delete on the Magic and MacBook Keyboards
- iCloud Photo Library Users: Do NOT Turn Off iCloud
- Ever Wondered Which Words to Capitalize in a Title? Use Capitalize My Title!
- Tips for Setting Up a Comfortable and Effective Home Work Space
- Tips for Better Videoconferencing
- Set Your Preferred Name and Photo for Messages on iOS
- The Fastest Way to Change Wi-Fi Networks in iOS
- What to Put at the End of Your Emails
- Apple Business Manager Is a Win for Apple-Driven Workplaces
- Find Wasted Space with Storage Management
- Forrester Research and IBM Studies Show Macs Are Cheaper than PCs
- Being an Apple User Means You’re Not the Product
- How to Ask for Tech Support So You Get Good Answers Quickly
- Apple Business Manager Is a Win for Apple-Driven Workplaces


