There’s little worse than missing an important call or text because your iPhone was in Do Not Disturb mode or because the Mute switch was engaged. If there are certain people—a spouse, parent, or child—whose calls and texts you always want to break through the cone of silence, iOS has a solution: Emergency Bypass. When enabled for a particular contact’s ringtone or text tone, Emergency Bypass ensures the sound and vibration will happen regardless of Do Not Disturb or the Mute switch position. To set up Emergency Bypass, edit the person’s contact card in the Phone or Contacts app, tap Ringtone, and enable Emergency Bypass. You can turn on Emergency Bypass separately for calls in the Ringtone settings and for texts in the Text Tone settings. And remember, you can always set someone’s tone to None and enable a vibration instead to ensure Emergency Bypass doesn’t allow a call to interrupt a movie, play, or concert.
Need to Limit How Much Your Kids Use Their Devices? Use Screen Time in iOS 12
It’s a constant refrain in many homes—a kid clamoring to use an iPad or iPhone to play games, watch videos, or chat with friends. As a parent, you know too much screen time is bad, especially when it affects homework or family dinners. At the same time, an iOS device may be essential for communication and schoolwork.
In iOS 12, Apple introduced Screen Time, which shows how much time you spend on your own device, and helps you control your usage—see our recent article for details. But Screen Time also has parental controls. They’re best managed with Family Sharing from your own iOS device, so if you haven’t already done so, tap Settings > YourName > Set Up Family Sharing and follow the instructions. (You can also set up Screen Time directly on the child’s device—tap Use Screen Time Passcode to set a passcode that prevents the child from overriding limits.)
With Family Sharing set up, go to Settings > Screen Time and notice your children’s names in the new Family section. Tap a child’s name to set Screen Time limitations and restrictions on their iOS devices. Initially, Screen Time walks you through an assistant that explains the main features and helps you set some basic limitations. It also prompts you to create a four-digit parent passcode, which you’ll need to adjust settings in the future or override time limits.
Subsequently, when you tap your child’s name, you’ll see Screen Time’s standard sections for Downtime, App Limits, Always Allowed, and Content & Privacy Restrictions. For a full explanation of the first three, see our previous article; we’ll focus on what’s different for children and on Content & Privacy Restrictions here.
Downtime
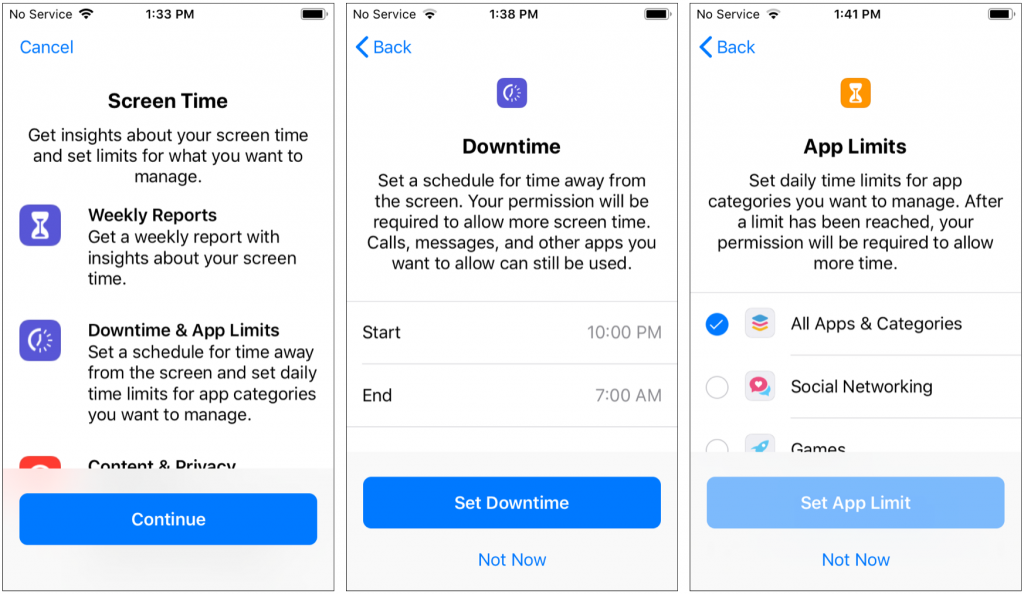
Downtime is useful for blocking all device usage during a time when your child should be sleeping, doing homework, or just not using the screen. You can set only one time period, so if you want to control usage on a more complex schedule, you’ll need to do that in another way.
For a child, the Downtime screen has a Block at Downtime option that you must enable to actually block access to the device during the scheduled time. If it’s off, and the child tries to use the device during that time, they’ll be able to tap Ignore Limit just like an adult can. That might be appropriate for a teenager who may need to check email late at night to find details for tomorrow’s sports practice. With Block at Downtime on, however, the only override is with the parent passcode.
App Limits
As our previous article noted, App Limits specify how long a category of apps—or a specific app—may be used each day, with the time resetting at midnight. For children, you might want to try restricting nothing for a week, and see what apps they’re using and for how long. Then have “the talk” about appropriate use of digital devices and agree on limits.
You can tap Customize Days to allow more time on weekends, for instance, and you can exempt an app from all limitations in the Always Allowed screen.
Once your child hits an app limit, Screen Time will block them from using the app, with the only override being your parent passcode.
Content & Privacy Restrictions
Here’s where you’ll find all the previous parental controls, which let you turn on a wide variety of restrictions. To get started, enable the Content & Privacy Restrictions switch. There are three basic sections here:
- Store and Content Restrictions: Use these to control app downloading and deletion, what sort of content can be downloaded from Apple’s online stores, whether or not Web content should be filtered, and more.
- Privacy Restrictions: The entries here depend on what apps are installed, but the main question is if you want to allow location sharing.
- Allow Changes: These items relate to settings on the iOS device itself. You might want to disallow passcode and account changes, and volume limit changes, if you’ve set a maximum volume in Settings > Music > Volume Limit.
Reports
At the top of its main screen for the child, Screen Time reports on usage for both the current day and the last 7 days, showing a graph of screen time by hour or day, with color coding to indicate which app categories were in use. Review this report regularly to see if you need to adjust the Downtime or App Limit settings. Your child can also check the same report directly on their device in Settings > Screen Time.
Screen Time’s controls are good but not perfect. Enterprising kids have discovered workarounds such as changing the device’s time setting and deleting and redownloading apps. So don’t see Screen Time as a guaranteed technological solution—it’s just another tool in your parenting toolkit.
So What Are All Those Stacks of Notifications in iOS 12?
It can be easy to become overwhelmed by iOS notifications, particularly if you have chatty friends or apps. In iOS 12, Apple corralled notifications by grouping them into stacks so you no longer see an endless screen of alerts. To expand a stack of notifications on either the Lock screen or in Notification Center (swipe down from the top of the screen), tap the stack. Once you’ve expanded a stack, you can tap Show Less to restack it, tap the X button to remove the entire stack, or tap any individual notification to open it. By default, iOS 12 groups notifications intelligently, which might entail separate stacks for different Messages conversations, for instance. If that’s still too much, you can go to Settings > Notifications > App Name > Notification Grouping and tap By App to collect every notification from the app into the same stack.
Did You Know iOS 12 Lets You Add a Second Person to Face ID?
Touch ID lets users register up to five fingers that can unlock an iPhone, which has long been a boon for those who share access to their iPhone with trusted family members. However, users of the iPhone X haven’t been able to give a second person Face ID-based access, forcing those people to wait for Face ID to fail and then tap in a passcode manually. iOS 12 lifts that limitation, allowing a second person to register their face with Face ID on the iPhone X and the new iPhone XR, XS, and XS Max. To set this up, go to Settings > Face ID & Passcode. Enter your passcode and tap Set Up an Alternate Appearance. Then give your iPhone to the person who should have access and have them follow the simple setup directions.
In iOS 12, Do Not Disturb Can Turn Itself Off—No More Missed Alerts!
We love the Do Not Disturb feature in iOS—it’s essential for keeping notifications from waking us up at night or causing embarrassing light and noise in dark movie theater. But it’s long had a problem. When you invoked Do Not Disturb manually for a movie or doctor’s appointment, you had to remember to turn it off manually when you were done, or risk missing important notifications. No more!
In iOS 12, Apple enhanced Do Not Disturb in two ways: enabling it to disable itself automatically after a certain amount of time or when your location changes and adding a Bedtime mode that holds all notifications until you wake up.
An Automatic End to Do Not Disturb Sessions
In previous versions of iOS, you invoked Do Not Disturb manually by tapping its button in Control Center. However, if you forgot to turn it off after your meeting, say, it would stay on forever unless you had a Do Not Disturb schedule set, and even then, not until the end of that schedule. So if you forgot to turn Do Not Disturb off after a 10 AM meeting, it could stay on until the next morning or until you realized you weren’t getting any calls or messages.
If you start Do Not Disturb sessions in the same way in iOS 12, they’ll act the same way. But if you force-touch or press and hold the Do Not Disturb button in Control Center, that brings up the Do Not Disturb card with five options:
- For 1 hour: This first choice tells Do Not Disturb to hold all your calls for an hour, after which it will turn off automatically.
- Until this evening/Until tomorrow morning: If you invoke this option during the day, it will silence calls and notifications until 7 PM. Select it at night, however, and it will quiet your iPhone until 7 AM.
- Until I leave this location: Use this choice when you’re invoking Do Not Disturb in conjunction with being in a particular spot that you’ll leave as soon as you’re done.
- Until the end of the next event: When you enable Do Not Disturb during an event on your calendar, this choice appears, giving you the option of turning off Do Not Disturb at the end of the event.
- Schedule: Tap this button to open Settings > Do Not Disturb.
While Do Not Disturb is on, iOS 12 puts a notification on the Lock screen telling you when it will turn itself off. At any time before then, you can tap the Lock screen notification to allow calls and notifications again.
Do Not Disturb During Bedtime
In Settings > Do Not Disturb, you’ll find a new Bedtime switch. When enabled during the times for which you’ve scheduled Do Not Disturb, it dims and blacks out the Lock screen, silences calls, and sends all notifications to Notification Center instead of showing them on the Lock screen.
The idea behind the Bedtime switch is that it reduces the chances that glancing at your iPhone in the middle of the night to see what time it is will shock your eyes or engage your brain. Sleep is good! But if you get up early and want to allow notifications through again, tap the Do Not Disturb notification on the Lock screen to turn it off.
That’s not all you can do with Do Not Disturb During Bedtime. You might know that there’s a Bedtime screen in the Clock app that’s designed to help you go to bed and wake up at the same time every day. If you use it to set your desired sleep schedule and enable the Do Not Disturb During Bedtime switch in Clock > Bedtime > Options, you get another Do Not Disturb schedule.
That could be extremely welcome if, for instance, you want Do Not Disturb on automatically both at night when you’re sleeping and also during a regularly scheduled class or meeting.
Give these new Do Not Disturb options a try! They go a long way toward ensuring that our iPhones fit into our lives better, rather than forcing us to pay attention to every last alert or message.
Make Safari Tabs Easier to Identify by Adding Icons
Do you end up with so many tabs in Safari that it becomes impossible to read the truncated tab titles? There’s no shame in that, and Safari 12—which comes with macOS 10.14 Mojave and is a free update for 10.12 Sierra and 10.13 High Sierra—now offers an option to add an icon representing the Web site to each open tab. Called a favicon, this tiny image is usually carefully designed to identify its site and makes it easier to pick out the tab. To enable the feature, open Safari > Preferences > Tabs and select “Show website icons in tabs.” Unlike other Web browsers, Safari never shrinks a regular tab to just the icon, so you’ll always see the icon and some text.
Make More Space for Documents by Putting Your Dock on the Side of Your Mac’s Screen
By default, Apple locates the Dock at the bottom of the Mac’s screen. If that location interferes with you seeing as much of your document windows as you’d like, you can set it to appear only when you move the pointer to the bottom edge of the screen. But there’s a better way: put the Dock on the side of the screen where there’s plenty of horizontal room and it won’t get in the way of most document windows. Open System Preferences > Dock, and select Right or Left from the Position on Screen radio buttons.
The post Make More Space for Documents by Putting Your Dock on the Side of Your Mac’s Screen appeared first on TidBITS Content Network.
Let Your Fingers Do the Walking: 13 Essential Trackpad Tricks for Mac Users
A trackpad is not a mouse. In some ways, that’s obvious—you swipe your fingers on it, rather than dragging it around. Less obvious, however, are the many gestures that make using a trackpad on your Mac faster and more fun. These gestures aren’t limited to laptop users, thanks to Apple’s Magic Trackpad 2, which brings gesturing goodness to any desktop Mac. Here’s how to put your fingers to work.
Four Fingers on the Trackpad
The four-fingers-down gestures are dramatic and an easy way to appreciate the power of trackpad gestures, so we’ll start with them.
Say you have a lot of windows open, and you want to move them all aside quickly so you can open a file on the Desktop. Place your thumb and three fingers together on your trackpad and then spread them outward. Your windows scurry to the edges of the screen. To bring the windows back, reverse the gesture, pinching your fingers in toward your palm.
If you haven’t moved windows aside, pinching your thumb and three fingers together instead opens Launchpad, which shows icons for installed apps. Click an icon to open that app, or use the spreading four-fingered gesture to exit Launchpad.
Three Fingers on the Trackpad
Move three fingers horizontally on your trackpad and either nothing will happen, or you’ll switch to a different “desktop space.” This state of affairs is most easily seen by making an app full-screen. For instance, open Safari and click the green full-screen button at the upper left of the window. Safari takes over the entire screen, including the menu bar (to put it back, hover the pointer at the very top of the screen to see and click the green button again).
Now swipe left and right horizontally to switch in and out of the Safari space. As you make more apps full-screen, they’ll each create their own space. (If you’ve enabled Apple’s Dashboard, you may see it at the far left.)
What if you swipe vertically with three fingers? Swipe up to enter the All Windows view of Mission Control, which shows all open windows as thumbnails, plus desktop spaces in the top bar. Click any thumbnail to switch to it, or jump to any space by clicking it. You can also click the plus button at the upper right or drag any window into the top bar to create a new space. To move a space’s apps back to the current space, hover over a space on the top bar and click the close button that appears. To exit All Windows view, swipe down with three fingers.
If you haven’t invoked All Windows view, swiping down with three fingers instead invokes App Exposé view, which displays thumbnails of all open windows in the current app. Click any one to switch to it. Swipe right or left with three fingers while in App Exposé to switch between apps.
Finally, on older MacBooks that don’t have Force Touch-capable trackpads, tap with three fingers on words to look them up, on files to preview them with Quick Look, and more. With newer MacBooks, if you have “Force Click and haptic feedback” enabled in System Preferences > Trackpad > Point & Click, you can instead “force click” with one finger for these features. That involves clicking on something and then pressing firmly without letting up.
Two Fingers on the Trackpad
The two-fingered gestures are easy to get your head around:
- In Safari, swipe left on a page to go back in that tab’s page history or right to go forward.
- Also in Safari, tap two fingers on the trackpad to zoom in on the content. Another two-fingered tap zooms back out.
- In Photos, and some graphics apps, zoom in and out by pinching with two fingers, and rotate selected objects by putting two fingers on the trackpad and turning them. A two-finger pinch also zooms the page in Safari.
- To open Notification Center quickly, swipe left from off the right-hand edge of your trackpad. Swipe back to the right to close Notification Center.
Changing Your Preferences
If you need a refresher on all these gestures, open System Preferences > Trackpad. Look in the Point & Click, Scroll & Zoom, and More Gestures panes to see a video for each gesture. You can also adjust which ones are active and how many fingers they require.
With so many gestures on offer, it’s worth your time to explore everything you can do with your trackpad.
Social Media: Did you know that you can make your Mac dance (well, not literally) with two-, three-, and four-fingered gestures on the trackpad? Read on to learn more.
A Hidden Trick that Lets You Navigate Your iPhone with One Hand
Unless you can palm a basketball, you may not be able to use an iPhone single-handed. But sometimes one hand is all you can spare. If you find yourself in such a situation, give Reachability a try. On a Touch ID–based iPhone, tap (don’t press) the Home button twice to slide the iPhone’s interface halfway down the physical screen, bringing everything into reach of your thumb. On the Face ID–equipped iPhone X, put your thumb in the bottom of the screen—about at the top edge of the Dock if you were on the Home screen—and swipe down. You can use apps normally for a tap or two, and then they’ll expand back to the full screen to show the full interface. If Reachability is off (or if you want to turn it off), go to Settings > General > Accessibility.
Top Features of iOS 12 to Take Advantage of Right Away
Feeling left behind because you don’t have the latest iPhone or iPad? Don’t, because Apple has a present for you in the form of iOS 12. The new operating system promises to increase performance, particularly for older devices as far back as the iPhone 5s and iPad Air.
But iOS 12 offers more than just a speed boost. Apart from adding fripperies like new animoji, text effects, and camera effects in Messages and FaceTime, iOS 12 helps you use your device less. That’s important, as it becomes increasingly obvious that many people spend more time than they’d like on addictive social media apps, games, and cat videos.
Screen Time
The marquee feature for helping you control device usage is Screen Time. Found in the Settings app, Screen Time reports on how much time you spend using different apps, how often you pick up your device, and how many notifications interrupt you. You can check it anytime and get weekly reports, and use this information to help you reduce undesirable usage.
Screen Time has two helpful options, Downtime and App Limits. With Downtime, you can specify a time period when you can only receive phone calls and use specific apps you set in Always Allowed. App Limits let you set how long you may use certain categories of apps. You can ignore the limit, extending it for 15 minutes or for the rest of the day, but that’s cheating, right?
Even better, you can set Downtime and App Limits for a child’s iPhone or iPad, ensuring that they can’t play games after bedtime or text their friends during dinner.
Notification Management
It’s easy to become overwhelmed with notifications, especially if you have chatty friends in messaging apps. iOS 12 can reduce the impact of non-stop notifications. On the Lock screen, iOS 12 now groups message threads and multiple notifications from the same app. Tapping a group expands it so you can see the details.
Plus, with a feature called Instant Tuning, you can change notification settings for an app right from a notification. Swipe left on a notification and tap Manage. Instant Tuning also lets you send notifications to Notification Center silently so they don’t interrupt you but are available later.
Do Not Disturb
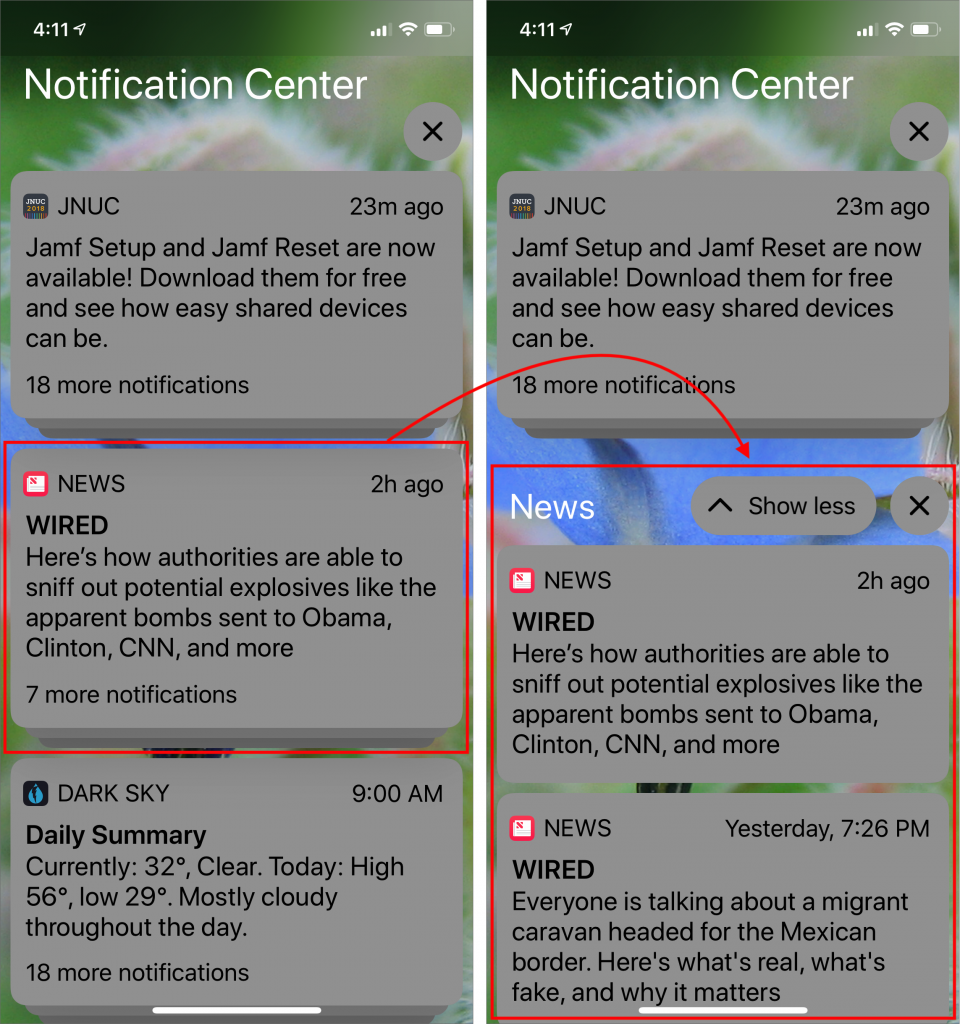
In the “it’s about time” department, iOS 12 beefs up Do Not Disturb so it works more the way people do. When you bring up Control Center and force-touch the Do Not Disturb button, it expands to let you turn on Do Not Disturb for 1 hour, for the rest of the day, or until you leave your current location. The beauty of these new options is that they disable Do Not Disturb automatically so you don’t have to remember—and potentially miss important notifications. Plus, a new Bedtime option in Settings > Do Not Disturb dims the display and silences overnight notifications until you unlock your device in the morning.
Siri Shortcuts
Another new feature, Siri Shortcuts, aims to help you use your device more effectively. As Siri learns your routines, it will start suggesting shortcuts for common actions, either on the Lock screen or when you pull down on the Home screen to search. You can see its suggestions in Settings > Siri & Search > All Shortcuts, and for those that seem useful, record a custom phrase that will invoke the shortcut. Plus, a new Shortcuts app lets you create more complex shortcuts that can run multiple steps at once.
Smaller Changes
Those may be the most significant changes in iOS 12, but they’re far from the only ones. Here’s a sampling of other refinements you’ll notice:
- Apple has redesigned the iBooks app and renamed it Books.
- The News, Stocks, and Voice Memos apps also received redesigns, Stocks and Voice Memos are now available on the iPad, and all three have made the jump to the Mac in Mojave, with their data synced via iCloud.
- A new Measure app uses augmented reality to help you measure objects in the real world.
- In Settings > Battery, iOS 12 shows graphs of battery usage and activity for the last 24 hours or the last 10 days.
iOS 12 has even more minor improvements that we’ll be sharing in the coming months, so watch this space!
Social Media: Apple has loaded iOS 12 with new features, and here’s a rundown of those that will make the most difference in your daily iPhone and iPad experience, including Screen Time, better notifications, improved Do Not Disturb, and more!