Quickly Put Lots of Files in a Folder with One Command
Quick Tip: A Shortcut to Create an Instant Slideshow from a Folder of Images
Having Trouble Finding Files on Your Mac? Here’s How to Reset Spotlight
Free Up Disk Space by Removing iCloud Drive Downloads
Free Up Disk Space by Removing iCloud Drive Downloads
With iCloud Drive, Apple provides an Optimize Mac Storage checkbox that, when checked, stores the full contents of iCloud Drive on the Mac only if there’s enough space. However, you may wish to recover local storage space without selecting that option—luckily, that’s easy to do. Open iCloud Drive in the Finder, Control-click a file, and choose Remove Download. The file remains in iCloud Drive, and if you need it locally, you can click the cloud icon next to its name to download it. If you’re not sure which files in the iCloud Drive window occupy the most space, choose View > As List, and then click the Size column so the largest files sort to the top (click again if they’re sorting to the bottom).

More great tips from the archives…
- Two Secret Key Combos for Forward Delete on the Magic and MacBook Keyboards
- iCloud Photo Library Users: Do NOT Turn Off iCloud
- Ever Wondered Which Words to Capitalize in a Title? Use Capitalize My Title!
- Tips for Setting Up a Comfortable and Effective Home Work Space
- Tips for Better Videoconferencing
- Set Your Preferred Name and Photo for Messages on iOS
- The Fastest Way to Change Wi-Fi Networks in iOS
- What to Put at the End of Your Emails
- Apple Business Manager Is a Win for Apple-Driven Workplaces
- Find Wasted Space with Storage Management
- Forrester Research and IBM Studies Show Macs Are Cheaper than PCs
- Being an Apple User Means You’re Not the Product
- How to Ask for Tech Support So You Get Good Answers Quickly
- Apple Business Manager Is a Win for Apple-Driven Workplaces
- The Hidden Dangers of Shadow IT on your business
- Need to Stay in Touch? Try One of These Videoconferencing Apps
- Never Send Someone a Password in Mail or Messages: Do This Instead!
- What Are All These New Privacy Request Dialogs in Mojave?
- The Importance of Productivity Tech for Your Road Warriors
Find Files in the Finder Better by Specifying a Search Scope
Customize What Appears in New Finder Windows with This Tip
Get Stacked: Reduce Icon Clutter in Mojave with New Desktop Stacks
There are three types of people in this world: those who keep their Mac Desktop organized, those who don’t and don’t care, and those who don’t but wish they could. If you’re sitting on the Group #3 bench–you have oodles of icons scattered willy-nilly`around your Desktop, and it bugs the bejeebers out of you—macOS 10.14 Mojave might have the solution: Stacks.
Apple has used the term “Stack” before, and still does, in relation to how the icons of folders in the Dock display, either as normal folders or as a stack of icons with the first on top. Mojave’s new Stacks feature brings that visual approach to the Desktop, organizing icon clutter into neat stacks that you can expand and collapse with a click, working with the revealed icons just as you’ve always done.
In the Finder, the best way to invoke Stacks is by Control-clicking the Desktop and choosing Use Stacks from the contextual menu (below left). If you first click the Desktop, you can also find the commands for Stacks in the View menu: Use Stacks and Group Stacks By. Lastly, if you open the View Options window by Control-clicking the Desktop and choosing Show View Options, you can work with Stacks by choosing from the Stack By pop-up menu (below right).
![]()
Regardless, when you invoke Stacks, the Finder promptly collects all like icons—even new files, as you create them—together into one or more stacks of icons. Click once on a stack to reveal its contents below. Click again to collapse the revealed icons back into the stack. If you open multiple stacks at once, each subsequent stack takes over a spot at the top of the screen and expands down. If you don’t show disks on your Desktop, you can get a nice columnar view of what’s on your Desktop.
![]()
How does Stacks figure out which files are alike? You determine that by Control-clicking the Desktop and choosing from the Group Stacks By menu. You can create three basic types of stacks:
- Kind: These stacks are named for the type of file they contain, such as Documents, PDF Documents, Movies, Images, Screenshots, etc.
- Date: With date-based collections, each stack’s name and contents depend on what date ranges make sense, such as Today, Previous 7 Days, Previous 30 Days, October, 2017, and so on. The date groupings can key off the date added, last opened, last modified, or created.
- Finder tags: Tag-based stacks are useful only if you regularly assign tags to all your files.
We expect that grouping stacks by kind will work best for most people, with a few chronologically inclined folks opting for one of the date options.
How can you control the order of the files within a stack? That’s trickier. Control-click the Desktop, choose Show View Options, and in the View Options window, choose from the Sort By pop-up menu. We’re partial to Name (for an alphabetical list) and Last Modified (to put the most recent file you’ve touched on top), but see what works for you.
The main problem with Stacks is that it eliminates any spatial memorization you might have relied on to find icons on your Desktop. You might be able to identify the document you’re looking for by its icon, but exactly where that icon appears when you expand its stack depends on what other stacks are open or closed, what other files are in the stack, and how the stack is sorted. So if your Desktop is a mess, but you know to look in the lower-left corner for the files you’re working with, Stacks may irritate you.
Luckily, you can give Stacks a try without permanently rearranging your Desktop. Just invoke it—the Command-Control-0 (zero) keyboard shortcut can be handy here—and try Stacks. If you don’t like it, another press on Command-Control-0 puts things back the way they were, with no harm done. (The only exception is that if you sort your Desktop, switching in and out of Stacks removes your Sort By setting.)
Stacks may not be ideal for everyone, but many people whose Desktops are obscured by icons will appreciate how it cleans things up instantly and keeps everything neat and tidy.
Social Media: Is your Mac’s Desktop a cluttered mess? If you’d like to clean it up in a flash—and keep it clean—try the new Stacks feature in macOS 10.14 Mojave.
Tired of PDFs or Other Documents Opening in the Wrong App?
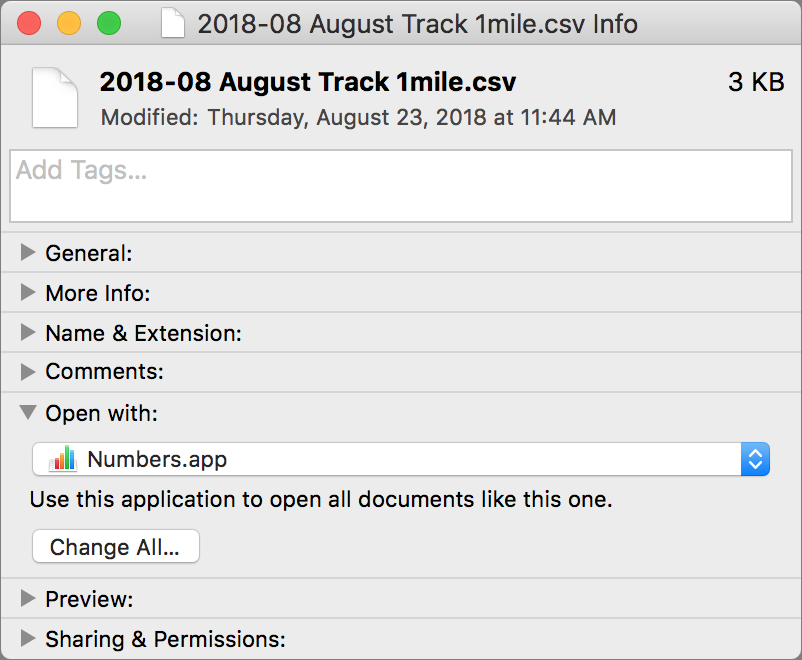
When you double-click a document, macOS uses the document’s file extension to figure out which app should open the file. So, by default, a PDF file called laser-squid.pdf opens in Preview because the Finder knows that everything with a .pdf extension should open in Preview. But what if you would prefer to open .pdf files in Adobe Reader, or you want comma-separated value (.csv) text files to open in Numbers? To change any mapping, select a file of the type in question and choose File > Get Info to open the Info window. In the Open With section, click the pop-up menu to choose the desired app and then click the Change All button.
Find Wasted Space with Storage Management
Find Wasted Space with Storage Management
Between photos, videos, music, and downloads, it’s easy to fill up your Mac’s drive, particularly if it has fast but small flash storage. A MacBook Air might have only 128 GB of drive space, and that goes quickly. Numerous utilities exist to help you find and delete unnecessary files, like GrandPerspective, OmniDiskSweeper, and WhatSize, but as of macOS 10.12 Sierra, Apple provides a built-in tool to clean house: the Storage Management window.
Storage Management is hidden inside the System Information app and is most easily accessed by choosing > About This Mac, clicking the Storage button, and then clicking Manage…but wait! Before you click Manage, look at the About This Mac window’s Storage view.
storage-management-about-this-mac

Hover over each colored bar to see how much space is taken up by a particular type of data. The white space at the end of the bar is what’s still available. You can’t do much here, but the view gives you a quick overview of your drive usage.
When you click Manage, System Information launches, and the Storage Management window appears. (You can also open System Information manually and choose Window > Storage Management.) In the sidebar at the left, ignore Recommendations and look at the rest of the categories. They will vary a bit between Macs, depending on what apps you use, but they correspond to the colored bars you saw in the About This Mac window’s Storage view.
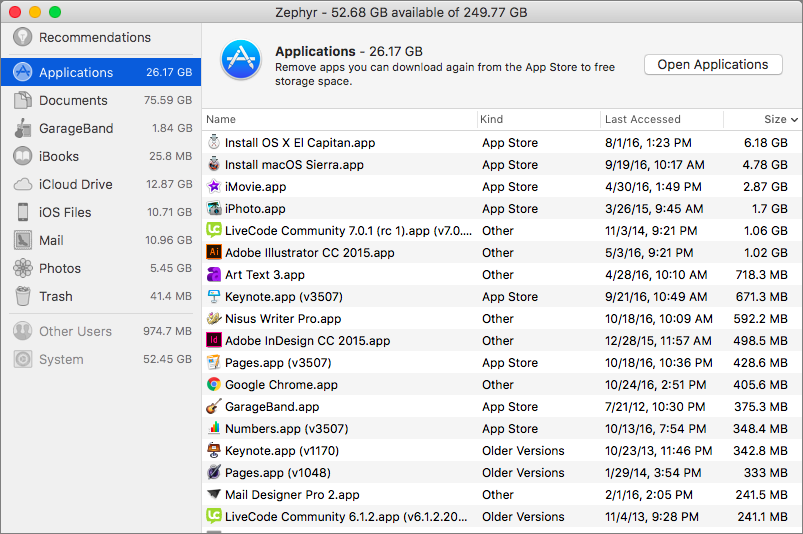
For some, mostly app-specific categories, like Mail and Photos, Storage Management merely tells you how much space the app’s data occupies and lets you either enable space optimization (downloading only recent attachments for Mail, and keeping only optimized photos on the Mac) or if that has been done already, open the app. To save more space, you must delete unnecessary data from within the app itself.
More interesting are the Applications, Documents, and iOS Files categories, all of which may contain gigabytes of unnecessary data. iOS Files, for instance, shows any device backups and software updates that are stored on your Mac’s drive. It’s worth keeping the latest backup of devices you still use, but many people have older backups and unnecessary updates kicking around.
The Applications category shown above lists your apps and is sorted by size by default. But try clicking the column header for Kind and scrolling down. You can probably delete most apps tagged as Duplicates or Older Versions. Similarly, click the Last Accessed column header to see which apps you haven’t launched in years. Many of them can probably go too. Plus, you can redownload anything tagged as coming from the App Store, so you can toss those apps if you want.
In Documents, you’ll see three buttons: Large Files, Downloads, and File Browser. Large Files focuses on files over 50 MB in size, Downloads shows you the contents of your Downloads folder (much of which you likely don’t need), and File Browser gives you a column view that’s sorted by file size and shows sizes next to each item. It’s great for trawling through your drive to find see what’s consuming all that space.
storage-management-documents
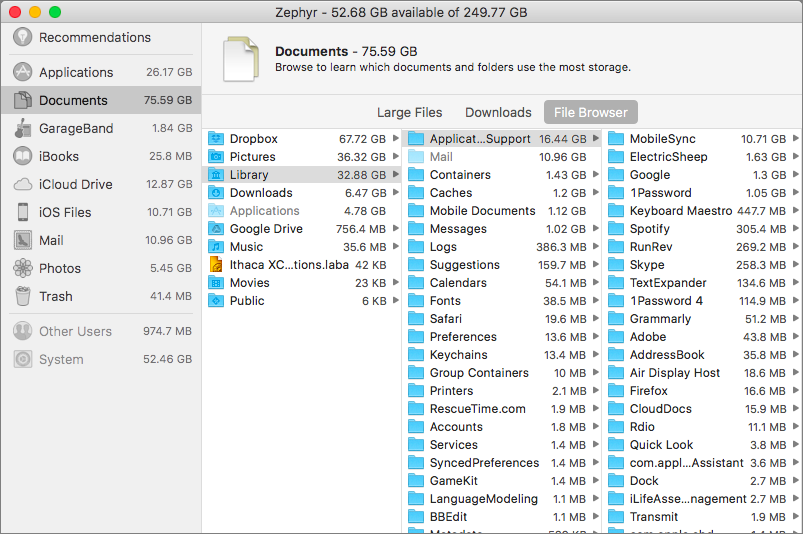
In any of these views other than File Browser, hover over any item and you see an X button for deleting the file and a magnifying glass button that reveals the file in the Finder. To delete multiple files at once, just Command-click or Shift-click to select them and then press the Delete key to remove them all at once. Storage Management gives you the combined size of all the selected files and warns you before deleting the files, so you can use this technique to preview how much space a multi-file deletion will save. In File Browser, select one or more files and either drag them to the Trash icon in the Dock, or press Command-Delete.
If your Mac’s drive is filling up—if it has less than 10 percent free space—consider using the Storage Management window’s tools to search out and delete files that are just wasting space.
All-Time most popular tips!
More great tips from the archives…
- Two Secret Key Combos for Forward Delete on the Magic and MacBook Keyboards
- iCloud Photo Library Users: Do NOT Turn Off iCloud
- Ever Wondered Which Words to Capitalize in a Title? Use Capitalize My Title!
- Tips for Setting Up a Comfortable and Effective Home Work Space
- Tips for Better Videoconferencing
- Set Your Preferred Name and Photo for Messages on iOS
- The Fastest Way to Change Wi-Fi Networks in iOS
- What to Put at the End of Your Emails
- Apple Business Manager Is a Win for Apple-Driven Workplaces
- Find Wasted Space with Storage Management
- Forrester Research and IBM Studies Show Macs Are Cheaper than PCs
- Being an Apple User Means You’re Not the Product
- How to Ask for Tech Support So You Get Good Answers Quickly
- Apple Business Manager Is a Win for Apple-Driven Workplaces
Did You Know You Can Customize the Columns in a Finder Window’s List View?
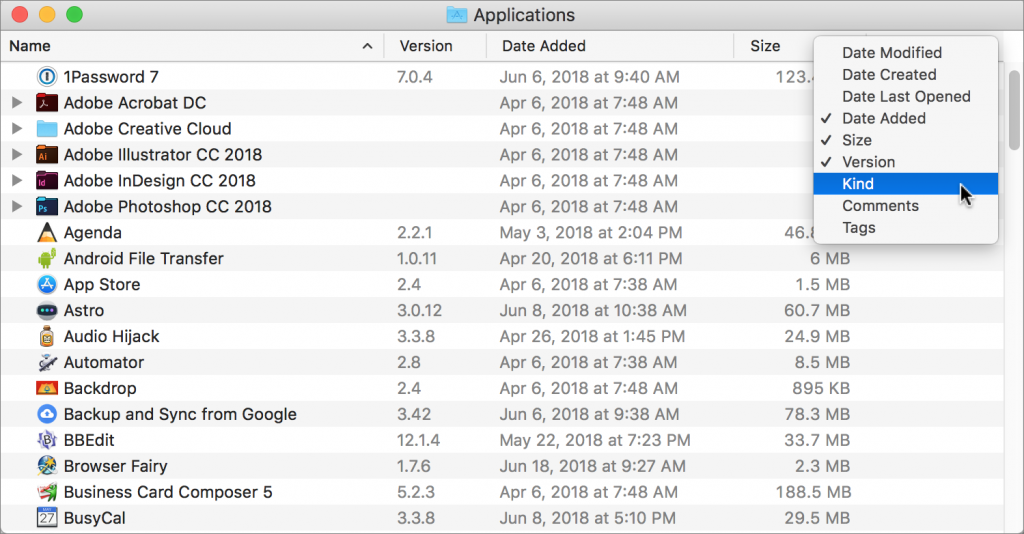
When a Mac folder contains a lot of files, the Finder’s List view often works best, since it lets you focus on a single folder and easily sort the contents by clicking the different columns: Name, Date Modified, Size, and Kind. But did you know that you can resize columns, rearrange them, and even add and remove columns? To resize a column, drag the vertical separator line to the right of its name. To move a column, click and hold on its name, and then drag it to the desired position. And to add or remove a column, Control- or right-click any column header and select or deselect the desired column. Choose from Date Modified, Date Created, Date Last Opened, Date Added, Size, Version, Kind, Comments, and Tags.
