
Everything You Need to Know about Multitasking in iPadOS 13

iOS 13 Makes Editing Text Easier


What Can You Store in Apple’s Wallet App? Credit Cards, Boarding Passes, Tickets, and More!

Did You Know You Can Make a Video of Anything on Your iPhone or iPad Screen?

Use Spotlight on the Mac to Convert Units, Track Flights, Find Movies, and More!

For Faster, Easier Photo Sharing, Try an iCloud Link
Is Your Photos Library Too Big? Here’s How to Move It to an External Hard Drive
SSDs are essential for ensuring optimal performance on a Mac, but because they’re expensive, many people don’t have as much built-in storage space as they would like. If your Photos library has grown to the point where your SSD is nearly full, it might be time to think about offloading it to an external hard drive. (Don’t put it on a drive that you’re using as a Time Machine destination because there could be permissions conflicts, and note that Apple doesn’t recommend storing a Photos library on a drive shared over a network.)
Before we explain how to offload your photos, we want to mention another way of reducing the Photos footprint on your drive. If you’re using iCloud Photos (previously called iCloud Photo Library) to sync photos and videos between your devices, the originals are all stored in iCloud. In Photos > Preferences > iCloud, you can enable Optimize Mac Storage, which swaps the full-resolution images for smaller versions, saving a boatload of space. However, you may find Photos somewhat slower to use, as it has to download full-resolution versions of images you work with, and you won’t have a local backup of the original images. So it’s an option, but it has tradeoffs.

For most people with burgeoning Photos libraries, a better approach is to offload the entire library to an external hard drive. This approach comes with tradeoffs too; accessing images from a hard drive is slower than getting them from an internal SSD, and you have to figure out how you’re going to back up that drive as well. Plus, the drive has to be available, connected, and turned on (so you have to listen to it) for you to use Photos at all, which might be especially annoying if you regularly work remotely on a notebook Mac.
To move your Photos library to an external drive, follow these steps:
- If it’s running, quit Photos.
- In the Finder, drag Photos Library, which is stored in your Pictures folder by default, to the external drive. A few answers to common questions:
- Where on the external drive should I put it? It doesn’t matter, but we recommend putting it at the top level so you are less likely to lose track of it in the future.
- I got an error—what should I do? If you see an error telling you that you don’t have permission to copy to that drive, select the drive’s icon in the Finder and choose File > Get Info to open the Info window. If necessary click the triangle next to Sharing & Permissions, and make sure “Ignore ownership on this volume” is selected. If it’s not, click the lock icon, enter an administrator name and password, and select the checkbox.

- How long will it take to copy? Quite some time, depending on how many photos you have. It’s best to do overnight or when you don’t need to use Photos.
- When it’s done copying, double-click the new Photos Library icon on the external hard drive to launch Photos and set it to open that new copy on future launches.
- If you use iCloud Photos, designate this new library as the System Photo Library by choosing Photos > Preferences > General and clicking the “Use as System Photo Library” button.
- Scroll through your photo collection and make sure all your photos are present—double-click a few of them to spot check that the actual images open properly.


Obviously, your original Photos library is still taking up space on your SSD, but it’s best to use the new version for a little while before deleting the old one, just in case. When you’re ready to do that, drag it from the Pictures folder to the trash and choose Finder > Empty Trash to reclaim the space.
Social Media: Running out of space on your internal drive? You can clear a bunch of space by moving your Photos library to an external hard drive—here’s how:
Collaborate with Colleagues in Google Docs
Collaboration is what all the cool kids—well, all the competitive businesses—are doing these days because it’s efficient and effective. See “Stop Mailing Files Around and Use Collaborative Apps” and for users of Apple’s iWork, “Collaborate with Colleagues in Pages, Numbers, and Keynote.” Today we’re going to look at collaborating using Google’s Web-based productivity suite, Google Docs, which businesses can use for free or as part of a G Suite subscription.
The Google Docs suite competes with Apple’s iWork and Microsoft’s Office 365, providing Google Docs for word processing, Google Sheets for spreadsheet work, and Google Slides for presentations. You can manage all your files in Google Drive. Although all are Web-based and work best on a Mac or other desktop computer, Google also makes iOS apps that let you work—a bit less flexibly—on an iPad or iPhone.
You’ll need a free Google account to create new documents, and for full-fledged collaboration, your colleagues will need Google accounts too. You can share documents with people who lack Google accounts or don’t want to sign in, but their comments and changes will be anonymous.
Invite Collaborators
Once your document is ready to share, you can invite collaborators by clicking the large Share button in the upper-right corner of the window.
Flexible permissions let you share with specific people, and for each person, set whether they can edit, comment on, or just view the document (below left). You can also add a note that will be sent with the invitation.
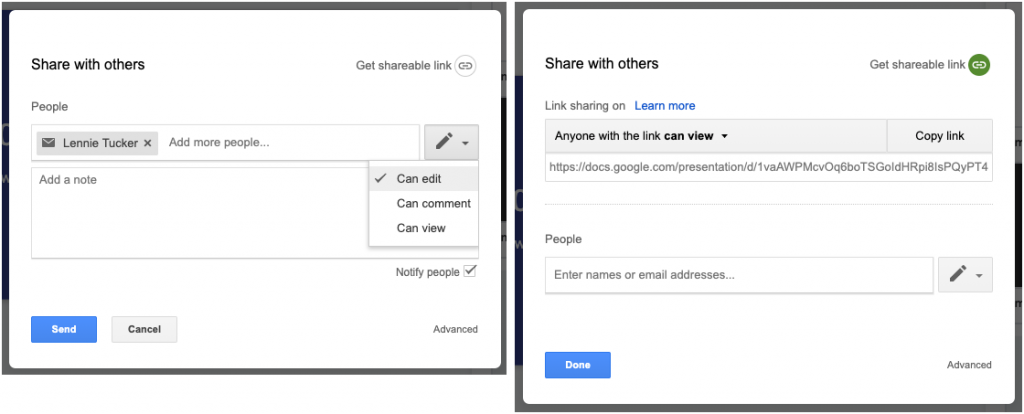
If that’s too specific—you’re sharing with a large group, for instance—click Get Shareable Link to turn on link sharing (above right). Then you can set the permissions for the link by clicking the down-pointing arrow next to “Anyone with the link can…” This works well for things like self-service signup spreadsheets. Copy the link and send it however you like, such as via Messages or to a mailing list.
If you add people over time, you can see who has access by clicking Advanced. That view also provides more owner controls, including the option to prevent commenters and viewers from downloading, printing, or copying.
When you’re done, click Send or Done.
Accept an Invitation
People you invite receive an email invitation and click the Open In button to start working on the document. With link sharing, all the recipient has to do is click the link.

The main gotcha is that recipients must sign in to their Google accounts if sharing has been restricted to specific people. A less common problem can occur when you send an invitation to someone at an email address that doesn’t match their Google account, which prevents them from collaborating. They can then request that you share the document with their Google account; click the Open Sharing Settings button in the request email to grant access.

Add and Change Data
Apart from the permissions that restrict collaborators to commenting or viewing, there are no limitations on what people can do in a shared document—all editors are equal, and Google Docs works the same whether a document has one person using it or ten.
You can see who is in the document by the little avatar icons in the menu bar. It also tells you when the last edit was, and Google Docs always shows where other users are working with a color-coded cursor and marks when other users have selected content in the document with a colored highlight box.

Add Comments
The beauty of comments in a collaborative scenario is that discussions can occur in context. To add a comment, select some text and choose Insert > Comment. Comments show up in the right-hand sidebar in Google Docs and Google Slides; in Google Sheets, the cell containing a comment gets a little yellow triangle in the corner, and the comment appears when you click the cell.

Google pioneered comment conversations, which allow collaborators to reply to each others’ comments and keep the discussion connected to the initial comment. You can edit or delete your own comments by clicking the stacked three-dot More menu. Do that for someone else’s comment and you can get a link to the comment—it’s useful if you need to point someone to the discussion.
To see all the comments in a stream, click the Comment History button in the menu bar, which looks like a speech balloon. It’s especially useful when reviewing comments in Sheets, where you would otherwise have to click all the little yellow triangles in cells.

View Versions and Suggested Changes
The main way to see who has done what in a document is by choosing File > Version History > See Version History. That displays a right-hand sidebar showing dates when the file was changed; click an entry to see the changes in the main pane. Arrows above the main pane let you highlight each change in turn. If you want to revert to the selected version (which will delete all subsequent changes!), click Restore This Version.

For Google Sheets and Google Slides, version history is all that’s available, which can be frustrating because when you’re reviewing edits in version history, you can’t make changes. As a workaround, open a second browser window so you can review changes in one window and make edits in another.
Google Docs (the word processor, in this case) offers another choice: Suggesting mode, which works more like Track Changes in Page or Word. Switch into it by clicking the pencil icon in the upper-right corner and choosing Suggesting. From then on, all edits are non-destructive and are color-coded by the person who makes them. They’re coupled with boxes in the right-hand sidebar that detail the change, provide  and X icons for accepting or rejecting the change, and offer a Reply field that enables discussions of each change—a brilliant feature.

If you want to be guided through all the suggested edits, or accept or reject changes all at once, rather than handling them one at a time in the right-hand sidebar, choose Tools > Review Suggested Changes.
When you’re done collaborating on a document, you can click the Share button and remove people or turn off link sharing. That immediately prevents others from making more changes.
When choosing a collaboration platform, you’ll generally pick what your colleagues use, whether that’s Google Docs, iWork, or Office 365. However, if you’re sharing with people whose platform and app details you don’t know, Google Docs is the best choice—Google accounts are common and the Google Docs apps work equally well on all computers. Plus, since Google Docs was built from the ground up for collaboration, it’s a mature solution that’s quick, easy, and effective.
Social Media: For quick, easy, and effective collaboration regardless of what apps or platforms people use, give Google Docs, Sheets, and Slides a try. We’ll help you get started here: