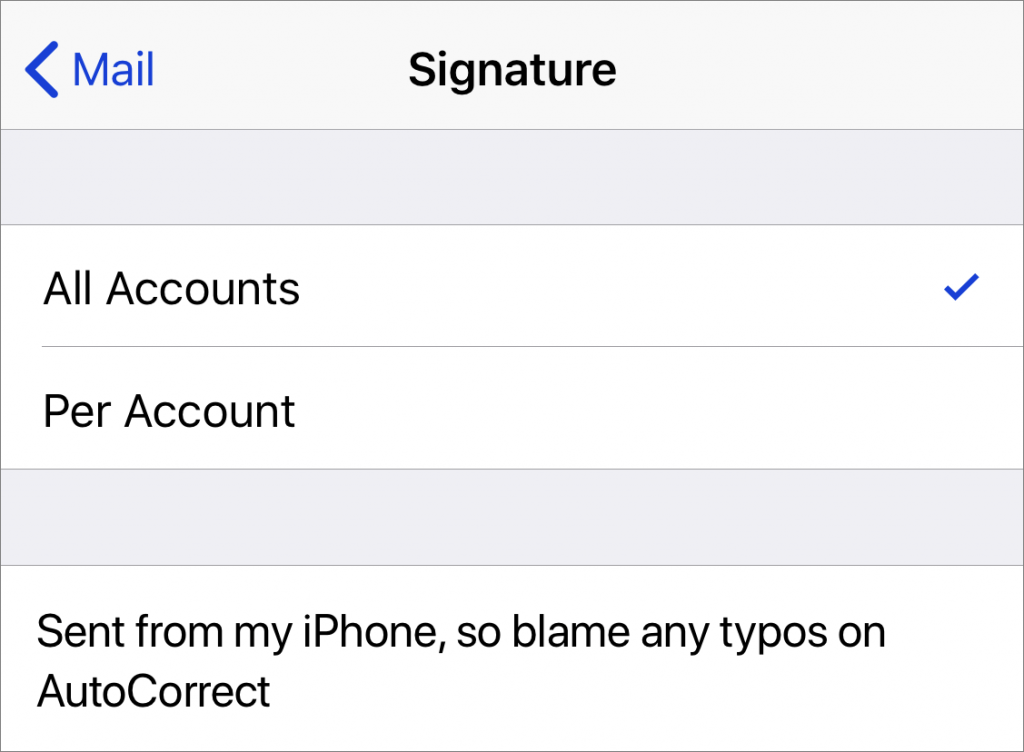
When you use Apple’s Mail app on your iPhone to send email, the default signature is “Sent from my iPhone.” If you’d rather not advertise that fact with every email, or would prefer to change it to something more personal, don’t bother poking around in the Mail app itself. Instead, go to Settings > Mail > Signature, where you can change the signature to anything you like or delete it entirely. If you have multiple email accounts configured, such as one for work and one for home, you can also set a different signature for each.
How to Make the Most of Apple’s New AirPlay 2
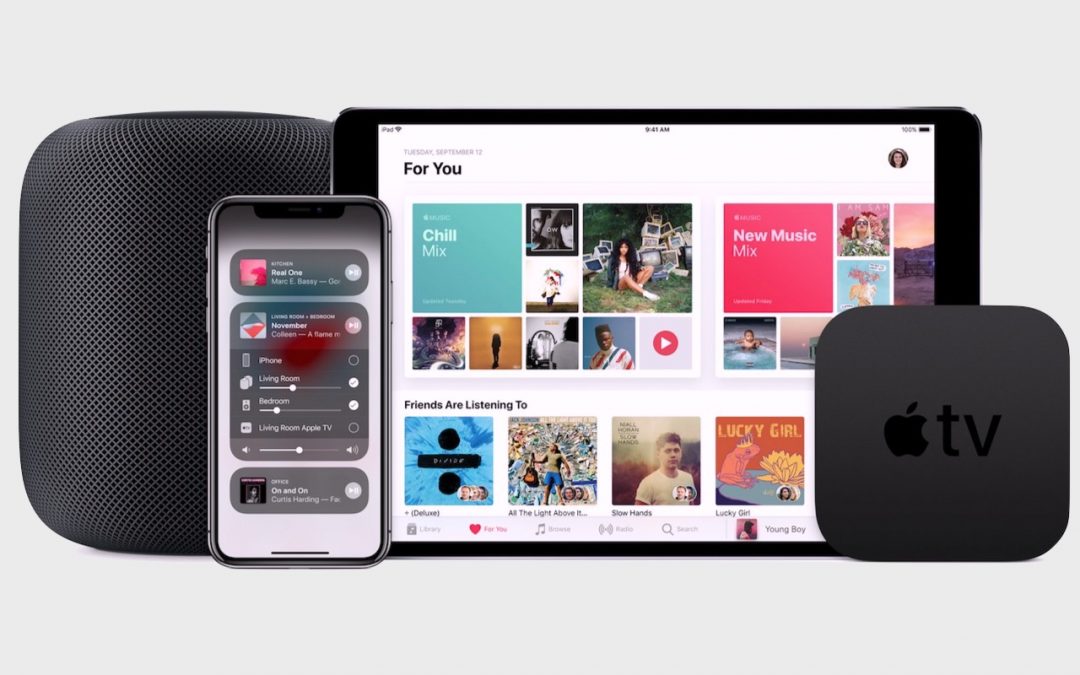
For many years now, Apple’s AirPlay feature has made it possible to stream audio from an iOS device or Mac to an AirPlay-enabled speaker, AirPort Express base station, or most recently, a HomePod. Because AirPlay transfers sound over a Wi-Fi network, it eliminates the need for stereo wires and lets you put your speakers where you want them.
In June 2017, Apple threw back the curtains on AirPlay 2, saying it would play the same song on multiple speakers (with AirPlay 1, this is possible only in iTunes) or play different songs on different speakers. Subsequently, Apple released the HomePod, promising to add multi-room audio and stereo sound with linked HomePods in the future.
Apple recently released three updates—iOS 11.4, tvOS 11.4, and HomePod 11.4—with an eye toward delivering AirPlay 2 and these promised features. Once you’ve installed these updates, here’s how to start enjoying AirPlay 2’s improvements.
AirPlay 2 in iOS
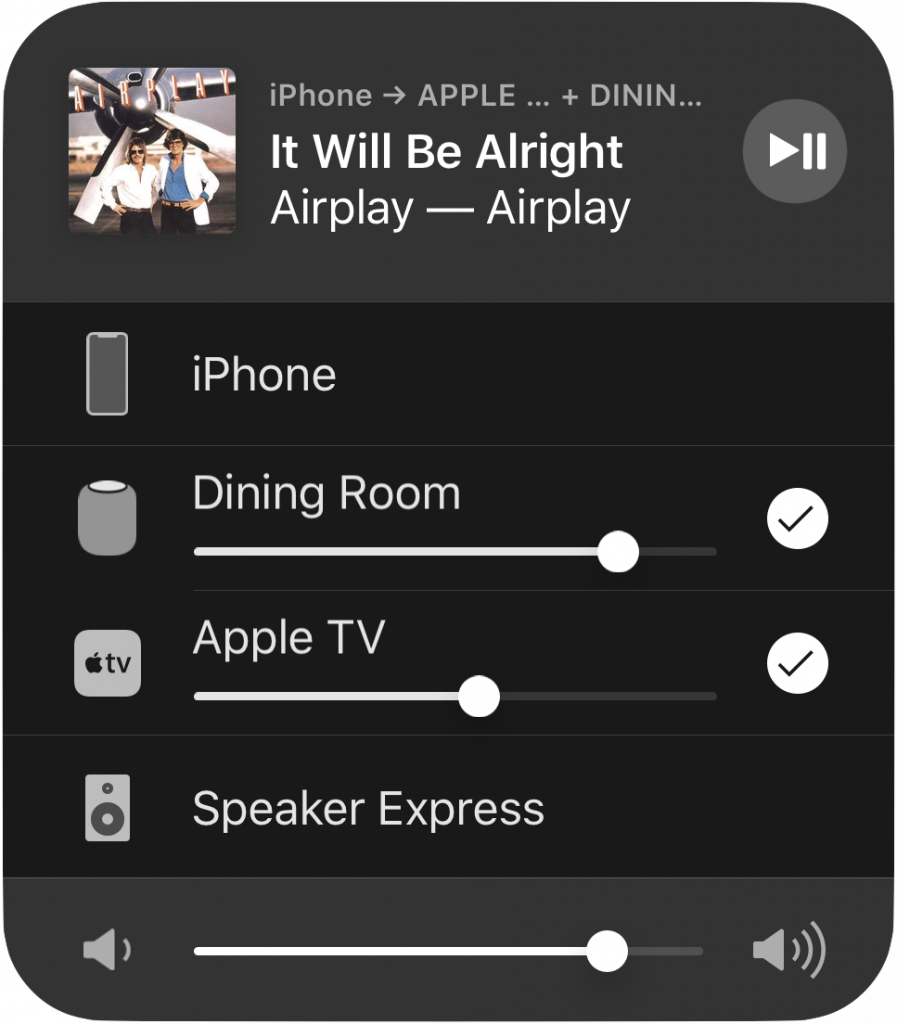
To take advantage of the multi-room audio capabilities in iOS, start playing some audio. Then open Control Center, press the audio card to expand it, and tap the AirPlay button in the upper right. You see a list of available output devices; those that support AirPlay 2 have a circle to the right of the name. Tap one or more of those circles to send the audio to that speaker. If an app has its own AirPlay button, you can also tap that to access the same controls.
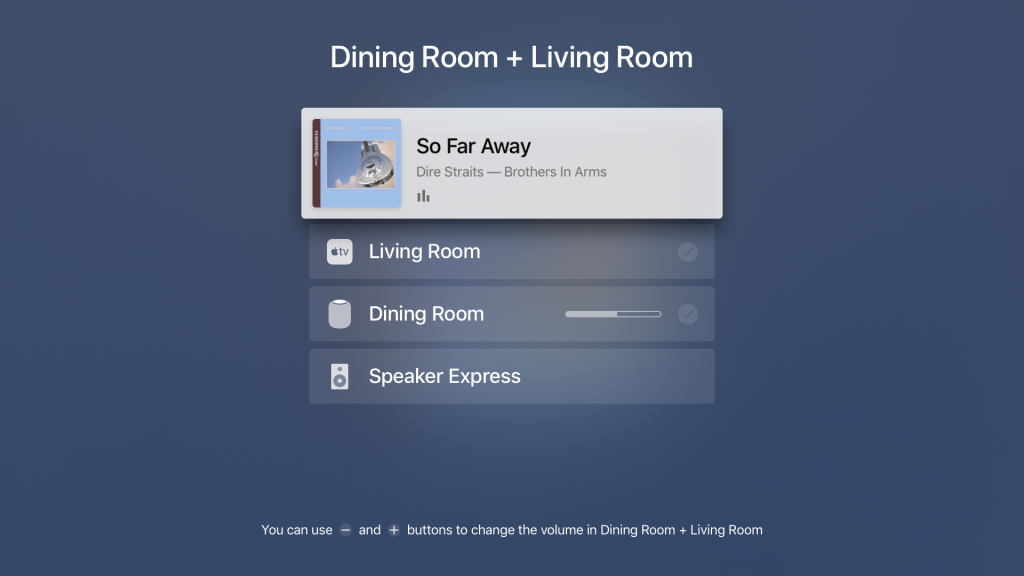
The iPhone can’t play audio simultaneously with an AirPlay 2 speaker, which is why there’s no circle next to iPhone in the image above. Although AirPlay 1 devices—such as the AirPort Express base station (Speaker Express above)—still work singly, they can’t be included in a multi-room set.
AirPlay 2 in tvOS
Once your Apple TV is running tvOS 11.4, it can become an AirPlay 2 speaker, sending audio through your TV, soundbar, or home theater system. It can also broadcast its own audio to other AirPlay 2 speakers.
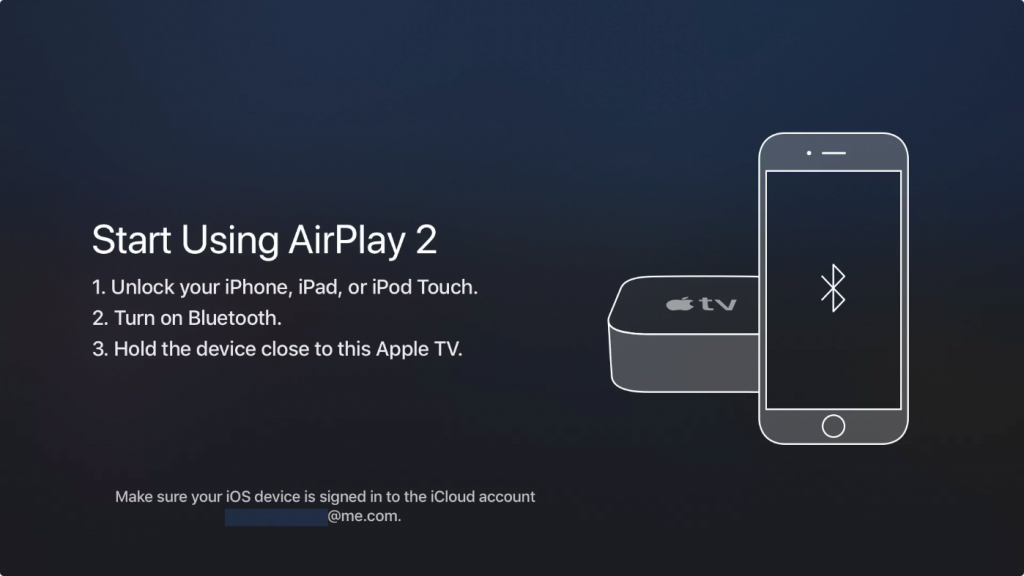
To enable an Apple TV for AirPlay 2, go to Settings > AirPlay > Room, and bring your iPhone or iPad close to the Apple TV. Accept the prompt that appears on the iPhone or iPad, and the Apple TV joins other AirPlay 2 devices associated with your Apple ID.
Once it’s set up, you can send audio from the Apple TV to different speakers. In a video app, swipe down from the top of the Siri Remote, select Audio, and then select one or more speakers (not all video apps offer this feature).
For music, the steps are a little different. Start playing some music and then, from the Music app’s Now Playing screen, swipe up and to the left to highlight the AirPlay button (if no icons are showing at the top of the screen, press the Menu button to display them). Or—this is much easier!—just press and hold the Play/Pause button on the Siri Remote. Then, as in iOS, select the desired AirPlay 2 speakers with circles to the right of their names by swiping down and clicking the touchpad.
You can also send all Apple TV audio to AirPlay 2 speakers by going to Settings > Video and Audio > Audio Output and selecting the desired speakers.
Other AirPlay 2 Improvements
AirPlay 2 includes a few welcome performance improvements. A larger streaming buffer makes for fewer audio drops, and tighter device syncing provides a faster response when you play or pause the music. Another plus for iOS users is that taking a phone call or playing a game won’t interrupt playback.
Siri works better with streaming audio as well. You can specify which speaker Siri should play through, as in “play David Bowie’s Hunky Dory on Dining Room,” and play the same music through all your speakers with a command like “play the Brandenburg Concertos everywhere.” You can even move audio from one speaker to another—try asking your HomePod to “move the music to the Apple TV.”
AirPlay 2 speakers are now HomeKit accessories, so you can start and stop them in the Home app. That’s about it for now, but we hope a future update will let us integrate audio into HomeKit scenes and automations, so your HomePod could automatically start playing soft jazz when you walk in the door from work.
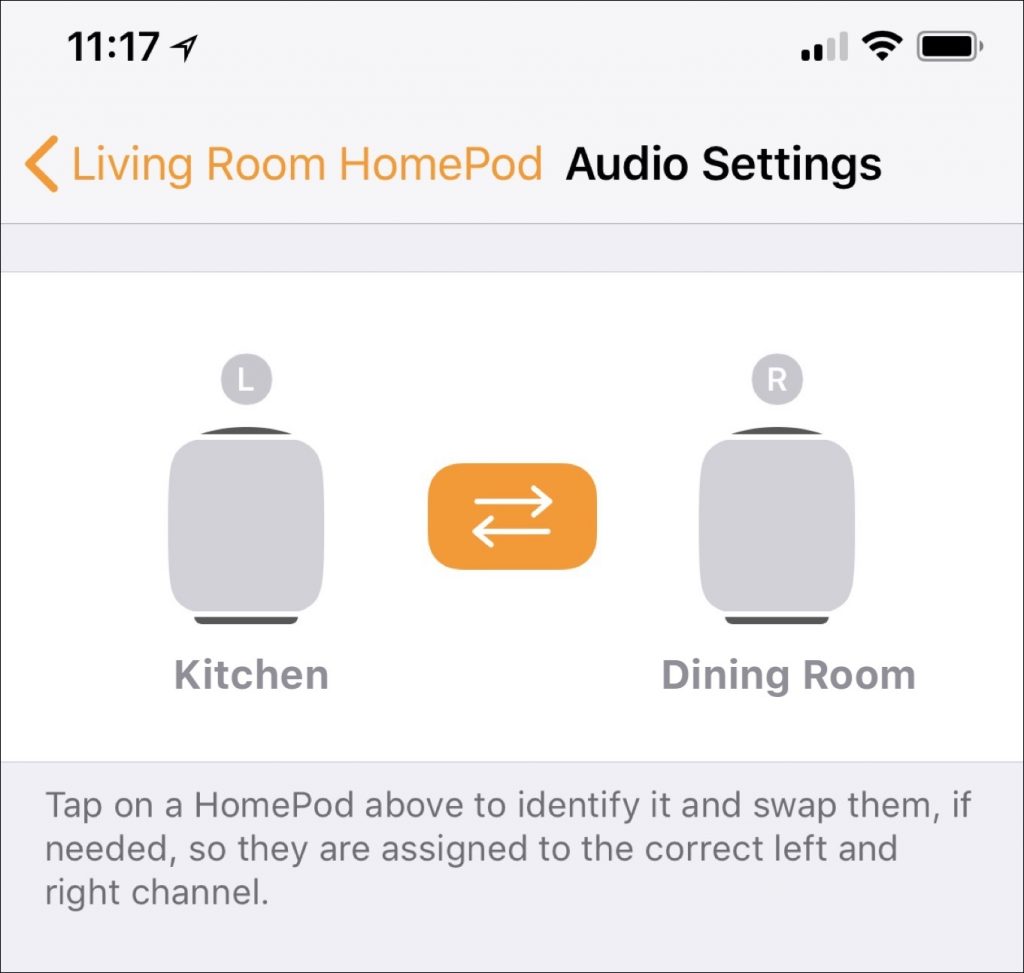
Finally, although it’s unclear whether this feature is part of AirPlay 2, a pair of HomePods can now act as stereo speakers. Once each HomePod is running 11.4, a new option to pair them appears in the HomePod settings in the Home app. Select the HomePods, assign them to the left and right sides, and you can enjoy true stereo music.
It may sound as though all AirPlay 2-compatible speakers come from Apple, but in fact, a wide range of speaker manufacturers—including names like Bang & Olufsen, Bose, Denon, Marantz, Polk, and Sonos—have committed to supporting AirPlay 2, either with updates to existing products or in new speakers. Look for such products later in 2018, and, in the meantime, we hope you enjoy using AirPlay 2 with HomePods and Apple TVs.
Tired of Skewed Lines in Your Photos? Use the Camera App’s Hidden Level.
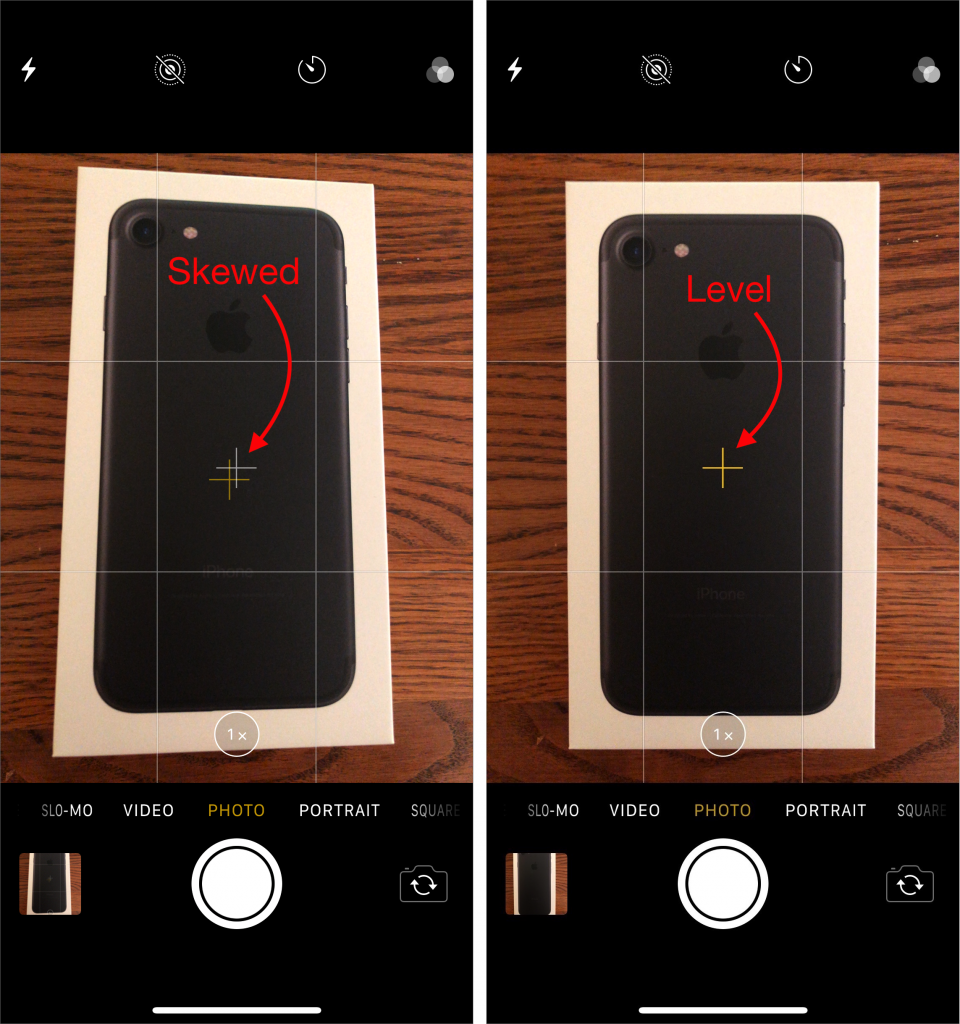
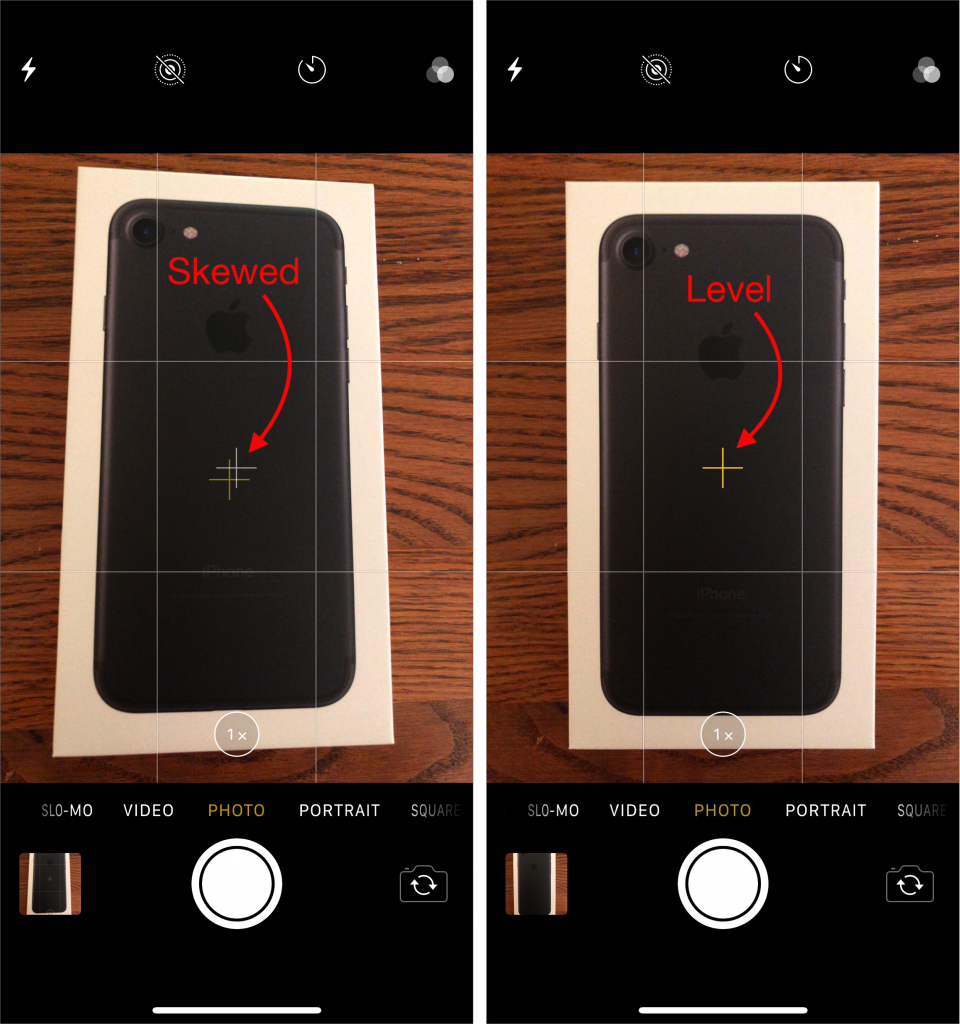
If you’ve ever photographed a sheet of paper or some other rectangular object, the image may have come out skewed because you inadvertently tilted the camera. The iOS 11 Camera app has a level feature to help you avoid this problem, but it’s so subtle that you may not have noticed it. To use it, first go to Settings > Camera and turn on the Grid switch so thin white lines divide the viewfinder image into a grid of nine rectangles. Then, to access the level, hold the iPhone or iPad flat, so the camera points straight down toward the floor (or straight up toward the sky, if you’re photographing a ceiling). Notice that two crosshairs appear in the middle of the viewfinder, a yellow one that marks the position where the camera will be level and a white one that shows the camera’s current angle. Tilt the camera until the crosshairs merge into a single yellow image, and tap the Shutter button.
All about Find My Friends
As iPhones have become ever more prevalent, one of Apple’s bundled apps—Find My Friends—has become significantly more useful. Although there are legitimate concerns about sharing your location willy-nilly, Find My Friends gives everyone full control over what they share, making it truly helpful for families and close friends. So if you’ve ever thought it would be useful to know when your child left their soccer game or wanted them to receive an automatic alert when you leave to pick them up, Find My Friends is the app for you. It’s also great for keeping track of aging parents or for housemates looking out for one another.
Add and Remove Friends
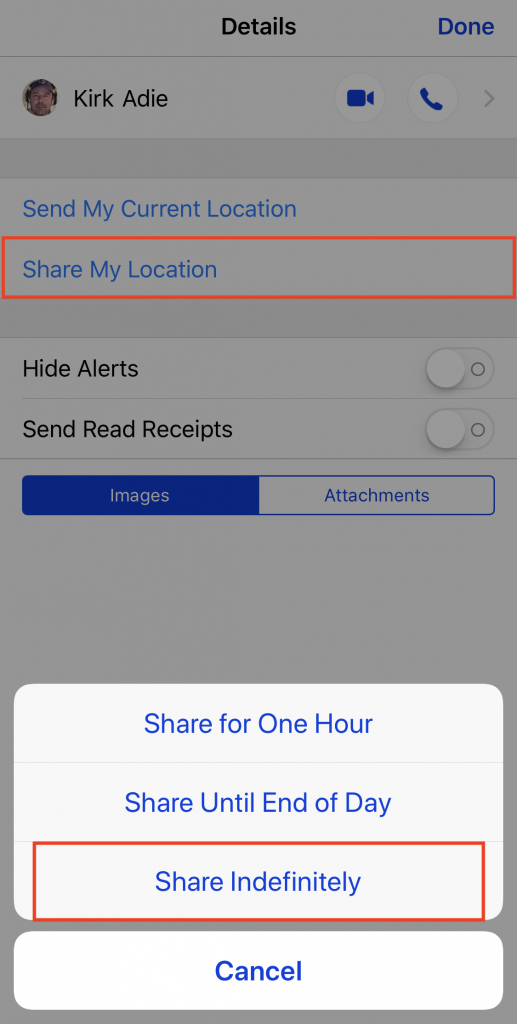
Although you can add friends in the Find My Friends app by tapping Add and selecting their contact card, it’s easier to work from Messages, assuming you want to share your location with someone with whom you regularly text anyway. In their conversation, tap the i button, tap Share My Location, and in the popover that appears, tap Share Indefinitely. (Share for One Hour and Share Until End of Day are useful for temporarily sharing your location while traveling, say, to visit colleagues with whom permanent sharing would be inappropriate.)
However you initiate the sharing, the other person receives a notification and can accept and choose to share their location as well. (If they don’t do so right away, you can tap their name in your Find My Friends list and tap Ask to Follow.) That said, unidirectional sharing is all right, though in families and particularly for children, bidirectional sharing can be more helpful.
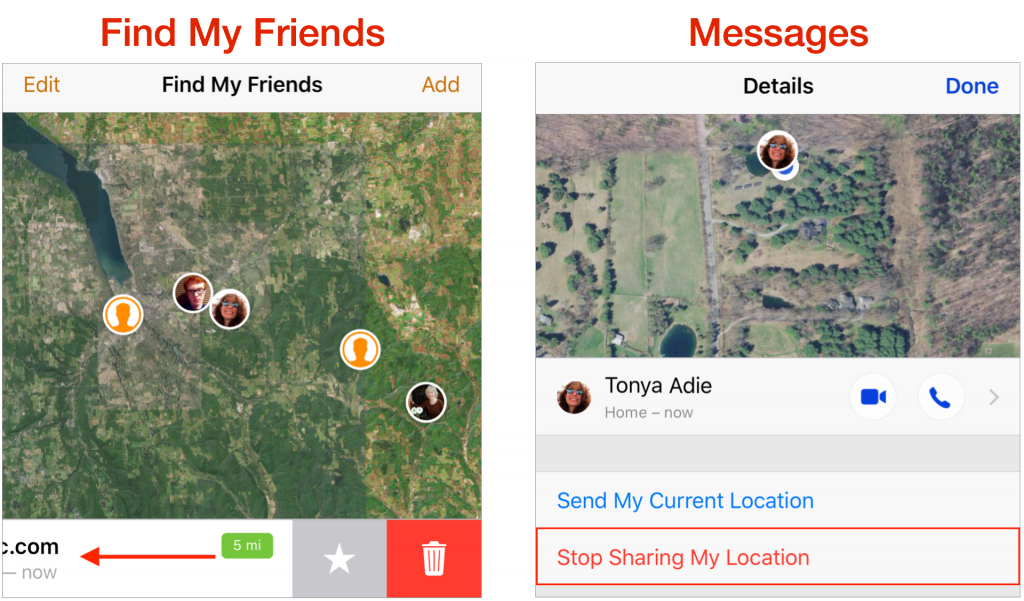
Should you ever wish to stop sharing your location with someone, you can either swipe left on their entry in Find My Friends and tap the red Trash button, or go into their conversation details in Messages and tap Stop Sharing My Location.
Work with Locations
Once you have someone in the Find My Friends app, you’ll see their entry in the list and their location on the map. That may be all you need if, for example, your goal is to see where your spouse is on their bike ride so you can figure out when to start dinner. A tip: for a quick location check, ask Siri something like, “Where is my wife?”
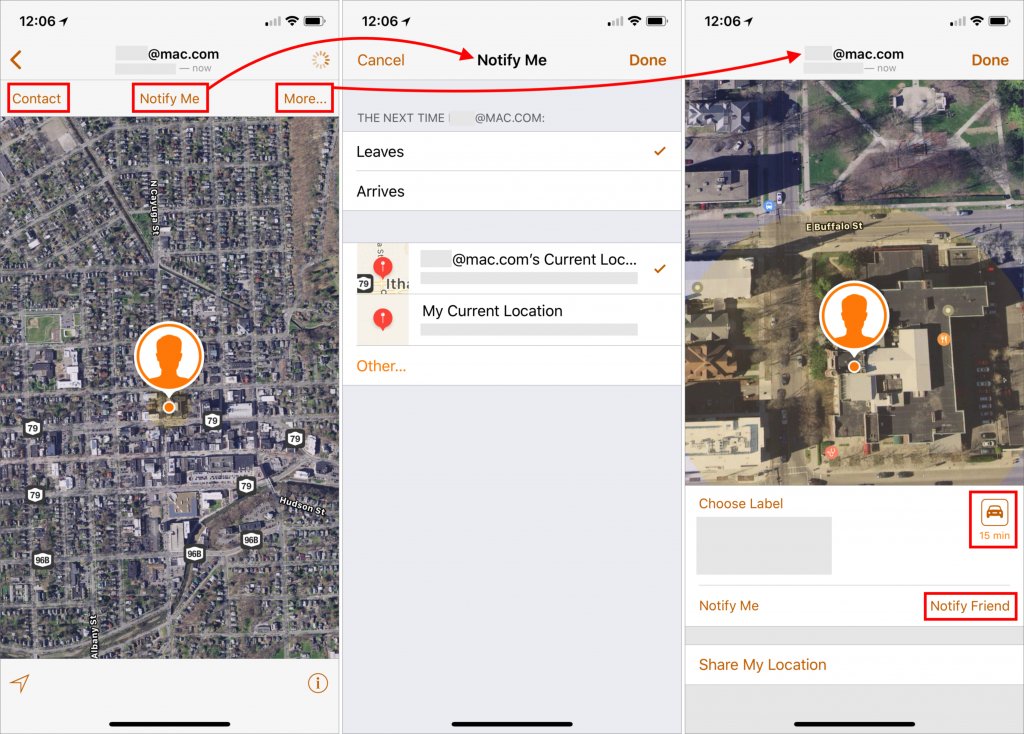
But Find My Friends has other features that make it even more useful. To access these features, tap a friend in the list or on the map to focus on them.
- Contact: Tap Contact to view your friend’s contact card. From it, you can start a Messages conversation, phone call, FaceTime call, email message, or money transfer via Apple Pay. You can also edit their details from here.
- Notify Me: With the Notify Me feature, Find My Friends can tell you when your friend leaves or arrives at a particular location. Two locations—their current location and your current location—are always available for quick selection. Or tap Other, and then either search for a location or press and hold on the map to drop a pin at that spot. You can even expand the orange dropped-pin circle to make the location less precise (and thus less likely to miss, if the person doesn’t quite go where you expect).
- Notify Friend: On the flip side, Notify Friend (tap More to access this feature) lets you tell your friend of your location right now, or when you leave or arrive at a location. A welcome addition here is a Repeat Every Time switch, so you could, for instance, have Find My Friends alert your mother in advance whenever you decide to stop over at the last minute.
- Get Directions: Also in the More screen is a car icon; tap it to display directions to your friend’s current location in Maps. It’s a great way to avoid those awkward conversations when you need to pick up your kid after a party and they can’t tell you precisely where they are.
It’s easy to be cynical about the privacy implications of location sharing. Obviously, you want to share locations only with people you trust, and who trust you. But once you do that, you’ll likely discover that Find My Friends provides peace of mind, since you know you’ll be on time to pick up your kid after an away game and your spouse knows that if she has a bike accident, you’ll be able to find her.
What OS Version Are You Running? Here’s How to Find Out.
In Troubleshooting 101, one of the first questions is always, “What version of the operating system are you running?” There’s a big difference between Mac OS X 10.6 Snow Leopard and macOS 10.13 High Sierra, and the solution to any particular problem will likely revolve around knowing what operating system is in play.
The same is true of Apple’s other operating systems: iOS, watchOS, and tvOS. And, although they aren’t quite in the same category, Apple’s AirPods and HomePod both have system software that can be updated as well.
For the next time you’re experiencing a problem, here’s how to find the version of each of Apple’s operating systems.
macOS
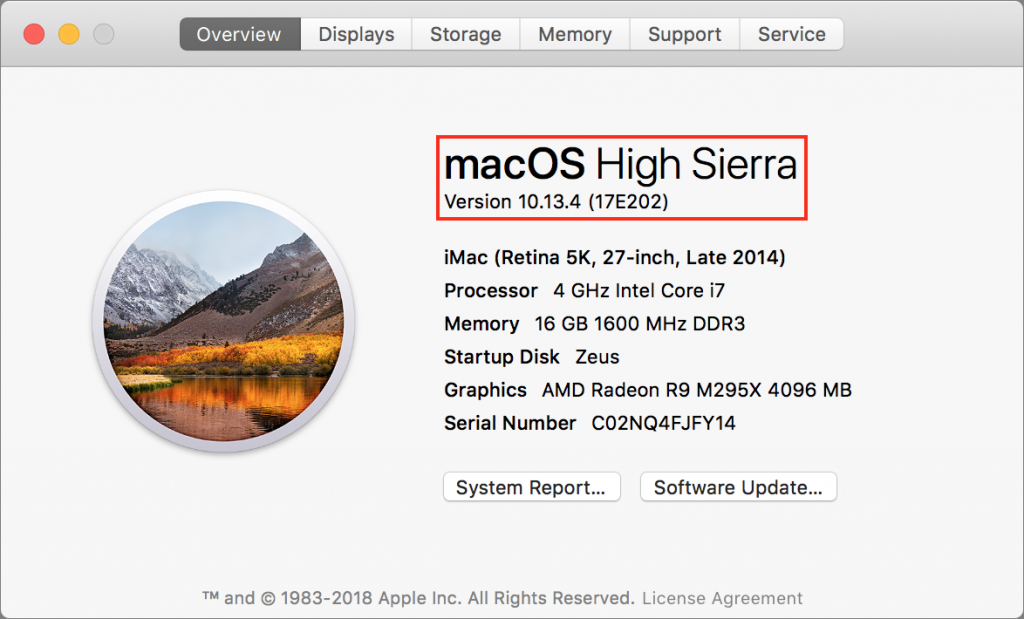
On the Mac, click the Apple menu in the upper-left corner of the screen and choose About This Mac. A window opens, displaying the name (macOS High Sierra shown here) and version (10.13.4) of the running version of macOS.
Every now and then, it can be important to learn the build number too—it’s one step more specific than the version number. A new Mac may have a different build number of the same version of macOS, for instance, or Apple may push out a silent security update that changes the build number. To find the build number, simply click the version number—the six-character build number (17E202) appears in parentheses, as above.
iOS
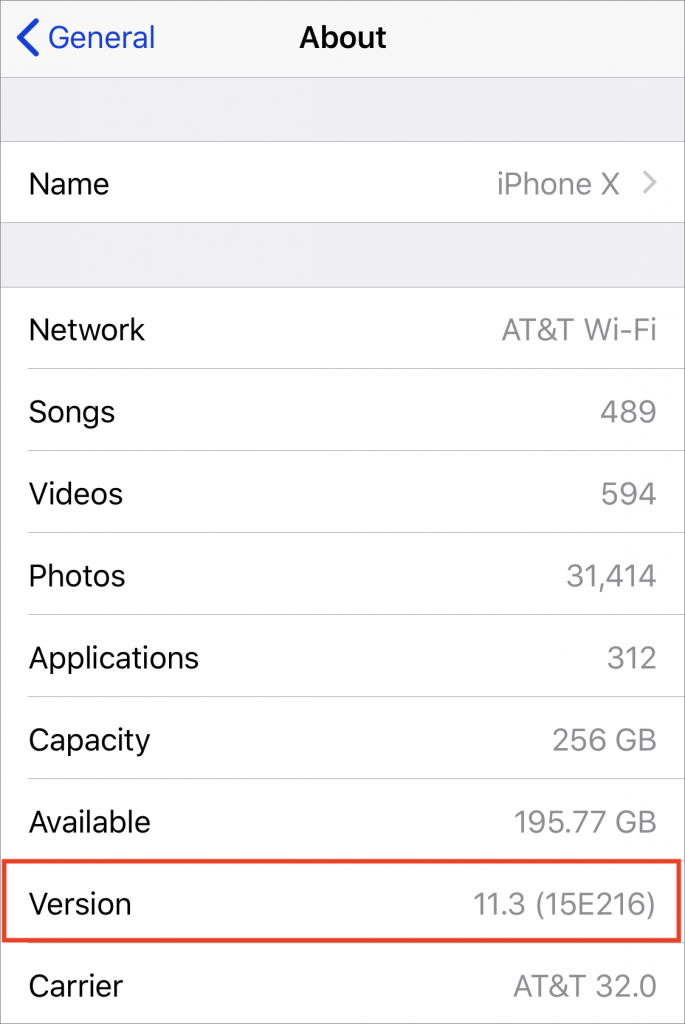
On an iPhone, iPad, or iPod touch, you find the version number in Settings > General > About. Scan down the screen until you see the Version line, which tells you both the version of iOS and the build number.
watchOS
There are two ways to find the version of watchOS running on an Apple Watch:
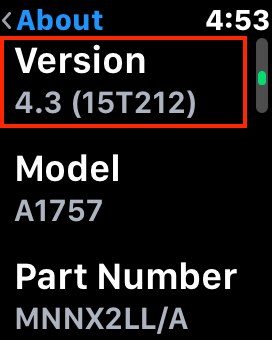
- On the watch, open the Settings app, scroll down to and tap General, tap About, and then scroll down until you see Version.
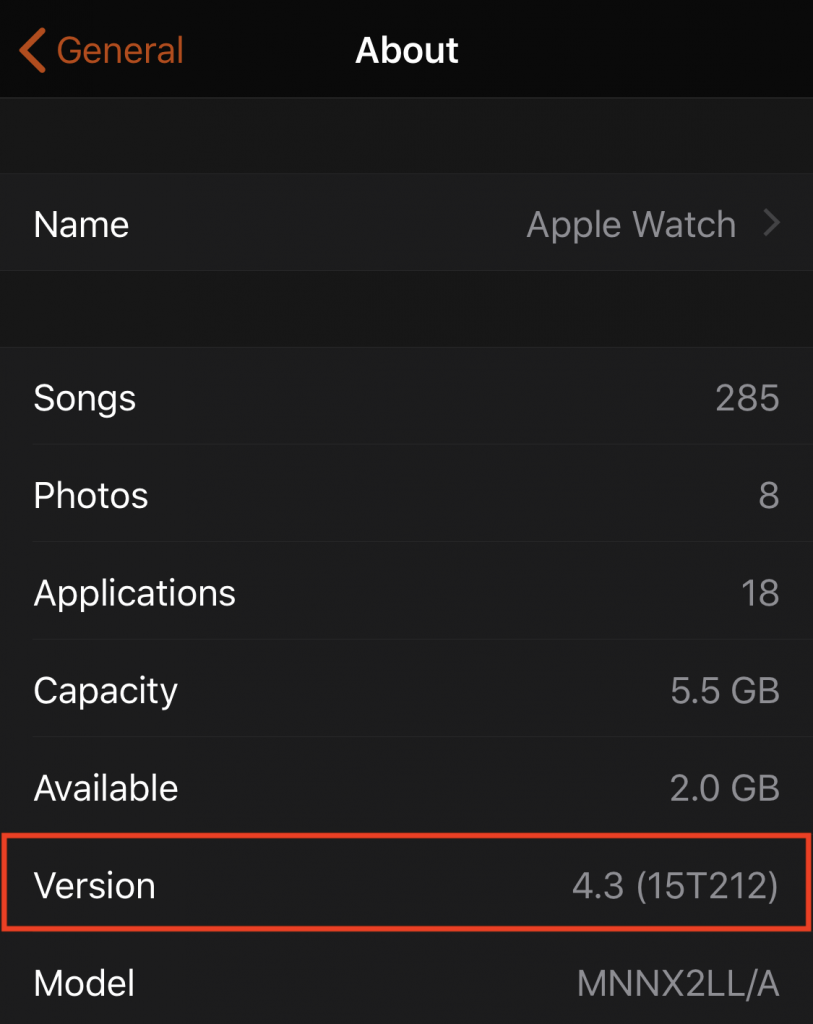
- On your iPhone, open the Watch app and make sure My Watch is selected in the bottom button bar. Then go to General > About to see a screen that displays much the same information as the Settings app on the watch, including the version number.
tvOS
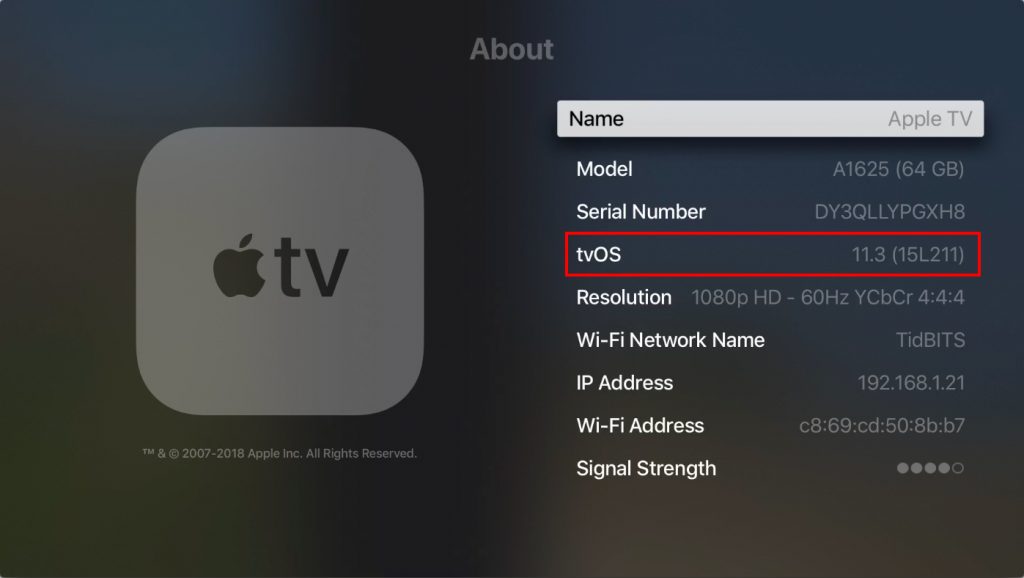
By now, you can probably guess that on an Apple TV you go to Settings > General > About to find the tvOS version. Apple is nicely consistent in this regard. That said, only the fourth-generation Apple TV and Apple TV 4K run tvOS. The obsolete second- and third-generation Apple TVs are instead based on a stripped-down version of iOS, and the first-generation Apple TV is an entirely different beast yet, with its large white case and internal hard drive.
AirPods
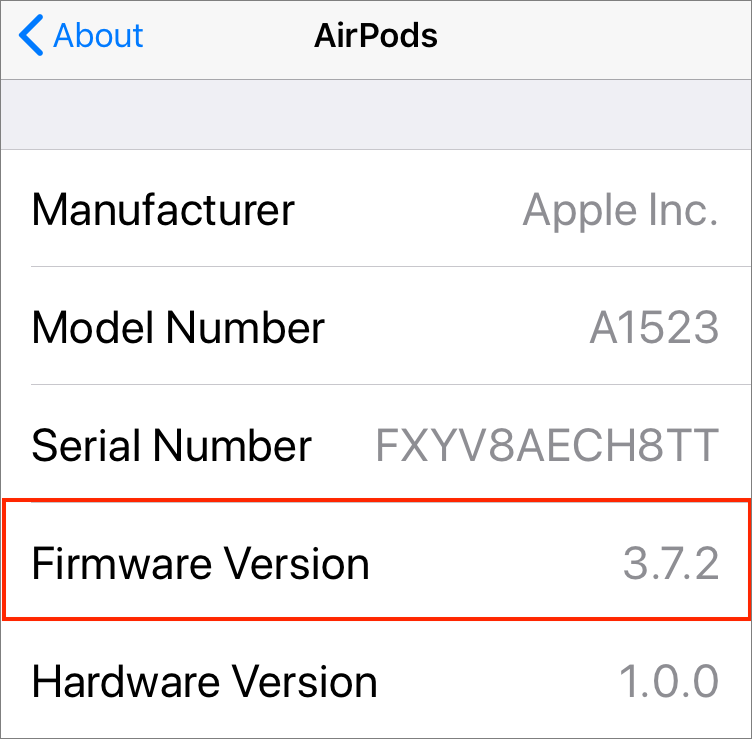
You’re unlikely to need to check the version of your AirPods, but if it ever comes up, make sure the AirPods are either connected to their host iOS device or in their case with the top open. Then, on the host iOS device, go to Settings > General > About > AirPods and look for the Firmware Version line.
HomePod
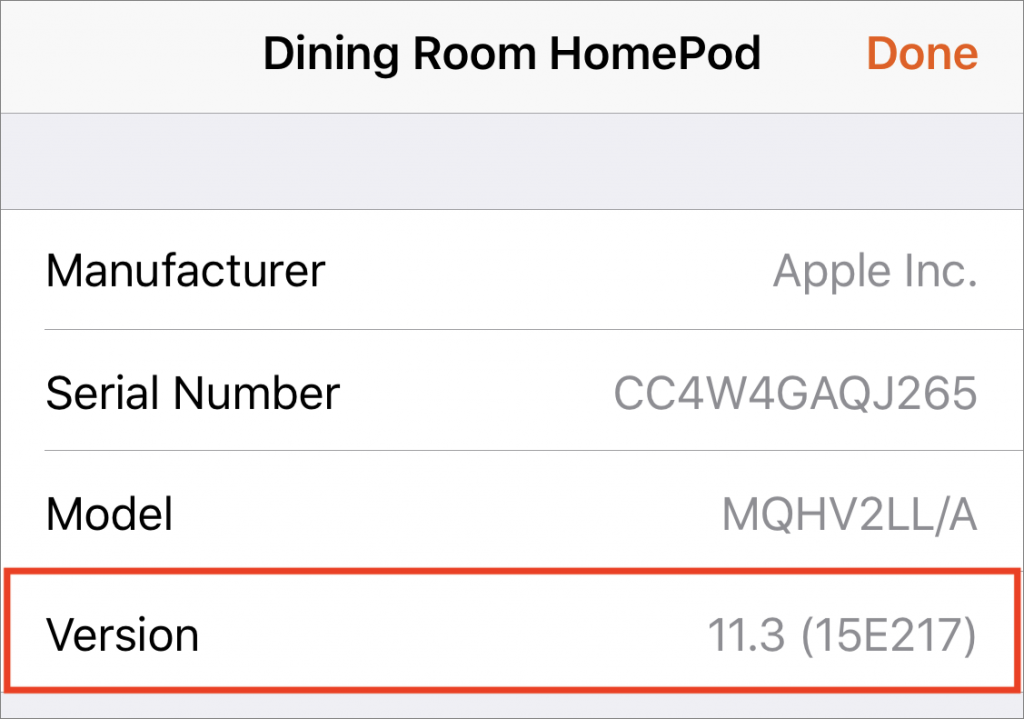
Although the HomePod shipped only recently, Apple has promised software updates that will allow two HomePods in a room to provide true stereo sound and support multi-room audio if you’ve sprinkled HomePods around your house. To check the version of the HomePod software, open Apple’s Home app, make sure Home is selected in the bottom toolbar, and then press and hold on the HomePod’s tile until it opens. Then tap the Details button in the lower right and scroll down until you see the Version line.
Social Media: Quick! Can you find the current operating system version for all your Apple devices? Learn how to carry out this essential troubleshooting task—it’s easy!
How to Recover Space by Offloading Unused Apps in iOS 11
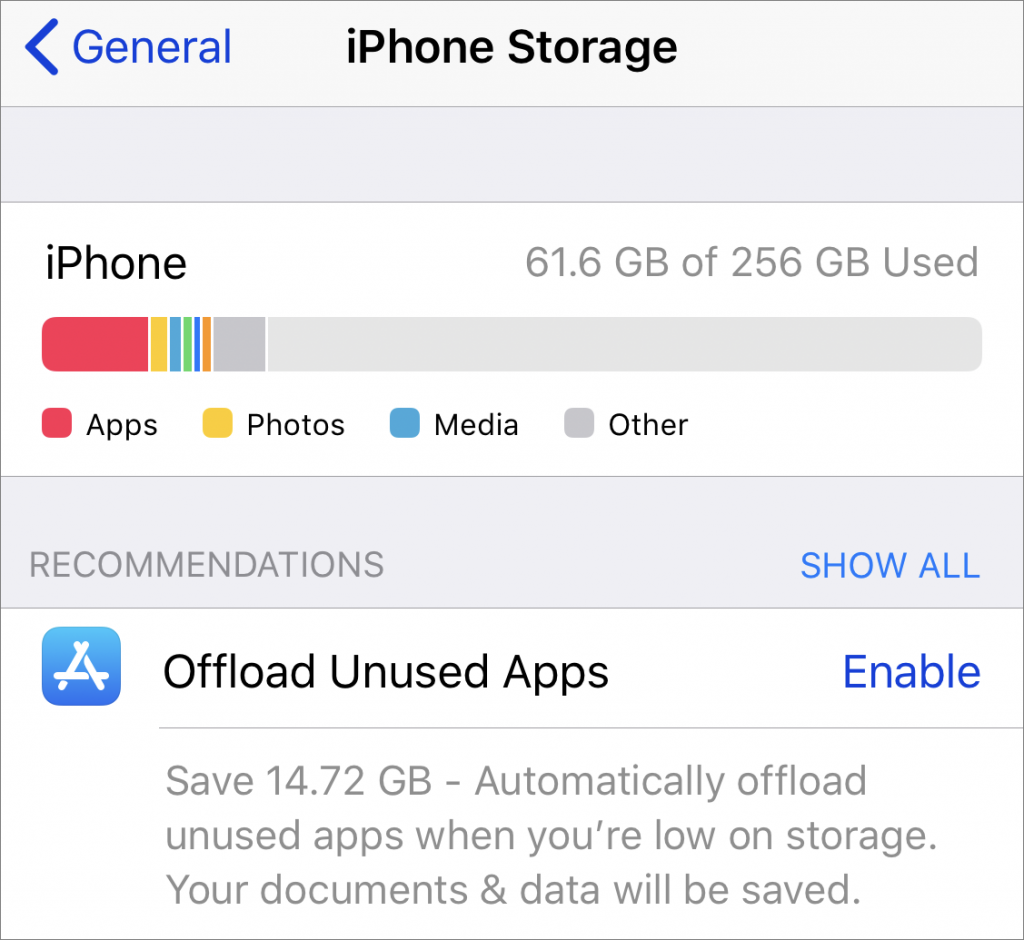
Running low on space on your iPhone or iPad in iOS 11? This problem may be easier to deal with than you expect because Apple has added a quick way to free up storage space by removing unneeded apps. Go to Settings > General > iPhone/iPad Storage, where you’ll see a Recommendations section. This section may include an option to Offload Unused Apps with an estimate of how much space you could save. Tap Enable to allow iOS to remove apps that you haven’t launched in a while—this happens only if you’re low on space. iOS preserves any documents or data associated with the offloaded app, and the app’s icon remains on the Home screen, with a cloud badge. Tapping the app icon reloads it from the App Store, assuming it’s still available. If you find yourself waiting for apps to reload often and you can clear space in other ways, you can disable the feature in Settings > iTunes & App Store > Offload Unused Apps.
Sneak Preview of What’s Coming from Apple This Fall
At Apple’s Worldwide Developer Conference keynote on June 4th, the company unveiled the first developer versions of all four of its operating systems: macOS 10.14 Mojave, iOS 12, watchOS 5, and tvOS 12. They won’t be available until this fall, likely in September or October, but here is a glimpse of what you can expect.
macOS 10.14 Mojave Adds Dark Mode, Enhances the Finder, and Gains Four iOS Apps
With the update to macOS, which Apple is calling “Mojave” after the southern California desert, the company is beefing up the Finder, adding visual enhancements, and bringing some familiar iOS apps to the Mac. Apple is dropping support for some older Macs, so you’ll need a Mac introduced since 2012 to run Mojave.
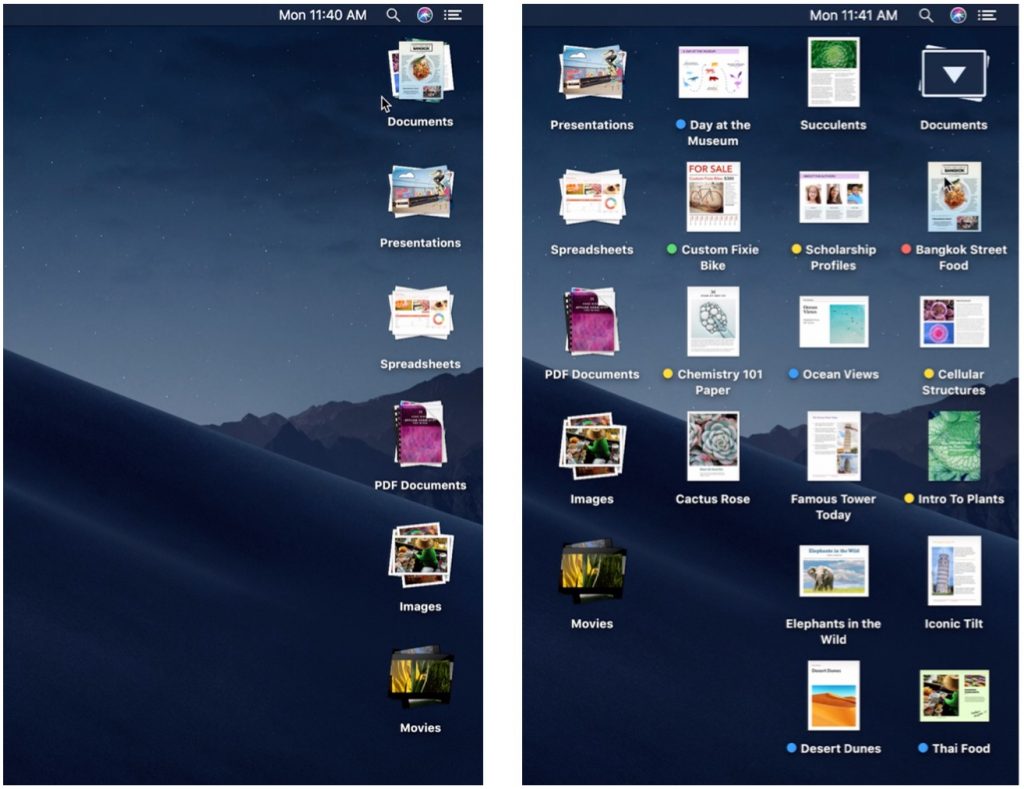
Productivity mavens with messy Desktops will appreciate a new Finder feature, which, when turned on, automatically gathers all the files on the Desktop into “stacks,” sorting them by file type, date, tag, or other criteria. Click a stack to expand it, much like a Dock stack today.
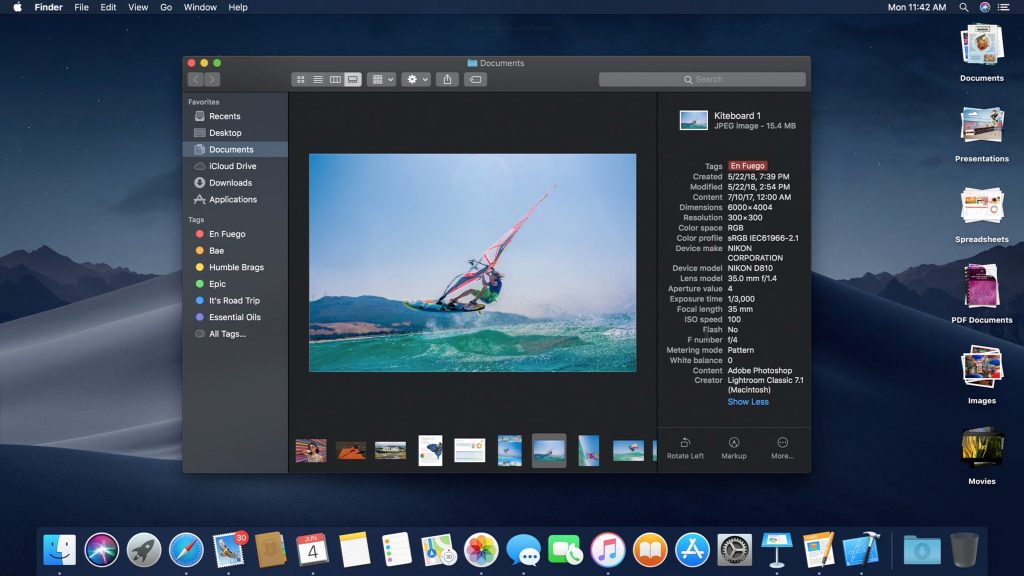
Apple has replaced Cover Flow view, which combined a large preview area and a file list, with the new Gallery view. Aimed at helping you browse in a folder of images, Gallery view displays a large preview of the selected file above a row of thumbnails for other items in the folder. A right-hand sidebar in Gallery view shows more information about the current file and lets you edit or mark up the file with Quick Actions (which you can create with Automator) without opening the file in an app. Press Space bar to preview a file with Quick Look, and you can apply appropriate Quick Actions to the file as well, all from the Finder.
If you find the white backgrounds in the Mac’s windows too bright, you’ll like Mojave’s new Dark Mode (shown above), which intelligently reverses things to display white text in a largely black interface. Additional eye candy comes from Dynamic Desktops, which change the appearance of new Apple-provided Desktop backgrounds based on the time of day.
For those who take a lot of screenshots, Apple has given the Mac’s long-standing screenshot capabilities a visible interface that simplifies taking still screenshots or recording a movie of your actions. Plus, you can preview, edit, share, or delete a screenshot or movie immediately after creating it.
A new feature called Continuity Camera lets you use your iPhone’s camera in Mac apps, either taking a photo directly into a Mac app or scanning a document as a PDF.
Lastly, although Apple was emphatic that it won’t be replacing macOS with iOS, or merging the two, the company is working to make it easier for developers to create apps that work on both platforms. Independent developers won’t be able to do that until 2019, but Apple is testing the waters by bringing four familiar apps from iOS to the Mac: News, Stocks, Voice Memos, and Home. They look and work very much like their iPad counterparts, but rely on the mouse or trackpad, and use normal Mac interface elements like resizable windows.
iOS 12 Improves Performance, Provides Time Management Tools, and More
In the WWDC keynote, Apple emphasized that one of its main goals for iOS 12 is to improve performance, especially for older devices. Unlike Mojave, iOS 12 will support all the same devices as iOS 11, so those with an iPhone 5s or original iPad Air may benefit the most from this effort.
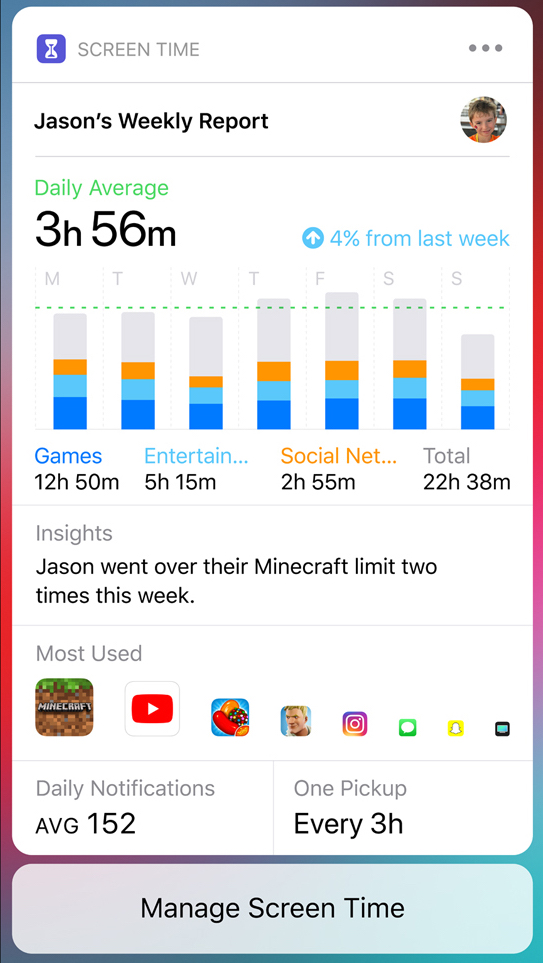
To address increasing concerns about how much we—and our kids—are using smartphones, Apple has made some important changes. Perhaps most important is the new Screen Time feature, which shows how often you use your iOS devices and how much time you spend in different apps. It also lets you set daily time limits for specific apps, so you can make sure you don’t spend too much time in Facebook, for instance. Even better, you can set such limits for your children’s devices via Family Sharing.
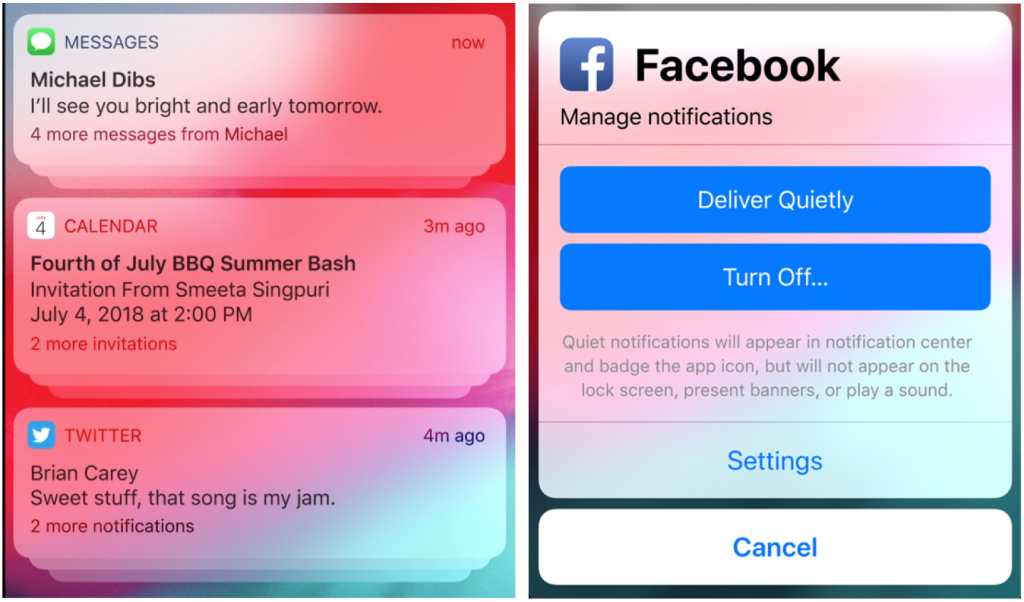
Do Not Disturb has become a more appealing feature, because you don’t need to worry about accidentally leaving it on for too long—it can now be set to turn off automatically after some time or when you leave a location, such as at the end of a class or when you leave your doctor’s office. (This feature also comes to the Apple Watch with watchOS 5.) Also new is Do Not Disturb During Bedtime, which ensures you won’t see enticing notifications on the Lock screen if you check the time on your iPhone in the middle of the night.
Getting too many notifications? Notification grouping gathers all the notifications from each app together on the Lock screen so it doesn’t fill up, but you can see them all at once when you’re ready. Plus, a new feature called Instant Tuning helps you reduce the number of notifications you see, right from the Lock screen.
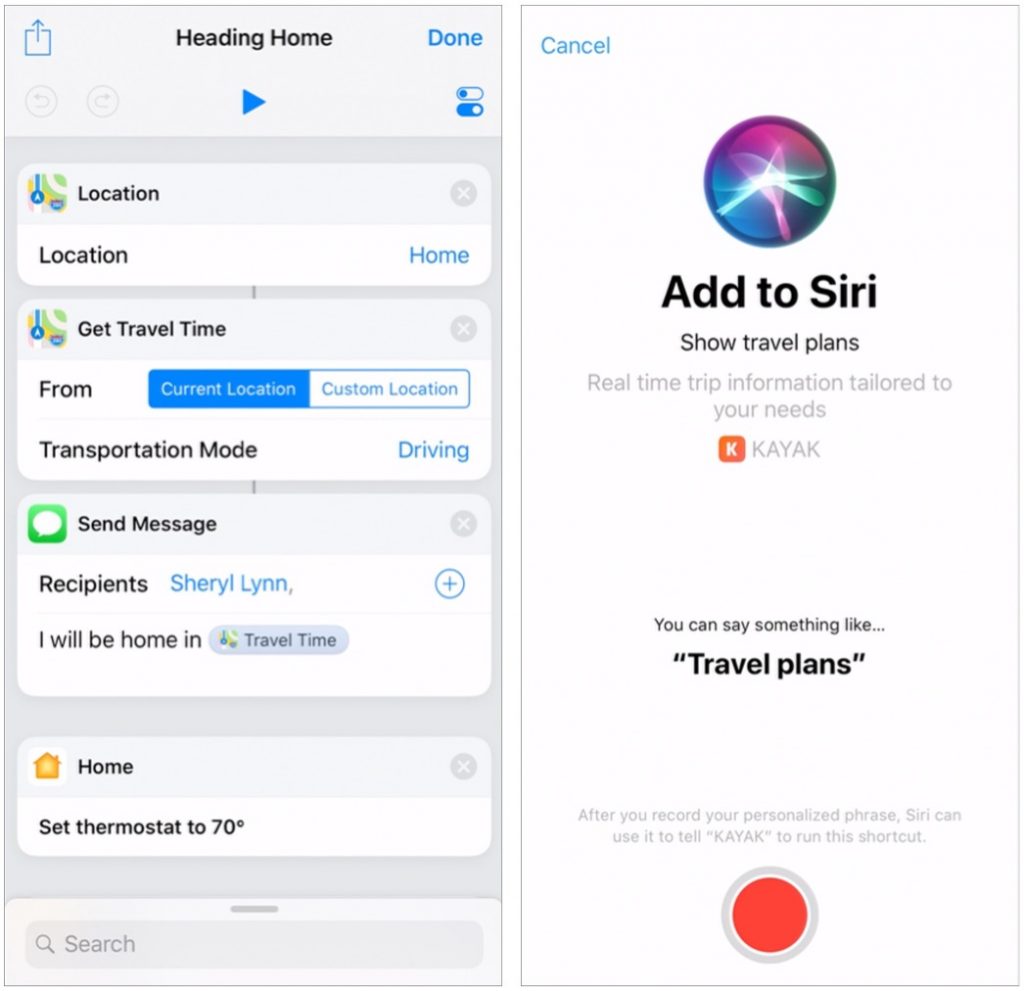
If you’ve always wanted to automate repetitive actions in iOS, you’ll love the new Siri Shortcuts feature. You can use it to string together actions in different apps—send a message to your spouse that you’re leaving work, show the traffic conditions on your commute home, and start playing a podcast app—and then invoke them all via Siri with a custom phrase.
Other interesting changes in iOS 12 include these:
- Apple has renovated the interfaces of several bundled apps, including iBooks (now called Apple Books), News, Stocks, and Voice Memos (which can now sync recordings with the Mac).
- FaceTime is no longer limited to one-on-one conversations and can now include up to 32 people in a single FaceTime conversation. The Mac version of FaceTime gains this capability too.
- Photos boasts improved searching, can unearth photos from your library in a new For You tab, and prompts you to share photos with friends who it recognizes in your photos.
- Apple is working with colleges and universities to add Wallet support for contactless student ID cards so students can use an iPhone (or Apple Watch) for unlocking doors, paying for meals, and more.
- CarPlay allows apps from non-Apple developers to take over the car’s screen so that you can use alternative mapping apps like Google Maps and Waze in a CarPlay-enabled car.
watchOS 5 Improves Workouts, and Adds Walkie-Talkie and Podcasts Apps
Apple has realized that the Apple Watch is popular primarily for fitness and communication, so the company focused on those areas for watchOS 5. Alas, watchOS 5 isn’t available on the original Apple Watch.
On the fitness side, the Apple Watch can now start many workout types automatically when it detects that you’re exercising, and end a workout automatically when it sees that you’ve stopped. It even provides retroactive credit for what you did before the workout was detected. Apple has added new Yoga and Hiking workouts, each with their own metrics, and the running and walking workouts now measure cadence (steps per minute).
For those running outside, the Workout app can also display the rolling mile pace—the pace for the last mile—and can sound an alarm if you’re going slower or faster than a specified pace. And for those who do better with social motivation, watchOS 5 provides 7-day activity competitions.
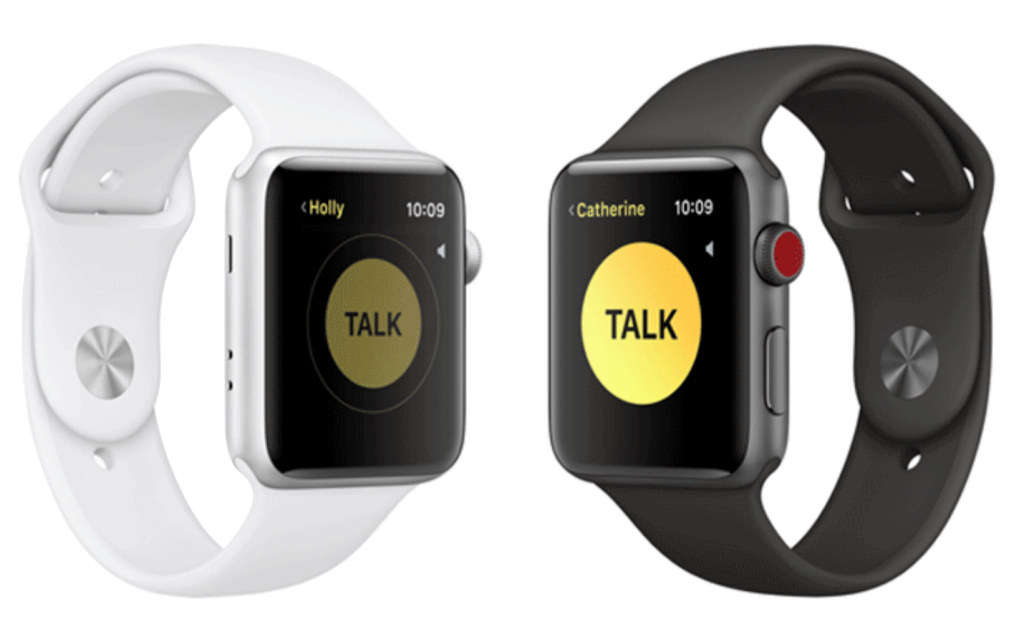
In terms of communication, watchOS 5’s marquee feature is the new Walkie-Talkie app. Once you and a friend have set it up, you can tap a big yellow button to talk to your friend—and they can reply—just as though you were using old-school walkie-talkies. It works over both Wi-Fi and cellular.
Apple is bringing the Podcasts app to watchOS 5, so you’ll be able to listen to podcasts from your wrist, assuming you have AirPods or a Bluetooth headset. Plus, watchOS 5 makes it possible for other audio apps to store audio on the watch, so it should get easier to listen to audiobooks and the like even when you don’t have your iPhone with you.
Other welcome changes in watchOS 5 include:
- The Siri watch face has new options, including sports scores, heart-rate readings after workouts, and commuting times from Maps. Independent apps will also be able to contribute bits of data to appear in the Siri face.
- Notifications can be interactive, so you could tap on your wrist to check in for a flight, confirm a restaurant reservation, or extend parking time. As with iOS 12, multiple notifications from the same app will be grouped.
- Web links in Messages or email can be previewed on the Apple Watch.
- When you raise your wrist to talk to Siri, you no longer have to say “Hey, Siri.
tvOS 12 Gains Dolby Atmos Support, Zero Sign-on, and a New Aerial Screensaver
Although the Apple TV often receives less attention than Apple’s other platforms, it still gains new capabilities with tvOS 12. Most notable among these is support—on the Apple TV 4K only—for Dolby Atmos audio, which makes audio sound more realistic by going beyond the simple right and left channels to provide 3D sound. You’ll need an Atmos-capable soundbar too, along with Atmos-compliant video content, but Apple will automatically upgrade anything you’ve bought from the iTunes Store to the Atmos version once it’s out.
Two other new features work on both the Apple TV 4K and the fourth-generation Apple TV but require support from both apps and TV providers: Zero Sign-on and Cloud DVR. Zero Sign-on figures out your Internet provider, and if it’s the same as your TV service, automatically detects apps that need authentication and logs you in to them. It will work only with Charter Spectrum at launch, but Apple is negotiating with more providers. Similarly, the new Cloud DVR feature lets you watch TV you’ve recorded via the Apple TV, if your TV provider supports it. In the U.S., that again means Charter Spectrum to start.
Apple put some work into the Apple TV’s gorgeous aerial screensaver, introducing a new view from space using imagery taken by astronauts on the International Space Station. Also, you can tap the Siri Remote touchpad while a screensaver is showing to see where it was taken.
Finally, in conjunction with iOS 12, tvOS can autofill passwords saved on your iOS devices so you don’t have to type them on the awkward onscreen keyboard. And if iOS 12 detects an Apple TV, it automatically adds an Apple TV Remote button to Control Center on your iPhone or iPad. (You can do that now, but you have to add the button manually in Settings > Control Center > Customize Controls.)
Getting Ready for These OS Releases
Apple usually makes new versions of its operating systems available in September or October, in conjunction with new iPhones. That doesn’t mean you should upgrade immediately, and we always recommend that you hold off on upgrades until Apple had had a chance to address the inevitable bugs that come with the initial release of any major upgrade. So sit tight, and we’ll tell you more when the time is right.
That said, if these features sound enticing and you have a pre-2012 Mac, an iPhone 5 or earlier, an iPad that predates the iPad Air, or an original Apple Watch, some new hardware may be in your future.
Moment Helps You Gauge Your iPhone Use and Offers Parental Oversight Option
Smartphone addiction is real. Do you check your iPhone before you get out of bed? During family dinners? Right before you go to sleep? Constantly during the day even when you’re on vacation? If you—or your family members—feel that you’re disappearing into your phone too often or at inappropriate times, it may be time to do something about it.
To start, you might want to quantify the problem, and for that, you can turn to a free iPhone app called Moment. Written by developer Kevin Holesh, Moment is designed to track three key pieces of data:
- How often you pick up your iPhone every day
- How much time you spend on your iPhone
- Which apps you use the most
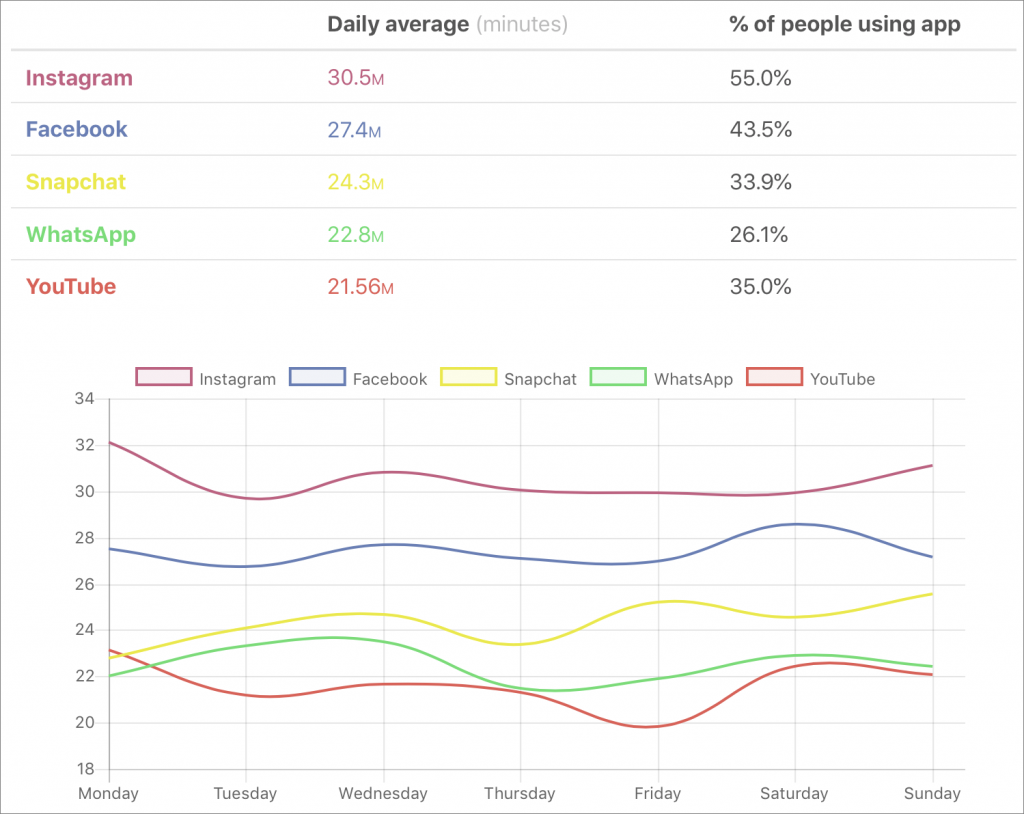
It then uses that information to paint a picture (well, not literally) of your iPhone use. Most people underestimate how much time they spend on their iPhones by about 100% (the average Moment user uses their iPhone for nearly 4 hours per day!). Knowing how much time you spend is the first step toward using your phone intentionally, rather than as a conduit to a constant stream of social media updates (look at the stats shown below), email messages, and quick-hit entertainment.
To get started, use the App Store app to install Moment, and then launch the app. It starts tracking your usage immediately, although once per week you’ll need to take screenshots of Settings > Battery so Moment can figure out how long you use each app. Then ignore Moment for a few days so it can gather some data.
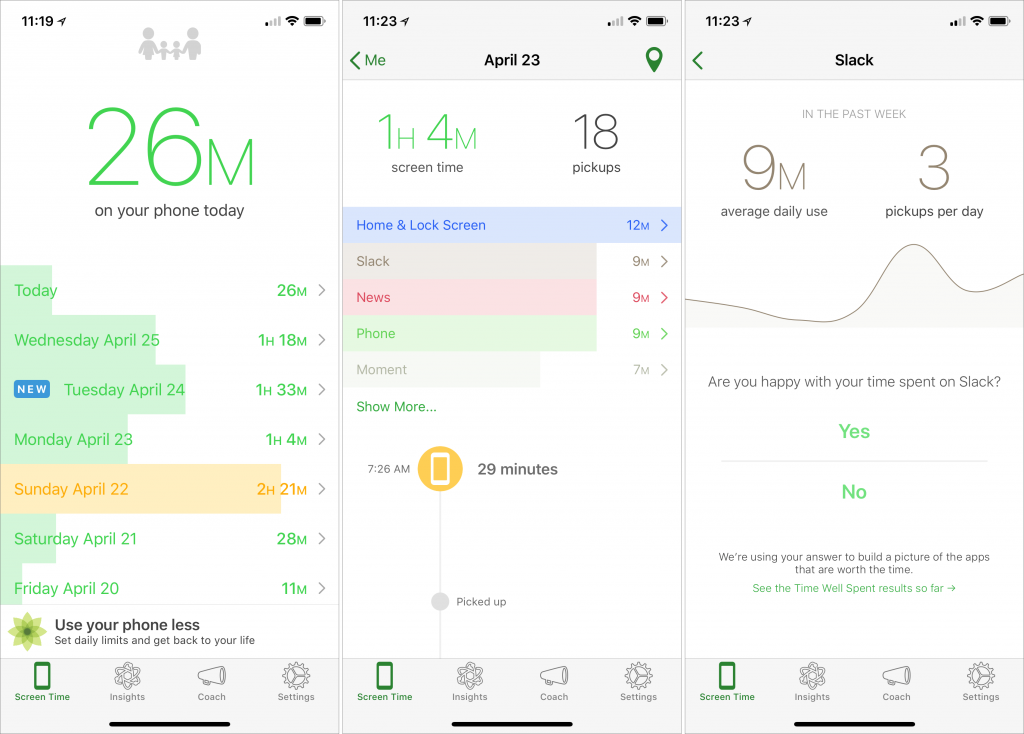
On the main Screen Time screen, Moment shows how much time you’ve spent on your phone today, along with a scrolling bar graph of how much time you spent every day since you installed Moment. Don’t get too hung up on these raw numbers, though, since Moment tracks every second the screen is on. You probably aren’t concerned about time spent reading an ebook or working out with an app that talks you through a routine.
To view both a breakdown by app and a timestamp for each time you picked up your iPhone, tap any day’s entry, and to see how much you use a particular app on average, tap it in the day view. You can answer a Yes/No question about whether you’re happy with how much you use the app, which informs the Time Well Spent aggregate data about which apps people are and are not concerned about.
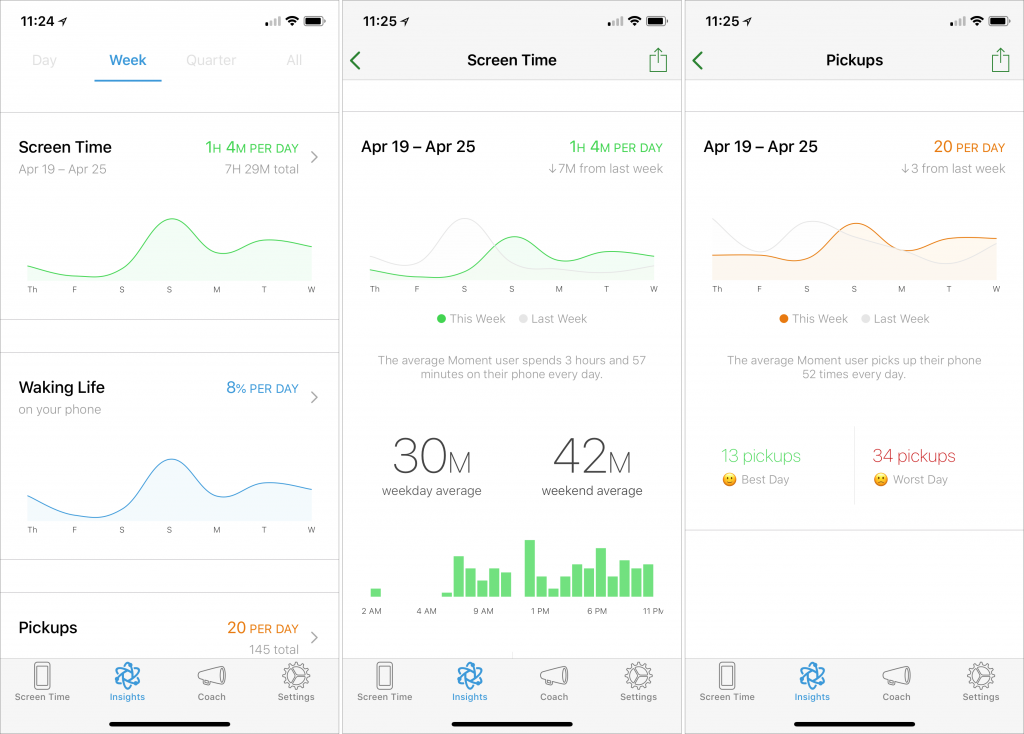
All that is helpful, but for a more useful overview, tap Insights and then Week. You’ll see graphs of your usage patterns for screen time, waking life, pickups, most used app, and sleep (this depends on your first and last pickups of the day, so take its data with a grain of salt). Tap any graph to see more detail, but wait until you’ve used Moment for a while.
Everything we’ve described so far is free, but Moment offers additional features for a one-time $3.99 in-app purchase. They let you exclude certain apps from the app-use detection, if you don’t want to be dinged for using apps that are necessary or otherwise positive. You can receive quick reminders about your usage, and set daily time limits. There is even a 14-day Phone Bootcamp course that helps you rethink your relationship with your phone.
More interesting for parents is Moment Family, a subscription service ($26.99 for 6 months or $44.99 for 12 months) that allows you to monitor your entire family’s screen time with Moment, set phone-free dinner times, and enforce daily limits.
So if you’re perturbed by the amount of time you spend using your iPhone every day, give Moment a try. On its own, it won’t solve your problem but by showing you exactly how often you turn to your phone—and for what apps—it can help you regain control over your usage patterns. And if others in your family have trouble putting their iPhones down at dinner or to do homework, Moment Family could be the answer.
Teach Siri How to Pronounce Names Properly
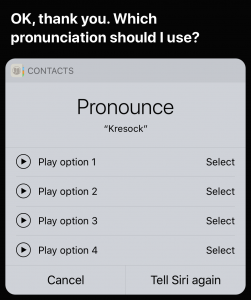
Siri is supposed to be a competent voice assistant, but sometimes Siri can’t even pronounce your own name correctly! Luckily, it’s easy to fix Siri’s pronunciation for any name. Just say to Siri, “Learn how to pronounce Jill Kresock.” (Siri defaults to “krehsock” rather than the correct “kreesock” in this case.) Siri first asks you to say the person’s first name and then presents a list of options for the best pronunciation. Tap the play button next to each option to hear it, and tap Select for the one you like best. If none are good, tap Tell Siri Again and say the name again, perhaps changing your enunciation slightly. Once you’ve set up the first name, Siri will ask you to say the person’s last name, after which you can pick the best pronunciation for the last name.
There’s a Hidden Keyboard Shortcut Cheat Sheet in Your iPad
If you’re working on an iPad with a physical keyboard—either a Bluetooth keyboard or an iPad Pro with Apple’s Smart Keyboard—there are quite a few keyboard shortcuts you can use to work faster. Many are what you’d guess if you have Mac experience; for instance, Command-F generally maps to Find. But to see a list of supported keyboard shortcuts in an app, simply press and hold the Command key on the keyboard until an information panel appears. Some apps, like Calendar (shown below), even have multiple pages of shortcuts; swipe to see them all. Not all apps will display the cheat sheet, but most of Apple’s productivity apps do.