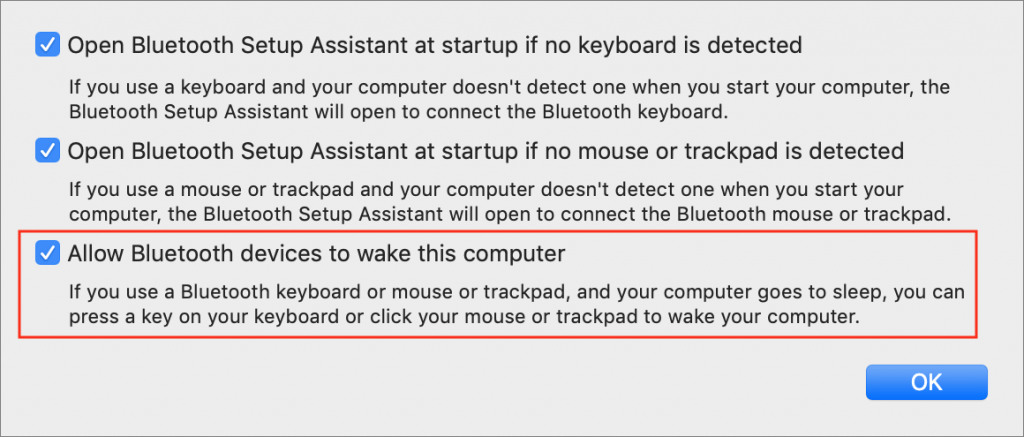
Photos on the Mac provides so many editing tools that it’s easy to lose track of how an edited image compares to the original. You can always use the Revert to Original command and then undo it, but that’s fussy. Instead, Photos provides a Show Original button in the upper-left corner, between the window controls and the Revert to Original button. Click and hold it to see your original image; let up to see the edited version again. Even easier, press the M key on your keyboard. The only thing either of those techniques won’t do is show the effect of cropping; to see the uncropped original, press Control-M. And if you just want to see how a particular set of adjustment controls affected the image, click its blue checkmark
to turn it off and back on.
The Secret Keyboard Shortcut for Comparing Before/After Edits in Photos on the Mac
Use Continuity Camera to Scan Documents and Take Photos Right into Mac Documents
Have you found yourself composing an email message on your Mac while staring glumly at the receipt or document you need to scan and attach to the message? Adding that scan to the message isn’t impossible, but until macOS 10.14 Mojave, it hasn’t necessarily been easy.
It’s super simple now, thanks to a new Mojave feature called Continuity Camera. It lets you take pictures or scan documents with an iPhone or iPad running iOS 12 and have those images show up immediately on the Mac, either in a document or on the Desktop.
Continuity Camera Basics
Apart from Mojave and iOS 12, Continuity Camera requires that the devices be on the same Wi-Fi network, have Bluetooth turned on, and be logged in to the same Apple ID, which must use two-factor authentication. Continuity Camera also requires explicit support in apps, which means for the moment that it works only in Apple’s apps, including the Finder, Mail, Messages, Notes, TextEdit, Pages, Keynote, and Numbers. We aren’t aware of any third-party apps that support it yet.
How you access Continuity Camera can vary by app, but the most common approach is to Control- or right-click where you want the scan or photo to go. Look either for commands for Take Photo and Scan Documents, or for an Import from iPhone or iPad submenu, under which those commands will be replicated for each device.
The Take Photo and Scan Documents commands may also appear in the File menu or in an Insert menu. Plus, Mail composition windows have a drop-down menu on the right side of the toolbar that includes those commands.
Should you import directly into an app, or onto the Desktop? It’s up to you, of course, but adding a file to the Desktop that you can then drag to its eventual destination gives you more options for reuse or modification, along with backup. That could be important since the photos and scans aren’t stored on the iPhone or iPad.
Using Continuity Camera
Follow these steps to use Continuity Camera to take a photo or scan a document to your Mac. Because it’s the most likely scenario, we’ll describe importing to the Desktop from an iPhone, but the steps are the same for importing into any supported app or from an iPad.
First, Control-click the Desktop and choose either Import from iPhone > Take Photo or Import from iPhone > Scan Documents. A dialog appears on the Mac screen, telling you to use the iPhone to take the photo or scan the document. The iPhone displays a variant of the Camera app automatically.
If you’re taking a photo, you can switch between the rear- and front-facing cameras, pinch out to zoom, or enable the flash with the flash button. All you need to do is tap the shutter button. If the photo is blurry or otherwise unusable, tape Retake to try again, but if you like it, tap Use Photo. The picture shows up immediately on your Mac as a JPEG file.
If you’re instead scanning a document, you also get a Filters button that lets you set the scan type: color (the default), grayscale, black-and-white, or photo. By default, the scanning interface takes a picture automatically when it detects a document. If it moves too fast for you, tap Auto (at the upper right) to switch to Manual. Then tap the shutter button to capture the image, after which you may drag the circles to identify the document corners better. Then tap Retake or Keep Scan. If it’s a multi-page document, flip the page and continue scanning to add more pages. When you’re done, tap Save to send the document to your Mac as a PDF.
That’s it! The first time or two might seem a little awkward, but once you get the hang of Continuity Camera, it’s a wonderfully quick way to get a scan or photo onto your Mac.
Make More Space for Documents by Putting Your Dock on the Side of Your Mac’s Screen
By default, Apple locates the Dock at the bottom of the Mac’s screen. If that location interferes with you seeing as much of your document windows as you’d like, you can set it to appear only when you move the pointer to the bottom edge of the screen. But there’s a better way: put the Dock on the side of the screen where there’s plenty of horizontal room and it won’t get in the way of most document windows. Open System Preferences > Dock, and select Right or Left from the Position on Screen radio buttons.
The post Make More Space for Documents by Putting Your Dock on the Side of Your Mac’s Screen appeared first on TidBITS Content Network.
Remember That You Can Search for Nearly Anything in Your Photos Library
Apple’s Photos app on the Mac can identify thousands of different objects in your photos, so it’s easy to find photos based on their content. You can find objects (cars and trains), scenery (beaches and forests), and even some events (weddings and parades). This is both big fun and useful for those times when you can’t remember when you took a photo, but do remember what’s in it, like a cat, camera, or carousel. To carry out a search like this, type the search term into the Search field on the right side of the Photos toolbar. From the list that appears, choose the Category result. In macOS 10.13 High Sierra’s version of Photos, you can filter your results from the Showing menu at the upper right of the window. The feature isn’t perfect, so you may see some odd results or miss some photos, but it’s way faster than browsing manually!
Let Your Fingers Do the Walking: 13 Essential Trackpad Tricks for Mac Users
A trackpad is not a mouse. In some ways, that’s obvious—you swipe your fingers on it, rather than dragging it around. Less obvious, however, are the many gestures that make using a trackpad on your Mac faster and more fun. These gestures aren’t limited to laptop users, thanks to Apple’s Magic Trackpad 2, which brings gesturing goodness to any desktop Mac. Here’s how to put your fingers to work.
Four Fingers on the Trackpad
The four-fingers-down gestures are dramatic and an easy way to appreciate the power of trackpad gestures, so we’ll start with them.
Say you have a lot of windows open, and you want to move them all aside quickly so you can open a file on the Desktop. Place your thumb and three fingers together on your trackpad and then spread them outward. Your windows scurry to the edges of the screen. To bring the windows back, reverse the gesture, pinching your fingers in toward your palm.
If you haven’t moved windows aside, pinching your thumb and three fingers together instead opens Launchpad, which shows icons for installed apps. Click an icon to open that app, or use the spreading four-fingered gesture to exit Launchpad.
Three Fingers on the Trackpad
Move three fingers horizontally on your trackpad and either nothing will happen, or you’ll switch to a different “desktop space.” This state of affairs is most easily seen by making an app full-screen. For instance, open Safari and click the green full-screen button at the upper left of the window. Safari takes over the entire screen, including the menu bar (to put it back, hover the pointer at the very top of the screen to see and click the green button again).
Now swipe left and right horizontally to switch in and out of the Safari space. As you make more apps full-screen, they’ll each create their own space. (If you’ve enabled Apple’s Dashboard, you may see it at the far left.)
What if you swipe vertically with three fingers? Swipe up to enter the All Windows view of Mission Control, which shows all open windows as thumbnails, plus desktop spaces in the top bar. Click any thumbnail to switch to it, or jump to any space by clicking it. You can also click the plus button at the upper right or drag any window into the top bar to create a new space. To move a space’s apps back to the current space, hover over a space on the top bar and click the close button that appears. To exit All Windows view, swipe down with three fingers.
If you haven’t invoked All Windows view, swiping down with three fingers instead invokes App Exposé view, which displays thumbnails of all open windows in the current app. Click any one to switch to it. Swipe right or left with three fingers while in App Exposé to switch between apps.
Finally, on older MacBooks that don’t have Force Touch-capable trackpads, tap with three fingers on words to look them up, on files to preview them with Quick Look, and more. With newer MacBooks, if you have “Force Click and haptic feedback” enabled in System Preferences > Trackpad > Point & Click, you can instead “force click” with one finger for these features. That involves clicking on something and then pressing firmly without letting up.
Two Fingers on the Trackpad
The two-fingered gestures are easy to get your head around:
- In Safari, swipe left on a page to go back in that tab’s page history or right to go forward.
- Also in Safari, tap two fingers on the trackpad to zoom in on the content. Another two-fingered tap zooms back out.
- In Photos, and some graphics apps, zoom in and out by pinching with two fingers, and rotate selected objects by putting two fingers on the trackpad and turning them. A two-finger pinch also zooms the page in Safari.
- To open Notification Center quickly, swipe left from off the right-hand edge of your trackpad. Swipe back to the right to close Notification Center.
Changing Your Preferences
If you need a refresher on all these gestures, open System Preferences > Trackpad. Look in the Point & Click, Scroll & Zoom, and More Gestures panes to see a video for each gesture. You can also adjust which ones are active and how many fingers they require.
With so many gestures on offer, it’s worth your time to explore everything you can do with your trackpad.
Social Media: Did you know that you can make your Mac dance (well, not literally) with two-, three-, and four-fingered gestures on the trackpad? Read on to learn more.
Seriously Cool Features of macOS 10.14 Mojave You Won’t Want to Miss
With last year’s macOS 10.13 High Sierra, Apple made no sweeping changes, instead focusing on refinements and bug fixes. In keeping with the company’s alternating cycle of releases, this year’s macOS 10.14 Mojave boasts plenty of new features.
Dark Mode and Dynamic Desktop
In a major visual change, Mojave features a new Dark mode that reverses the standard black-on-white look with light gray text on a dark background throughout the interface—change it in System Preferences > General. If your eyes find white window backgrounds too bright, Dark mode will be a boon. Or, if the current bright approach doesn’t bother you, Dark mode may seem muddy and hard to read because of its reduced contrast.
Dark mode may be useful, but Dynamic Desktop is just eye candy. Select either Mojave or Solar Gradients in System Preferences > Desktop & Screen Saver > Desktop, and your wallpaper will change throughout the day.
Finder Stacks and Groups
Turning to more practical changes, Mojave’s Finder boasts a few new features to help you better navigate a cluttered Desktop and overflowing folders. Control-click the Desktop and choose Use Stacks, and the Finder will combine all the related icons on your Desktop into stacks. It collects them by kind by default, but you can instead have it group them by various dates or even by tags. Click a stack to see what’s inside.
Groups are like Stacks, but within a Finder window. With a Finder window open, choose View > Use Groups, and note that you can use the View > Group By submenu to change the grouping from kind to application, date, size, and tag.
Quick Actions in the Finder and Quick Look
The Finder’s new tricks go even further, with Quick Actions. Controlled in System Preferences > Extensions > Finder, these quick actions let you rotate or mark up a document within the Finder’s preview pane or a Quick Look window (select a file and press the Space bar). Other quick actions let you create PDFs and trim video.
Most useful of these is the Markup quick action, which gives you most of Preview’s editing tools—cropping, annotating, and more—right in a Finder or Quick Look window.
Still and Video Screen Captures, with Editing
Markup also features prominently in Mojave’s new screen capture interface. You’ve long been able to press Command-Shift-3 for a screenshot of the entire screen and Command-Shift-4 for a portion of the screen. Now, press Command-Shift-5 for an interface to those capabilities, plus video screen recording, which was also possible before with QuickTime Player.
These capabilities may not be new, but they’re a lot easier to use in Mojave, and there are a few new options, such as being able to keep the same size selection across multiple screen captures and include the pointer in screenshots.
Continuity Camera with iPhone
Have you ever wanted to insert a photo or scanned page into an email message or document? Mojave makes this easier with Continuity Camera, a feature that lets you use your iPhone within a Mac app. In Mail, for instance, start a new message, and then choose File > Insert from iPhone > Take Photo/Scan Documents. Either way, your iPhone immediately switches to the appropriate photo or scanning mode, and the resulting photo or scan lands in your message.
iOS Apps: News, Stocks, Voice Memos, Home
Apple has been emphatic that it is not planning to retire macOS in favor of iOS. However, the company does want to make it easier for developers to write apps that run in both operating systems. As the first phase of that strategy, Apple has ported four iOS apps to the Mac: News, Stocks, Voice Memos, and Home.
They look a little different from their iOS cousins, as they should, but they work similarly, and you can sync their settings and data between your devices via iCloud (look in System Preferences > iCloud on the Mac and in Settings > Your Name > iCloud in iOS).
There are a variety of other small changes throughout Mojave and in Apple’s standard apps, and we’ll share more of those in future posts, so stay tuned!
Social Media: There’s a lot going on in macOS 10.14 Mojave, so read on to learn about Dark mode, Dynamic Desktop, Stacks, Groups, Quick Actions, and even four apps that Apple brought over from iOS.
Tired of PDFs or Other Documents Opening in the Wrong App?
When you double-click a document, macOS uses the document’s file extension to figure out which app should open the file. So, by default, a PDF file called laser-squid.pdf opens in Preview because the Finder knows that everything with a .pdf extension should open in Preview. But what if you would prefer to open .pdf files in Adobe Reader, or you want comma-separated value (.csv) text files to open in Numbers? To change any mapping, select a file of the type in question and choose File > Get Info to open the Info window. In the Open With section, click the pop-up menu to choose the desired app and then click the Change All button.
A Simple Technique for Decluttering Your Reminders List
Productivity experts recommend offloading things you have to remember to a task-management app like Apple’s Reminders, which syncs your to-dos among your Mac, iPhone, iPad, and Apple Watch. That’s particularly helpful for tasks you want to be reminded of in a few months or next year, but then those far-in-the-future tasks—especially repeating ones!—clutter your main Reminders list. The solution? Create a Far Future Reminders list, and move reminders to it that aren’t relevant within the next month or so. Just make sure everything in Far Future Reminders is set to alert you on the appropriate day.
Apple Is Discontinuing Its Photo Printing Services—Here Are 7 Alternatives
Sad news: Apple is discontinuing its photo printing services, which enabled you to create and order physical prints, cards, calendars, and books from within Photos on the Mac. If you’re building such a project right now, be sure to place your order before September 30th, 2018. After that, Apple is directing users to download a Photos Project Extension from the Mac App Store. You’ll see this dialog whenever you click a project in Photos.
When you click the Open App Store button, Photos opens the App Store app and shows available Photos Project Extensions. (If you need to open this Mac App Store screen manually, search on appex:com.apple.photo-project
.) Most of these extensions are free, since they’ll make their money when you order projects.
These extensions aren’t exact replacements for Apple’s projects, so let’s look briefly at what they provide.
Mimeo Photos
The extension that comes closest to providing the same products and features as Apple’s print projects is Mimeo Photos, which can create cards, calendars, and books. It offers a wide array of themes.
Motif
Motif looks quite similar to Mimeo Photos, also enabling you to create cards, calendars, and books with selected photos, and it comes from RR Donnelley, the company that was previously Apple’s partner for print projects. It doesn’t offer as many themes or options as Mimeo Photos, but it has a better interface.
Shutterfly
Even though the popular Shutterfly photo service’s Web site lets you go beyond the basics to put your photos on a vast number of objects, such as pillows, candles, and trivets, the company’s Photos extension is limited to photo books. Happily, it provides quite a few different sizes and bindings, and numerous themes for each.
Fujifilm Prints & Gifts
The Fujifilm Prints & Gifts extension lets you order prints, cards, wall art, mugs and drinkware, magnets, T-shirts, puzzles, iPhone cases, and much more. However, it has a non-standard interface (basically the company’s Web site), and every time we switched out of the extension, it crashed and forgot which photo we’d had selected.
Mpix
Although Mpix seems to focus on prints, if you scroll down in the project list, the final option is Browse Mpix, which provides more possibilities, including photo books, calendars, collages, foil art prints, posters, keychains, magnets, playing cards, and business cards. Confusingly, with some of these items, Photos acts as nothing more than a window onto Mpix’s Web site, with no awareness of the photos you’ve selected.
WhiteWall
WhiteWall focuses entirely on prints, with high-end choices for exotic papers and options for mounting and framing. Supported sizes range from 8″ x 6″ up to 48″ x 36″. Unfortunately, the WhiteWall prices seemed high (a framed photo was between $130 and $530, depending on size), and once you select a particular paper or frame choice, there is no way to try another with the same photo without starting another project.
Wix
Unlike all the others, the Wix extension doesn’t put photos on physical products at all. Instead, it’s designed to create on-screen photo albums for Web sites designed with the Wix service. As such, it’s potentially extremely useful for Wix users, but not at all for everyone else.
It’s too bad that Apple is getting out of the print project business since the interfaces from these extensions tend not to be as good as what we’re used to from Apple. But if you like making yourself a calendar every year, you’ll probably do fine with Mimeo Photos or Motif, and the rest of the extensions do extend Photos’ printing capabilities in a big way.
Social Media: As of September 30th, you won’t be able to order prints, cards, calendars, or books from Apple in Photos. But several extensions do most of what Apple did, and others go well beyond!
Did You Know This Hidden Trick for Opening System Preferences Panes Directly?
The System Preferences app on the Mac contains about 30 icons, each leading to additional settings panes. Rather than opening System Preferences, scanning the collection of icons, and clicking the one you want, you can jump directly to the desired pane. Just click and hold on the System Preferences icon in the Dock, and choose a pane from the pop-up menu.