Use Spotlight on the Mac to Convert Units, Track Flights, Find Movies, and More!
The Secret Trick That Lets You Paste Phone Numbers into the Phone App
The Secret Trick That Lets You Paste Phone Numbers into the Phone App
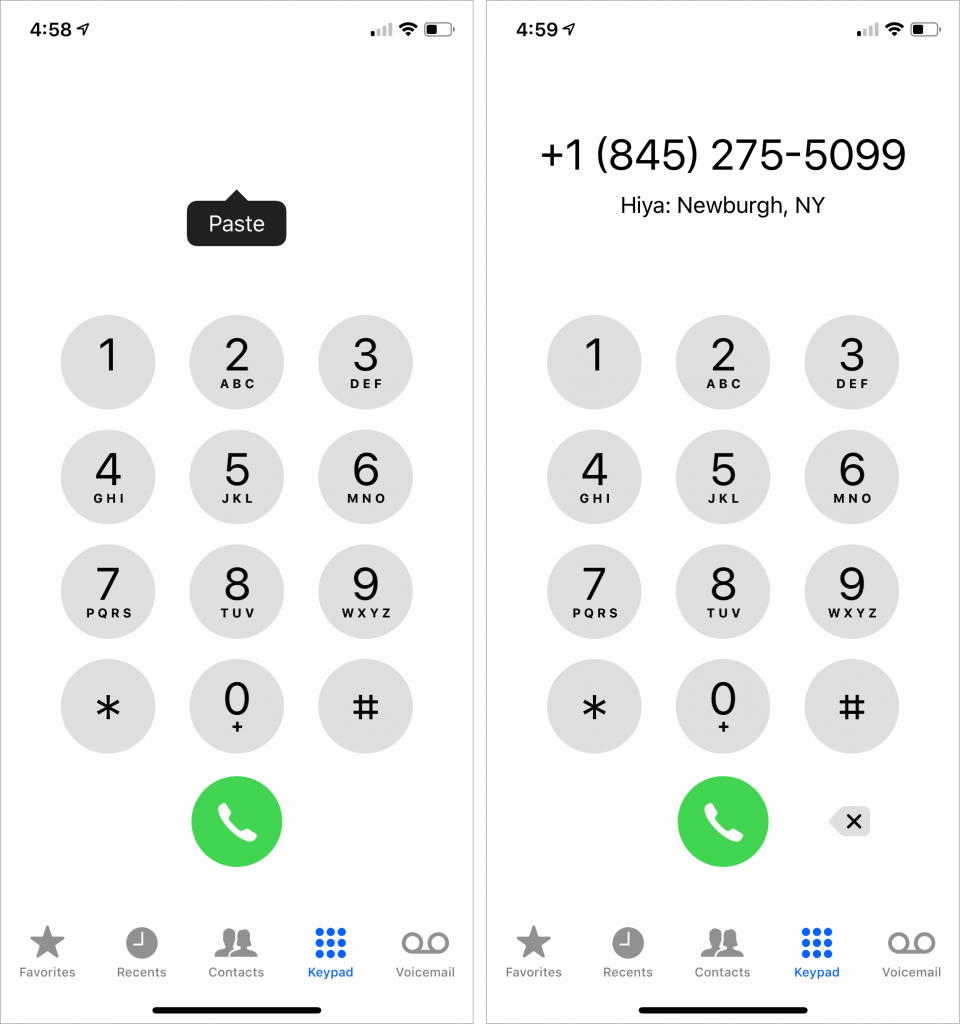
Most iOS apps and many Web sites make phone numbers “hot” so you can tap them to call. But it’s not uncommon to run across a number that’s formatted oddly or broken across a line of text such that it can’t be recognized. Just because iOS can’t recognize it doesn’t mean you have to memorize the number temporarily or flip back and forth to the Phone app to type it in it. Here’s a workaround. Double-tap the start of the phone number to select it, and then drag the rightmost blue handle to extend the selection to the entire number. Tap Copy in the popover that appears to copy it. Then switch to the Phone app, tap Keypad at the bottom, and then tap in the blank white area at the top where typed numbers would appear. When a Paste button appears, tap it, and if the Phone app recognizes the number correctly, tap the green Call button to place the call.
(Featured image by Markus Spiske temporausch.com from Pexels)
Our tips are better than queso on a corn dog.
More great tips from the archives…
- Two Secret Key Combos for Forward Delete on the Magic and MacBook Keyboards
- iCloud Photo Library Users: Do NOT Turn Off iCloud
- Ever Wondered Which Words to Capitalize in a Title? Use Capitalize My Title!
- Tips for Setting Up a Comfortable and Effective Home Work Space
- Tips for Better Videoconferencing
- Set Your Preferred Name and Photo for Messages on iOS
- The Fastest Way to Change Wi-Fi Networks in iOS
- What to Put at the End of Your Emails
- Apple Business Manager Is a Win for Apple-Driven Workplaces
- Find Wasted Space with Storage Management
- Forrester Research and IBM Studies Show Macs Are Cheaper than PCs
- Being an Apple User Means You’re Not the Product
- How to Ask for Tech Support So You Get Good Answers Quickly
- Apple Business Manager Is a Win for Apple-Driven Workplaces
- The Hidden Dangers of Shadow IT on your business
- Need to Stay in Touch? Try One of These Videoconferencing Apps
- Never Send Someone a Password in Mail or Messages: Do This Instead!
- What Are All These New Privacy Request Dialogs in Mojave?
- The Importance of Productivity Tech for Your Road Warriors
Customize Your Mac’s Dock for Increased Productivity
Customize Your Mac’s Dock for Increased Productivity
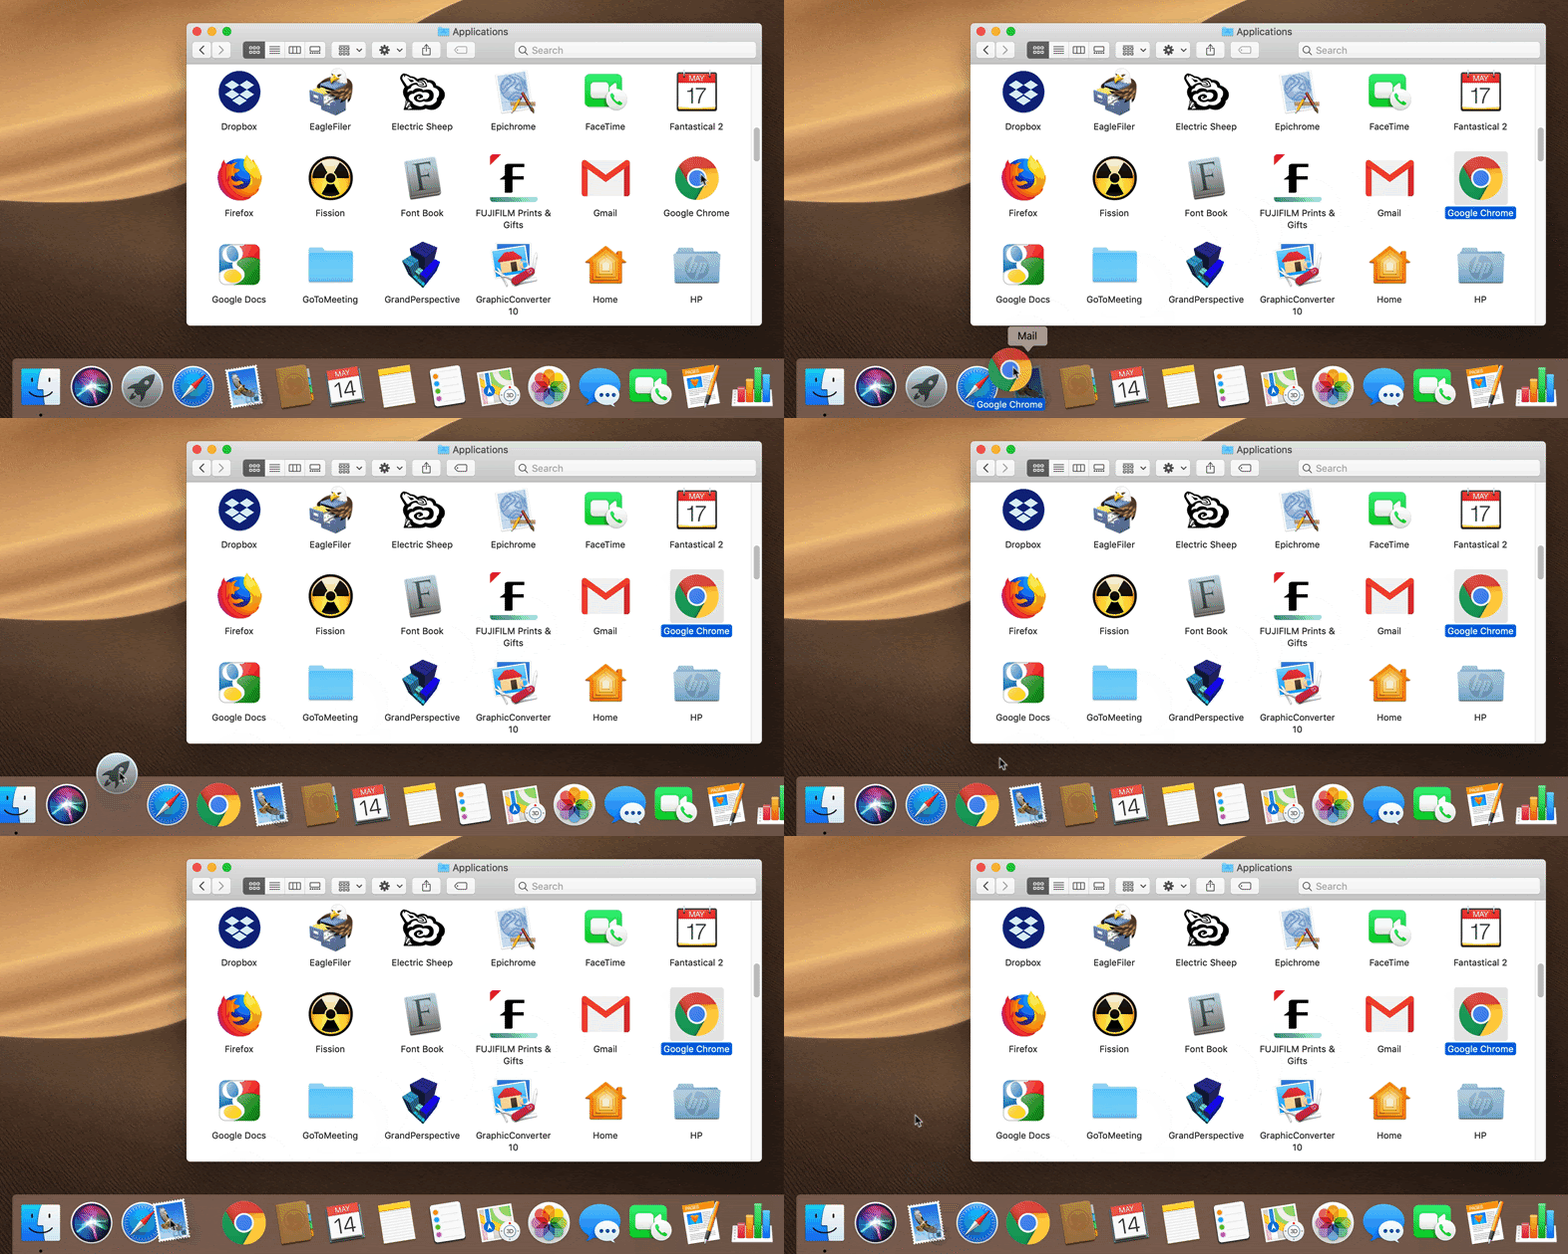
By default, Apple populates your Mac’s Dock with all sorts of apps and arranges them in a particular order. But there’s no rhyme or reason to the defaults, and you shouldn’t be afraid to add, remove, and rearrange apps on your Dock. To add an app, drag its icon from the Applications folder to the desired spot on the Dock. To remove an app you never use, drag its icon far enough off the Dock that a Remove tag appears above the icon and then let go. To arrange the Dock icons in the order that makes the most sense to you, just drag each icon to your preferred location. We generally like to put our most-used apps in the left-most or top-most spots.
(Featured image by StockSnap from Pixabay)
A bunch of quick tips, click one, you might learn something…
More great tips from the archives…
- Two Secret Key Combos for Forward Delete on the Magic and MacBook Keyboards
- iCloud Photo Library Users: Do NOT Turn Off iCloud
- Ever Wondered Which Words to Capitalize in a Title? Use Capitalize My Title!
- Tips for Setting Up a Comfortable and Effective Home Work Space
- Tips for Better Videoconferencing
- Set Your Preferred Name and Photo for Messages on iOS
- The Fastest Way to Change Wi-Fi Networks in iOS
- What to Put at the End of Your Emails
- Apple Business Manager Is a Win for Apple-Driven Workplaces
For Faster, Easier Photo Sharing, Try an iCloud Link
Collaborate with Colleagues in Google Docs
Collaboration is what all the cool kids—well, all the competitive businesses—are doing these days because it’s efficient and effective. See “Stop Mailing Files Around and Use Collaborative Apps” and for users of Apple’s iWork, “Collaborate with Colleagues in Pages, Numbers, and Keynote.” Today we’re going to look at collaborating using Google’s Web-based productivity suite, Google Docs, which businesses can use for free or as part of a G Suite subscription.
The Google Docs suite competes with Apple’s iWork and Microsoft’s Office 365, providing Google Docs for word processing, Google Sheets for spreadsheet work, and Google Slides for presentations. You can manage all your files in Google Drive. Although all are Web-based and work best on a Mac or other desktop computer, Google also makes iOS apps that let you work—a bit less flexibly—on an iPad or iPhone.
You’ll need a free Google account to create new documents, and for full-fledged collaboration, your colleagues will need Google accounts too. You can share documents with people who lack Google accounts or don’t want to sign in, but their comments and changes will be anonymous.
Invite Collaborators
Once your document is ready to share, you can invite collaborators by clicking the large Share button in the upper-right corner of the window.
Flexible permissions let you share with specific people, and for each person, set whether they can edit, comment on, or just view the document (below left). You can also add a note that will be sent with the invitation.
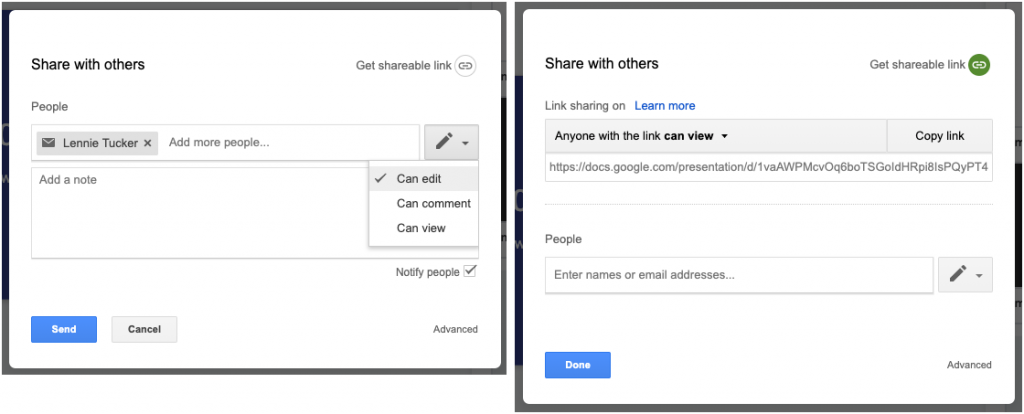
If that’s too specific—you’re sharing with a large group, for instance—click Get Shareable Link to turn on link sharing (above right). Then you can set the permissions for the link by clicking the down-pointing arrow next to “Anyone with the link can…” This works well for things like self-service signup spreadsheets. Copy the link and send it however you like, such as via Messages or to a mailing list.
If you add people over time, you can see who has access by clicking Advanced. That view also provides more owner controls, including the option to prevent commenters and viewers from downloading, printing, or copying.
When you’re done, click Send or Done.
Accept an Invitation
People you invite receive an email invitation and click the Open In button to start working on the document. With link sharing, all the recipient has to do is click the link.

The main gotcha is that recipients must sign in to their Google accounts if sharing has been restricted to specific people. A less common problem can occur when you send an invitation to someone at an email address that doesn’t match their Google account, which prevents them from collaborating. They can then request that you share the document with their Google account; click the Open Sharing Settings button in the request email to grant access.

Add and Change Data
Apart from the permissions that restrict collaborators to commenting or viewing, there are no limitations on what people can do in a shared document—all editors are equal, and Google Docs works the same whether a document has one person using it or ten.
You can see who is in the document by the little avatar icons in the menu bar. It also tells you when the last edit was, and Google Docs always shows where other users are working with a color-coded cursor and marks when other users have selected content in the document with a colored highlight box.

Add Comments
The beauty of comments in a collaborative scenario is that discussions can occur in context. To add a comment, select some text and choose Insert > Comment. Comments show up in the right-hand sidebar in Google Docs and Google Slides; in Google Sheets, the cell containing a comment gets a little yellow triangle in the corner, and the comment appears when you click the cell.

Google pioneered comment conversations, which allow collaborators to reply to each others’ comments and keep the discussion connected to the initial comment. You can edit or delete your own comments by clicking the stacked three-dot More menu. Do that for someone else’s comment and you can get a link to the comment—it’s useful if you need to point someone to the discussion.
To see all the comments in a stream, click the Comment History button in the menu bar, which looks like a speech balloon. It’s especially useful when reviewing comments in Sheets, where you would otherwise have to click all the little yellow triangles in cells.

View Versions and Suggested Changes
The main way to see who has done what in a document is by choosing File > Version History > See Version History. That displays a right-hand sidebar showing dates when the file was changed; click an entry to see the changes in the main pane. Arrows above the main pane let you highlight each change in turn. If you want to revert to the selected version (which will delete all subsequent changes!), click Restore This Version.

For Google Sheets and Google Slides, version history is all that’s available, which can be frustrating because when you’re reviewing edits in version history, you can’t make changes. As a workaround, open a second browser window so you can review changes in one window and make edits in another.
Google Docs (the word processor, in this case) offers another choice: Suggesting mode, which works more like Track Changes in Page or Word. Switch into it by clicking the pencil icon in the upper-right corner and choosing Suggesting. From then on, all edits are non-destructive and are color-coded by the person who makes them. They’re coupled with boxes in the right-hand sidebar that detail the change, provide  and X icons for accepting or rejecting the change, and offer a Reply field that enables discussions of each change—a brilliant feature.

If you want to be guided through all the suggested edits, or accept or reject changes all at once, rather than handling them one at a time in the right-hand sidebar, choose Tools > Review Suggested Changes.
When you’re done collaborating on a document, you can click the Share button and remove people or turn off link sharing. That immediately prevents others from making more changes.
When choosing a collaboration platform, you’ll generally pick what your colleagues use, whether that’s Google Docs, iWork, or Office 365. However, if you’re sharing with people whose platform and app details you don’t know, Google Docs is the best choice—Google accounts are common and the Google Docs apps work equally well on all computers. Plus, since Google Docs was built from the ground up for collaboration, it’s a mature solution that’s quick, easy, and effective.
Social Media: For quick, easy, and effective collaboration regardless of what apps or platforms people use, give Google Docs, Sheets, and Slides a try. We’ll help you get started here:
Clean Up Old Tabs in Safari in iOS with This Quick Trick
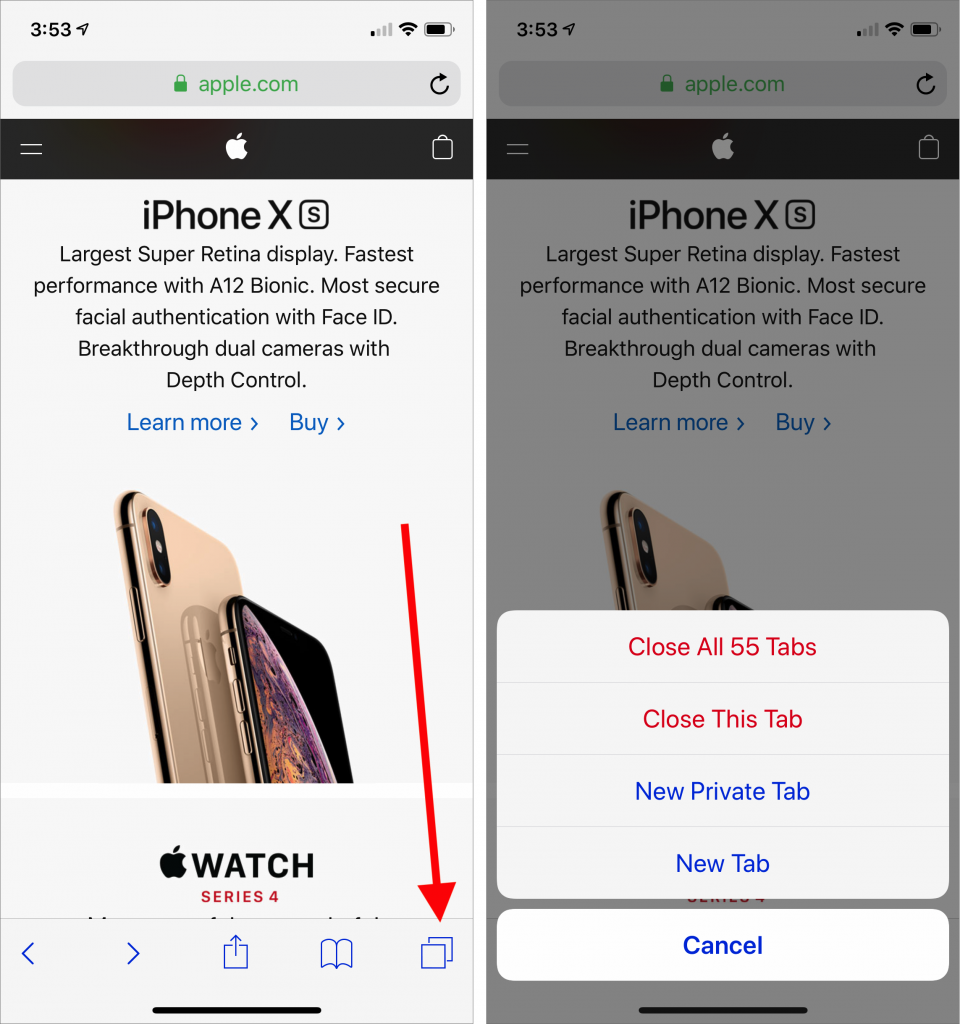
Every time you tap a link to open a Web page in Safari on your iPhone or iPad, it automatically opens a new tab. That’s fine until you realize that you have oodles of old tabs open, making it difficult to find any particular tab. To close all your old tabs in one fell swoop, press and hold on the tab button, then tap Close All X Tabs in the popover that appears.
Choose between Archiving and Deleting Messages in iOS Mail
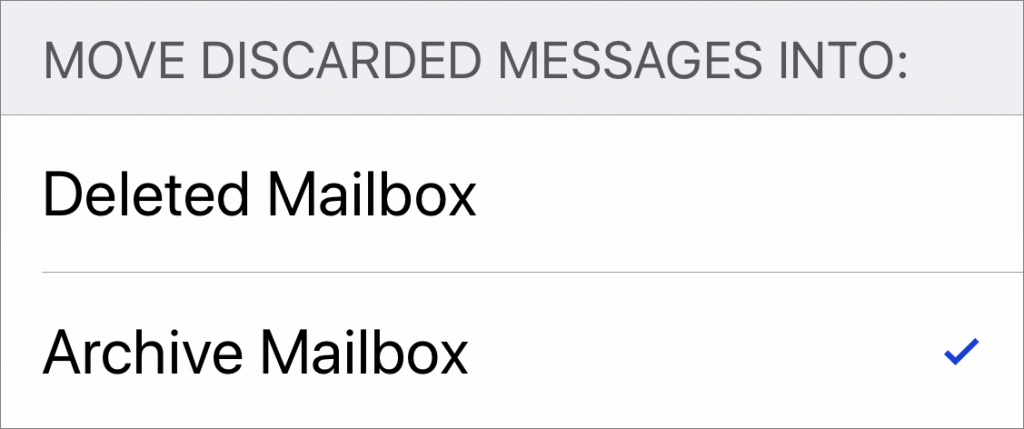
When you’re viewing a message in Mail on an iPhone or iPad, you get five buttons: Flag, Move, Archive or Delete, Reply/Forward/Print, and New Message. But what determines whether that third button is Archive or Delete? iOS hides that option in Settings > Passwords & Accounts > YourEmailAccount—the details then vary by account type before you see the Move Discarded Messages Into options.
- iCloud as your primary address: Mail (under Advanced) > Advanced
- iCloud as a secondary address: Account > Mail > Advanced
- Gmail or other email provider: Account > Advanced
But what if you want to archive a message when you have Deleted Mailbox selected, or vice versa? Simply tap and hold on the Archive or Delete icon, and a popover appears, giving you both choices.
Stop Mailing Files Around and Use Collaborative Apps
Easier Ways to Move the Cursor When Editing Text on an iPad or iPhone
A Quick Trick to Turn Your iPhone into a Magnifying Glass
It’s maddening to want to read a serial number or other bit of fine print that you can barely see. But fret no longer—your iPhone or iPad makes a fabulous magnifying glass! Assuming Magnifier is enabled in Settings > General > Accessibility > Magnifier, you can bring it up by pressing the Home button (for Touch ID devices) or side button (for Face ID devices) three times quickly. If that’s too hard to remember, you can also add a Magnifier button to Control Center in Settings > Control Center > Customize Controls. The special camera viewfinder is zoomed automatically, but you can change the zoom level with the slider, tap the flash icon to turn on the LED light (if available on your device), enable a filter to change the color or contrast, or lock the focus by tapping the lock icon. You can also freeze the image by tapping the white shutter button, which is great for grabbing a picture of a tiny serial number on the back of some device (tap that button again to resume using Magnifier). To leave Magnifier, press the Home button or swipe up from the bottom of the screen.
And YES – Jason Boettcher. I actually use this, because suddenly I have the eyes of a much older man. XOXO- T


