Data Backup Strategies Go Only So Far—What’s Your Plan If Your Mac Dies?
Make a Backup before Upgrading to Catalina or iOS 13!
Make a Backup before Upgrading to Catalina or iOS 13!
Confession time. If there’s one topic we can’t stop talking about, it’s backups. Backups are essential, since no one can guarantee that your Mac or iPhone won’t be lost or stolen, be caught in a flood from a broken pipe, or just fail silently. It happens.
You should have a good backup strategy that ensures backups happen regularly, but it’s not paranoid to make double extra sure when you’re doing something that’s more likely to cause problems than everyday activity. And by that we’re thinking about upgrading to a major new operating system, such as macOS 10.15 Catalina or iOS 13.
The reason is simple. As much as Apple tests the heck out of these upgrades, so many files are in play that all it takes is one unexpected glitch to render the entire Mac or iPhone non-functional. Wouldn’t you like to be able to revert instantly if something does go wrong?
Mac Backups before Upgrading
On the Mac side, most people should be using Time Machine. It ensures that you can not only restore your entire drive if necessary but also easily recover a previous version of a corrupted file. The other advantage of having Time Machine backups (and a bootable duplicate, discussed next) is that you can use either to migrate all your apps, data, and settings back to a new installation of macOS, should that become necessary.

As useful as Time Machine is, a bootable duplicate made with SuperDuper or Carbon Copy Cloner is the best insurance right before you upgrade to Catalina. If an installation goes south, you can also boot from your duplicate and get back to work right away.

Finally, although it’s not directly related to backing up before upgrading, we always recommend an offsite backup made via an Internet backup service like Backblaze. This is because a fire or flood would likely destroy your backup drive along with your Mac.
So please, back up your Mac before something goes wrong. It’s fast, easy, and inexpensive to get started, and we’re happy to help.
iOS Backups before Upgrading
Although upgrade-related problems are less common with iPhones and iPads, they can still happen. It’s more likely that you’d drop your little friend accidentally while juggling groceries or forget it after your workout at the gym, but regardless, a backup ensures that you don’t lose precious photos if you’re not using iCloud Photos or My Photo Stream, and backups make migrating to a new device like a fancy new iPhone as painless as possible.
With iOS, though, you don’t need extra software or hardware to make a backup. Apple provides two ways of backing up your iPhone or iPad: iTunes and iCloud. We generally recommend backing up to iCloud if your backups will fit in the free 5 GB of space Apple provides or if you’re already paying for more iCloud space. If you’re not a fan of the cloud or don’t have space, there’s nothing wrong with iTunes backups, though they’re a bit fussier to set up and manage.
There’s also no harm in using both, with iCloud for nightly automatic backups and iTunes for an extra backup just before upgrading to iOS 13 or to a new iPhone or iPad. A second backup can be useful—we’ve seen situations where an iPhone would refuse to restore its files from iTunes but would from iCloud.
To back up to iCloud, go to Settings > Your Name > iCloud > iCloud Backup, turn the switch on, and tap Back Up Now. For backups to happen automatically in the future, you must have sufficient space in your iCloud account (you can buy more), and your device must be on a Wi-Fi network, connected to power, and have its screen locked.

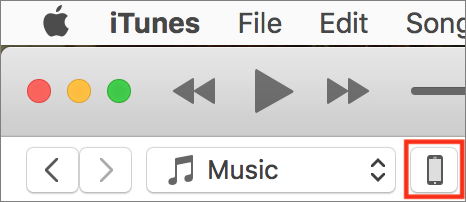
To back up to iTunes, connect your device to your Mac via a Lightning-to-USB cable, launch iTunes, and click the device icon to the right of the media menu.
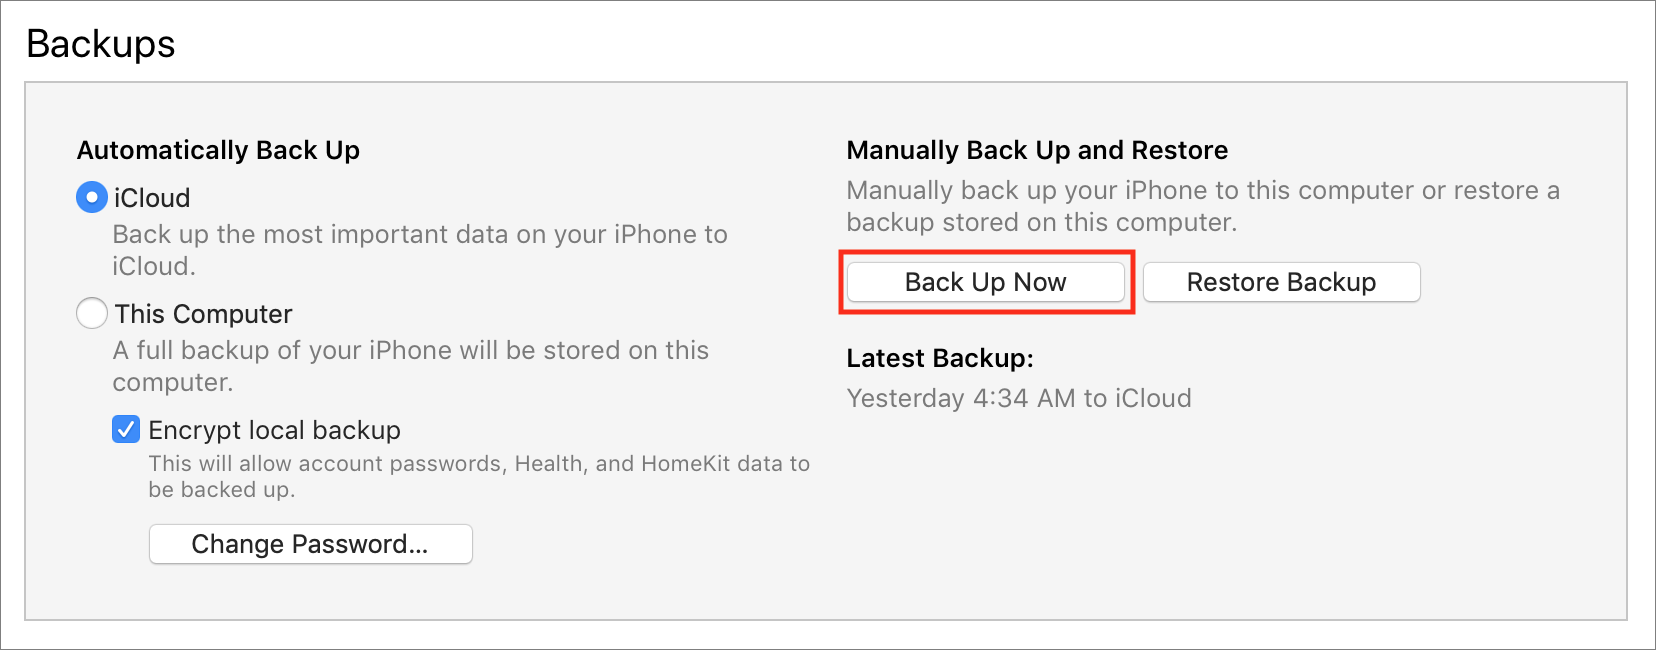
Then, in the Backups section, click the Back Up Now button. If you’re prompted to encrypt your backups, we encourage you to agree since otherwise your backup won’t include passwords, Health information, or HomeKit data. For automatic backups via iTunes, select This Computer. After that, every time you plug into your Mac, it will back up.
The eagle-eyed among you will have noticed that we’re not talking about how to restore if something goes wrong during an upgrade. That’s because it’s impossible to predict exactly what might happen or what state your device will end up in. So if you’re unfortunate enough to have such problems—or to have some other catastrophic failure—get in touch and we’ll be happy to help.
(Featured image based on an original by Alejandro Escamilla on Unsplash)
Just a few of the other 67 times we talk about backup…
- Recover Drive Space by Deleting Old and Unnecessary iOS Device Backups
- Make Sure to Test Your Backup System with Occasional Restores
- Data Backup Strategies Go Only So Far. What’s Your Plan If Your Mac Dies?
And a few all time favorites…
More great tips from the archives…
- Two Secret Key Combos for Forward Delete on the Magic and MacBook Keyboards
- iCloud Photo Library Users: Do NOT Turn Off iCloud
- Ever Wondered Which Words to Capitalize in a Title? Use Capitalize My Title!
- Tips for Setting Up a Comfortable and Effective Home Work Space
- Tips for Better Videoconferencing
- Set Your Preferred Name and Photo for Messages on iOS
- The Fastest Way to Change Wi-Fi Networks in iOS
- What to Put at the End of Your Emails
- Apple Business Manager Is a Win for Apple-Driven Workplaces
- Find Wasted Space with Storage Management
- Forrester Research and IBM Studies Show Macs Are Cheaper than PCs
- Being an Apple User Means You’re Not the Product
- How to Ask for Tech Support So You Get Good Answers Quickly
- Apple Business Manager Is a Win for Apple-Driven Workplaces
Some of Our Favorite Features of iOS 13 and iPadOS 13
Some of Our Favorite Features of macOS 10.15 Catalina
Six Tips for Writing Better Email
Buy Quality Cables to Avoid Possible Device Damage or Even Fires
Need to Merge Photos Libraries? Here Are Your Options
Photos makes it easy to create and switch between libraries. That’s good when photos need to be kept completely separate. For instance, a real estate agent might want to keep personal photos separate from house photos taken for work. But too much separation is annoying—you have to keep switching between libraries, and it’s easy to import new photos into the wrong one.
If you struggle with multiple Photos libraries, never fear—you can merge them. Unfortunately, the process is slow, can require a lot of disk space, and may result in the loss of some metadata. You have three options: merging through iCloud Photos, using the PowerPhotos utility, and merging by exporting and importing. Each has pros and cons.
Merge through iCloud Photos
Apple’s iCloud Photos service offers the best solution for merging libraries. The trick is that whenever you designate a library as your System Photo Library, Photos automatically uploads all images that aren’t already present, adding them to the photos already in iCloud Photos. It also retains all the metadata surrounding your photos—titles, keywords, albums, facial recognition, projects, and more.
On the downside, using iCloud Photos almost certainly won’t be free unless you have so few photos that the combined library will fit within the free 5 GB of iCloud space Apple gives everyone. Almost everyone will have to pay for additional storage space ($0.99 per month for 50 GB, $2.99 for 200 GB, or $9.99 for 2 TB) for at least the month in which you’re doing the merge. iCloud Photos is a good service, so it’s likely worth paying for anyway.
More problematic is that the iCloud Photos way of merging will be very slow. If you haven’t already started using it, it could take a week or more to upload many thousands of photos. Plus, it will probably download the entire cloud-based collection of photos to each library whose photos you want to merge, so you may need a lot of local disk space too.
If you haven’t previously used iCloud Photos, go to System Preferences > iCloud and click the Options button next to Photo. In the dialog, select iCloud Photos.
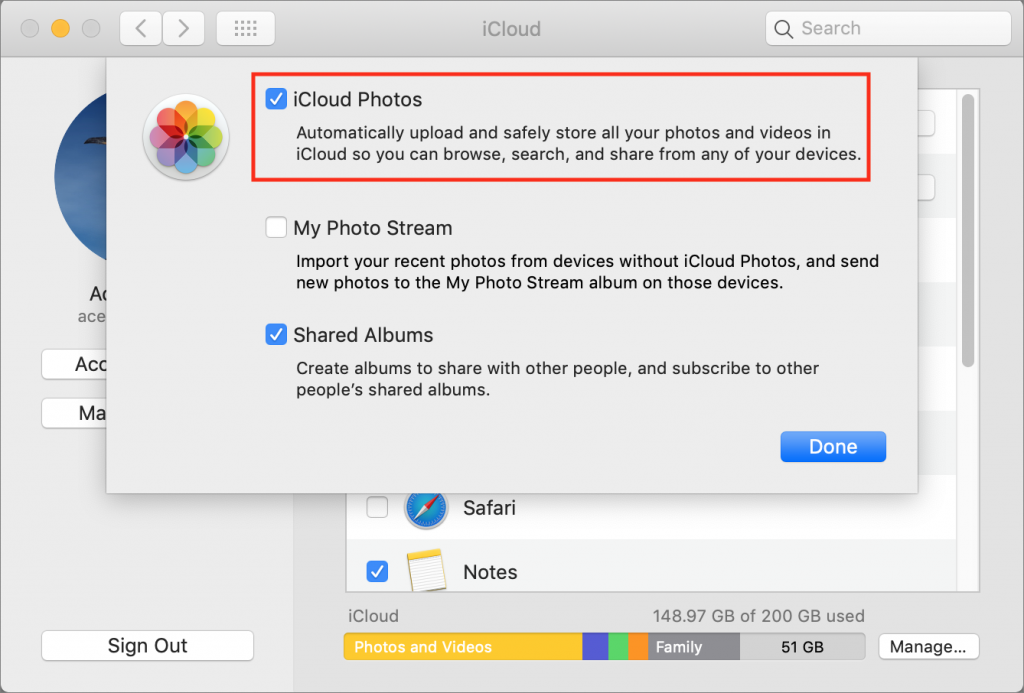
Now, starting with the smallest Photos library and working up in size, follow these steps for each library you want to merge:
- Double-click the Photos library to open it.
- In Photos > Preferences > General, click Use as System Photo Library. (If it’s dimmed out, that library is already set as the System Photo Library.)

- Wait for photos to upload. Scroll to the bottom of the Photos view to see the progress. A Pause link will appear there during uploading—click it if you need to keep Photos from overwhelming your Internet connection. Once the photos have all uploaded, go back to Step 1 with your next Photos library.
When you’re done, the last Photos library becomes the one you’ll keep, and you can delete the others. Needless to say, make sure you have good backups first!
Merge with PowerPhotos
The $30 PowerPhotos from Fat Cat Software provides a variety of extra capabilities when working with Photos. It helps you to create and manage multiple libraries, copy photos between libraries, find duplicates, and—most important for this topic—merge libraries.
Because PowerPhotos is working entirely on your Mac’s drive, it’s fast and it doesn’t require huge amounts of extra disk space. Unfortunately, unlike the iCloud Photos approach, which brings in both originals and any edits to those photos, PowerPhotos can import only your original photos or the versions that you’ve edited, not both. Plus, it can’t merge facial recognition data, smart albums, or print projects.
PowerPhotos provides an actual interface for merging too—choose Library > Merge Libraries to start.

In the window that appears, you have four tasks:
- Choose source libraries. You aren’t limited to merging just two libraries; you can pick multiple sources.
- Choose the destination library. This is the library you want to receive all the photos. If you want, you can create a new one.
- Configure duplicate handling. PowerPhotos can import just one of several copies of duplicate photos, or you can bring in all the duplicates if that’s important.
- Choose options. PowerPhotos can merge album contents, create an album from each source library, and create a backup before merging. Most important, though, is the choice of whether to merge your original photos or the edited versions.
Merge by Exporting and Importing
This final option is conceptually simple. You export all the photos from one library and then import them into another. It’s even what Apple recommends. The main thing it has going for it is that it’s free, and it will be faster than the iCloud Photos approach. It could also be useful if you want to copy a subset of photos between libraries, rather than merging all photos.
However, as with PowerPhotos, you have to choose between original and edited photos, and you’ll need a lot of extra disk space. Even worse, you’ll lose even more metadata, including albums, faces, and print projects. And if you export as JPEG, your photos may also suffer a slight quality drop as they’re recompressed.
For those who want to use this approach, Apple provides detailed instructions. In essence, you’ll click Photos in the sidebar to see everything, and then choose Edit > Select All. Then you’ll choose File > Export and either Export X Photos (to get the edited versions of images) or Export Unmodified Original for X Photos (to get the original images). Once everything has exported, you’ll switch libraries in Photos and then drag the folder of exported images back into Photos to import it.
Our nod goes to the iCloud Photos technique, but PowerPhotos is a fine utility for those who aren’t perturbed by its limitations. Of course, don’t start any merging without making backups first, and if you need help, don’t hesitate to call us.
Social Media: If you want to merge Photos libraries to avoid having to switch back and forth, there are several approaches you can take, but each comes with pros and cons. See them all at:
Easier Ways to Move the Cursor When Editing Text on an iPad or iPhone
Need to Clear Space on an iPhone or iPad? Here’s How to Do It in iOS 12
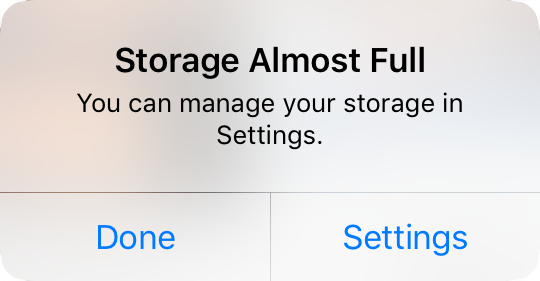
Little is more frustrating than running out of space your iPhone or iPad. You can’t take new photos, you can’t download new apps, some things may not work at all, and iOS will nag you repeatedly about how you can “manage” your storage in Settings. Luckily, over the past few versions of iOS, Apple has significantly improved the options for clearing unnecessary data from your device.
Storage Graph
To get started clearing space, go to Settings > iPhone/iPad Storage. At the top of the screen, a graph reveals where your space is going, such as Apps, Photos, Media, Messages, Mail, Books, iCloud Drive, and Other. You can’t do anything with the graph, but it will likely reveal the main culprits.

Recommendations
Next, iOS shows recommendations for quick ways to recover space. These vary based on how you use your device, so you will likely see other options here.

Some of the possibilities include:
 Offload Unused Apps: This choice is particularly helpful if you download a lot of apps that you later stop using. Enable it, and iOS automatically recovers space from unused apps when you’re low on storage. Each of these apps remains on your Home screen with a little cloud icon next to it, and when you next tap the app to open it, iOS re-downloads the app from the App Store. You won’t lose any documents, data, or settings associated with an offloaded app.
- Review Downloaded Videos: Some apps, like Netflix, can download videos for offline watching. That’s great for when you’re on a long flight, but if you forget to delete the videos, they can consume a lot of space. This option shows them to you and lets you swipe left on any one to delete it.

- Review Large Attachments: Photos, videos, and other files sent to you in Messages can take up a lot of space. This recommendation reveals them and lets you swipe left to delete those you don’t need to keep.
- “Recently Deleted” Album: When you delete photos in the Photos app, they go into the Recently Deleted album, where they’ll be deleted automatically after up to 40 days. This recommendation lets you remove those images right away.
- Review Personal Videos: Shooting videos with your iPhone or iPad can guzzle storage, so this recommendation shows you the videos you’ve taken in case you don’t want to keep them.
iOS’s recommendations are quite good and may be all you need to clear space quickly. However, if you need to dig deeper, you can look at the usage of individual apps.
Individual App Usage
The third and final section of the iPhone/iPad Storage screen lists every app on your device, sorted by how much space it takes up. Along with the app’s name and how much space it consumes, iOS helpfully tells you the last time you used the app. You may even see “Never Used” for older apps that you’ve carried over from previous devices but haven’t opened on this one.
When you tap an app, iOS shows more information about how much space the app and its documents occupy, and lets you tap Offload App or Delete App to recover its space. For some apps, mostly those from Apple, like Music and Podcasts, iOS also shows the data stored by the app and lets you delete any individual item (swipe left).

Focus on the apps at the top of the list—the list is sorted by size—since it will be a lot easier to realize, for instance, that you’ve never used GarageBand and recover its 1.59 GB of space than to sort through a long list of apps and their data.
With all these the tools from Apple, you should have no trouble making space on your device for more photos, videos, and apps that you actually want to use.
Social Media: Struggling with too little space on your iPhone or iPad? In iOS 12, Apple provides highly effective tools for clearing more space—read on for details!






 Offload Unused Apps: This choice is particularly helpful if you download a lot of apps that you later stop using. Enable it, and iOS automatically recovers space from unused apps when you’re low on storage. Each of these apps remains on your Home screen with a little cloud icon next to it, and when you next tap the app to open it, iOS re-downloads the app from the App Store. You won’t lose any documents, data, or settings associated with an offloaded app.


