Everything You Need to Know about Multitasking in iPadOS 13
What Does Having a T2 Chip in Your Mac Mean to You?
Beware Scammers when Selling Your Old Tech Hardware Online
Beware of Scammers, when Selling Your Old Tech Hardware Online
Whenever Apple releases hot new hardware, it’s tempting to order the latest and greatest and then put your old Mac or iPhone up for sale on a classifieds site like Craigslist. If you do that, be cautious about potential buyers—it’s increasingly common for a scammer to request that you ship them the device and then to “pay” you by forging payment email from PayPal or using a stolen PayPal account (whose owner will likely get PayPal to take the money back from you). Instead, insist on an in-person meeting in a public place and payment in cash or via a digital method like Apple Pay Cash or Venmo that can’t be canceled once you accept the money. Or, if the location and payment amount (under $1000) work, meet in a nearby post office and request payment via money order (US or Canada) that you can verify on the spot. Craigslist has more advice.

(Featured image modified from an original by Vitabello from Pixabay)
Thinking about security? Read these.
- Exercise (Some) Control over How Much Your Location Is Tracked
- Being an Apple User Means You’re Not the Product
- In Case of Emergency, Create an iPhone Medical ID
- Beware Microsoft Office 365 Phishing Attacks!
Do You Put Dates in Filenames? Use This Format for Best Sorting
Do You Put Dates in Filenames? Use This Format for Best Sorting
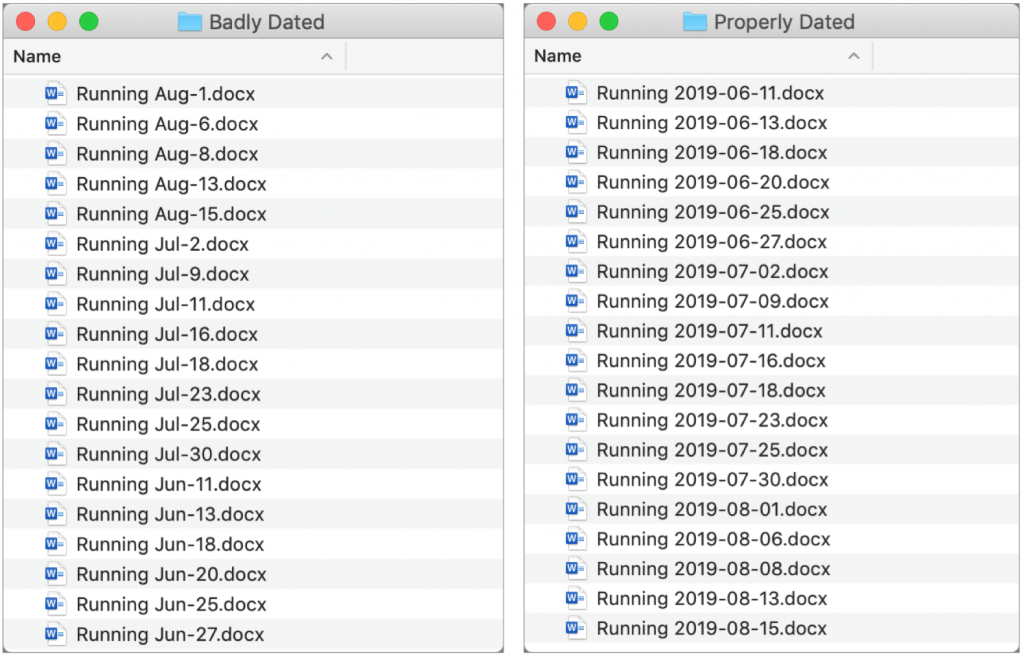
There are plenty of situations where it makes sense to put a date in a filename, but if you don’t use the right date format, the files may sort in unhelpful ways. For instance, using the names of months is a bad idea, since they’ll sort alphabetically, putting April before January. And although the Mac’s Finder is smart enough to sort filename-3 before filename-20, most other operating systems are not (because 2 comes before 3). So, to make your life—and the lives of everyone with whom you share files—a little easier, use this date format, which is guaranteed to sort correctly everywhere: YYYY-MM-DD. That translates to a four-digit year, followed by a two-digit month (with a leading zero if necessary), and a two-digit day (again, with a leading zero if need be).

(Featured image by Henry & Co. on Unsplash)
Got another minute? Check these tips out.
- Avoid Ransom Requests with a Unique iCloud Password
- Apple Music Can Be Your Personal DJ
- Did You Know You Can Make a Video of Anything on Your iPhone or iPad Screen?
- Did You Know Families Can Share Mac and iOS Apps Purchased from the App Store?
iOS 13 Replaces 3D Touch with Tap-and-Hold
iOS 13 Replaces 3D Touch with Tap-and-Hold
Do you use 3D Touch on your iPhone? From 2015 through 2018, every iPhone from the iPhone 6s through the iPhone XS supported 3D Touch, other than the iPhone SE and iPhone XR. With 3D Touch, you could (sometimes) press a control, and then press a little harder to make additional options appear. But because the 3D Touch hardware was expensive, it never made its way to the iPad or iPod touch. Apple replaced 3D Touch in the entire iPhone 11 line this year with the iPhone XR’s simpler Haptic Touch hardware that provides haptic feedback—the sensation of touching something—when you tap-and-hold (or long-press, if you prefer) on an object. With iOS 13, 3D Touch is gone, and almost everything it could do, you now accomplish with a tap-and-hold. So give it a try—long-press icons on the Home screen, panels in Control Center, messages in Mail, links in Safari, and a lot more.

More iOS tips!
- In Case of Emergency, Create an iPhone Medical ID
- Easier Ways to Move the Cursor When Editing Text on an iPad or iPhone
- Use Emergency Bypass and You’ll Never Miss a Call or Text from Important People
- Have You Learned iOS 12’s New Gestures on the iPad?
Do not upgrade to Catalina MacOS 10.15 until we give you the go-ahead. (.2 or .3 ask after Thanksgiving)
iOS 13 Makes Editing Text Easier
Make a Backup before Upgrading to Catalina or iOS 13!
Make a Backup before Upgrading to Catalina or iOS 13!
Confession time. If there’s one topic we can’t stop talking about, it’s backups. Backups are essential, since no one can guarantee that your Mac or iPhone won’t be lost or stolen, be caught in a flood from a broken pipe, or just fail silently. It happens.
You should have a good backup strategy that ensures backups happen regularly, but it’s not paranoid to make double extra sure when you’re doing something that’s more likely to cause problems than everyday activity. And by that we’re thinking about upgrading to a major new operating system, such as macOS 10.15 Catalina or iOS 13.
The reason is simple. As much as Apple tests the heck out of these upgrades, so many files are in play that all it takes is one unexpected glitch to render the entire Mac or iPhone non-functional. Wouldn’t you like to be able to revert instantly if something does go wrong?
Mac Backups before Upgrading
On the Mac side, most people should be using Time Machine. It ensures that you can not only restore your entire drive if necessary but also easily recover a previous version of a corrupted file. The other advantage of having Time Machine backups (and a bootable duplicate, discussed next) is that you can use either to migrate all your apps, data, and settings back to a new installation of macOS, should that become necessary.

As useful as Time Machine is, a bootable duplicate made with SuperDuper or Carbon Copy Cloner is the best insurance right before you upgrade to Catalina. If an installation goes south, you can also boot from your duplicate and get back to work right away.

Finally, although it’s not directly related to backing up before upgrading, we always recommend an offsite backup made via an Internet backup service like Backblaze. This is because a fire or flood would likely destroy your backup drive along with your Mac.
So please, back up your Mac before something goes wrong. It’s fast, easy, and inexpensive to get started, and we’re happy to help.
iOS Backups before Upgrading
Although upgrade-related problems are less common with iPhones and iPads, they can still happen. It’s more likely that you’d drop your little friend accidentally while juggling groceries or forget it after your workout at the gym, but regardless, a backup ensures that you don’t lose precious photos if you’re not using iCloud Photos or My Photo Stream, and backups make migrating to a new device like a fancy new iPhone as painless as possible.
With iOS, though, you don’t need extra software or hardware to make a backup. Apple provides two ways of backing up your iPhone or iPad: iTunes and iCloud. We generally recommend backing up to iCloud if your backups will fit in the free 5 GB of space Apple provides or if you’re already paying for more iCloud space. If you’re not a fan of the cloud or don’t have space, there’s nothing wrong with iTunes backups, though they’re a bit fussier to set up and manage.
There’s also no harm in using both, with iCloud for nightly automatic backups and iTunes for an extra backup just before upgrading to iOS 13 or to a new iPhone or iPad. A second backup can be useful—we’ve seen situations where an iPhone would refuse to restore its files from iTunes but would from iCloud.
To back up to iCloud, go to Settings > Your Name > iCloud > iCloud Backup, turn the switch on, and tap Back Up Now. For backups to happen automatically in the future, you must have sufficient space in your iCloud account (you can buy more), and your device must be on a Wi-Fi network, connected to power, and have its screen locked.

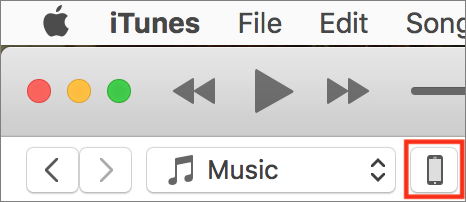
To back up to iTunes, connect your device to your Mac via a Lightning-to-USB cable, launch iTunes, and click the device icon to the right of the media menu.

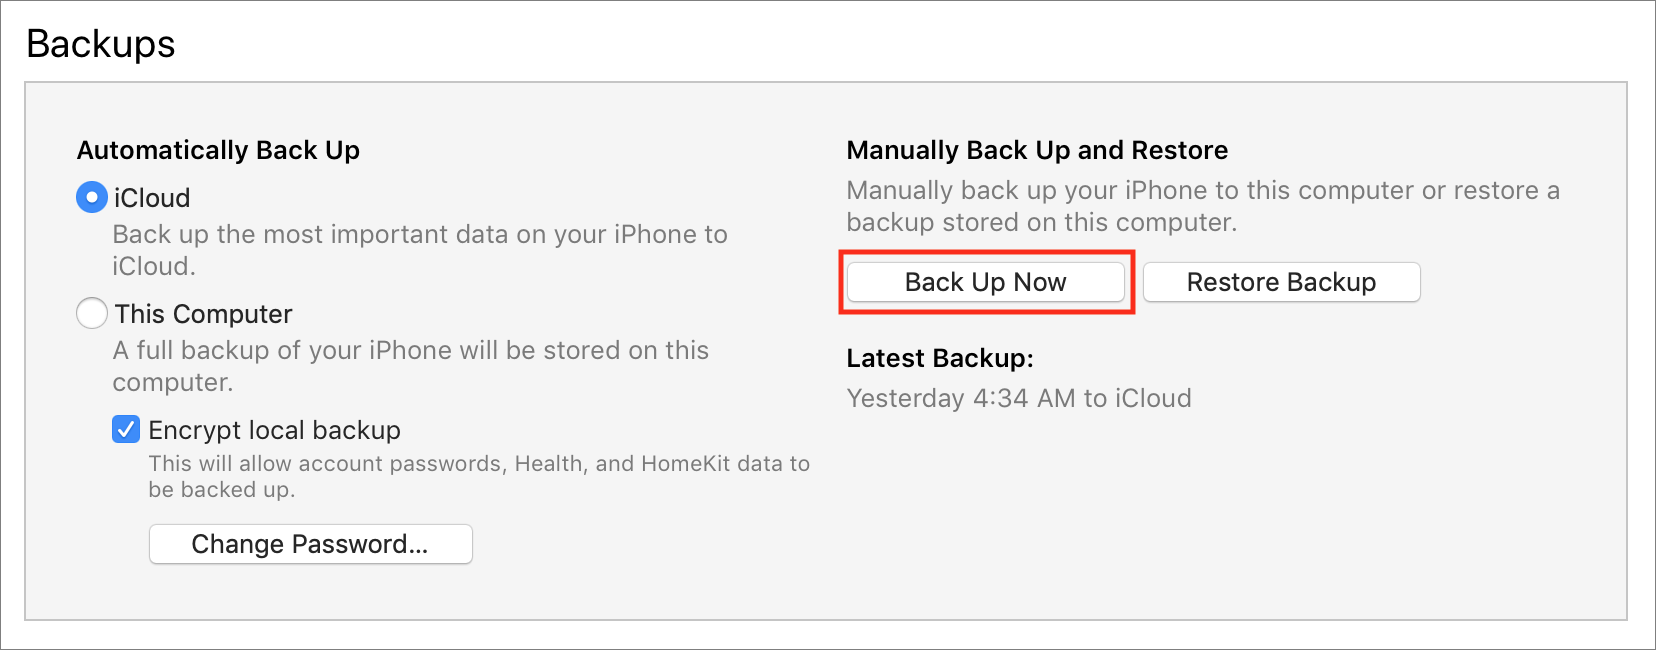
Then, in the Backups section, click the Back Up Now button. If you’re prompted to encrypt your backups, we encourage you to agree since otherwise your backup won’t include passwords, Health information, or HomeKit data. For automatic backups via iTunes, select This Computer. After that, every time you plug into your Mac, it will back up.

The eagle-eyed among you will have noticed that we’re not talking about how to restore if something goes wrong during an upgrade. That’s because it’s impossible to predict exactly what might happen or what state your device will end up in. So if you’re unfortunate enough to have such problems—or to have some other catastrophic failure—get in touch and we’ll be happy to help.
(Featured image based on an original by Alejandro Escamilla on Unsplash)
Just a few of the other 67 times we talk about backup…
- Recover Drive Space by Deleting Old and Unnecessary iOS Device Backups
- Make Sure to Test Your Backup System with Occasional Restores
- Data Backup Strategies Go Only So Far. What’s Your Plan If Your Mac Dies?
And a few all time favorites…
More great tips from the archives…
- Two Secret Key Combos for Forward Delete on the Magic and MacBook Keyboards
- iCloud Photo Library Users: Do NOT Turn Off iCloud
- Ever Wondered Which Words to Capitalize in a Title? Use Capitalize My Title!
- Tips for Setting Up a Comfortable and Effective Home Work Space
- Tips for Better Videoconferencing
- Set Your Preferred Name and Photo for Messages on iOS
- The Fastest Way to Change Wi-Fi Networks in iOS
- What to Put at the End of Your Emails
- Apple Business Manager Is a Win for Apple-Driven Workplaces
- Find Wasted Space with Storage Management
- Forrester Research and IBM Studies Show Macs Are Cheaper than PCs
- Being an Apple User Means You’re Not the Product
- How to Ask for Tech Support So You Get Good Answers Quickly
- Apple Business Manager Is a Win for Apple-Driven Workplaces
The Scoop on the New iPhone 11, Apple Watch Series 5, 7th-gen iPad, and Apple Services
Stop the Freakin Google Calendar Spam
Stop the Freakin Google Calendar Spam
We’re getting loads of gmail users that are seeing fake events show up on their calendars saying they’ve won a feee iPhone or some other useless BS.
You know its a scam – you just want it to go away.
To keep those events from showing up on your google calendar follow these simple steps.
Disable the “automatically add invite” function:
Go to Google Calendar on your computer
Click the cog in the upper right, then hit settings
On the list on the left, click “Event settings”
Look for the “Automatically add invitations” option. Change this to “No, only show invitations to which I have responded”
–Hat Tip to the many users that reported this issue this week. And special thanks to the Security Researcher Bryan Krebs for the fix.
Here are some more quick tips you can use…
More great tips from the archives…
- Two Secret Key Combos for Forward Delete on the Magic and MacBook Keyboards
- iCloud Photo Library Users: Do NOT Turn Off iCloud
- Ever Wondered Which Words to Capitalize in a Title? Use Capitalize My Title!
- Tips for Setting Up a Comfortable and Effective Home Work Space
- Tips for Better Videoconferencing
- Set Your Preferred Name and Photo for Messages on iOS
- The Fastest Way to Change Wi-Fi Networks in iOS
- What to Put at the End of Your Emails
- Apple Business Manager Is a Win for Apple-Driven Workplaces
- Find Wasted Space with Storage Management
- Forrester Research and IBM Studies Show Macs Are Cheaper than PCs
- Being an Apple User Means You’re Not the Product
- How to Ask for Tech Support So You Get Good Answers Quickly
- Apple Business Manager Is a Win for Apple-Driven Workplaces


