
Go Beyond External Hard Drives with Network-Attached Storage

Did You Know You Can Make a Video of Anything on Your iPhone or iPad Screen?

Use macOS’s Guest Account to Protect Your Privacy from Temporary Users
Use macOS’s Guest Account to Protect Your Privacy from Temporary Users
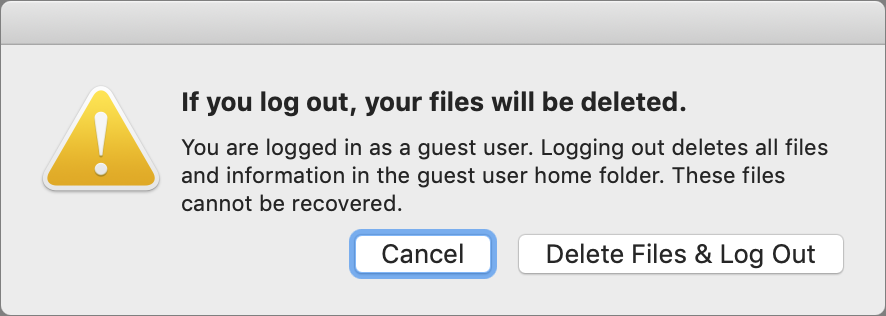
We’ve all had it happen. “Can I use your Mac for a minute to check my email?” The answer can be “Yes,” but to keep people from poking around on your Mac, have your visitor log in as Guest. To enable the Guest account, go to System Preferences > Users & Groups. If the lock at the bottom left is closed, click it and enter your admin credentials. Then click Guest User in the list, and select “Allow guests to log in to this computer.” To switch to the Guest account, go to the Apple menu and choose Log Out YourAccountName to access the login screen. Your guest can then click the Guest User icon, at which point they’ll have a clean account to work in. When they log out, the account—including any files they created or downloaded—will be deleted, thus protecting their privacy as well.
(Featured image by Apple)
More privacy tips…
More great tips from the archives…
- Two Secret Key Combos for Forward Delete on the Magic and MacBook Keyboards
- iCloud Photo Library Users: Do NOT Turn Off iCloud
- Ever Wondered Which Words to Capitalize in a Title? Use Capitalize My Title!
- Tips for Setting Up a Comfortable and Effective Home Work Space
- Tips for Better Videoconferencing
- Set Your Preferred Name and Photo for Messages on iOS
- The Fastest Way to Change Wi-Fi Networks in iOS
- What to Put at the End of Your Emails
- Apple Business Manager Is a Win for Apple-Driven Workplaces
- Find Wasted Space with Storage Management
- Forrester Research and IBM Studies Show Macs Are Cheaper than PCs
- Being an Apple User Means You’re Not the Product
- How to Ask for Tech Support So You Get Good Answers Quickly
- Apple Business Manager Is a Win for Apple-Driven Workplaces
- The Hidden Dangers of Shadow IT on your business
- Need to Stay in Touch? Try One of These Videoconferencing Apps
- Never Send Someone a Password in Mail or Messages: Do This Instead!
- What Are All These New Privacy Request Dialogs in Mojave?
- The Importance of Productivity Tech for Your Road Warriors

Buy Quality Cables to Avoid Possible Device Damage or Even Fires

Use Spotlight on the Mac to Convert Units, Track Flights, Find Movies, and More!

The Secret Trick That Lets You Paste Phone Numbers into the Phone App
The Secret Trick That Lets You Paste Phone Numbers into the Phone App
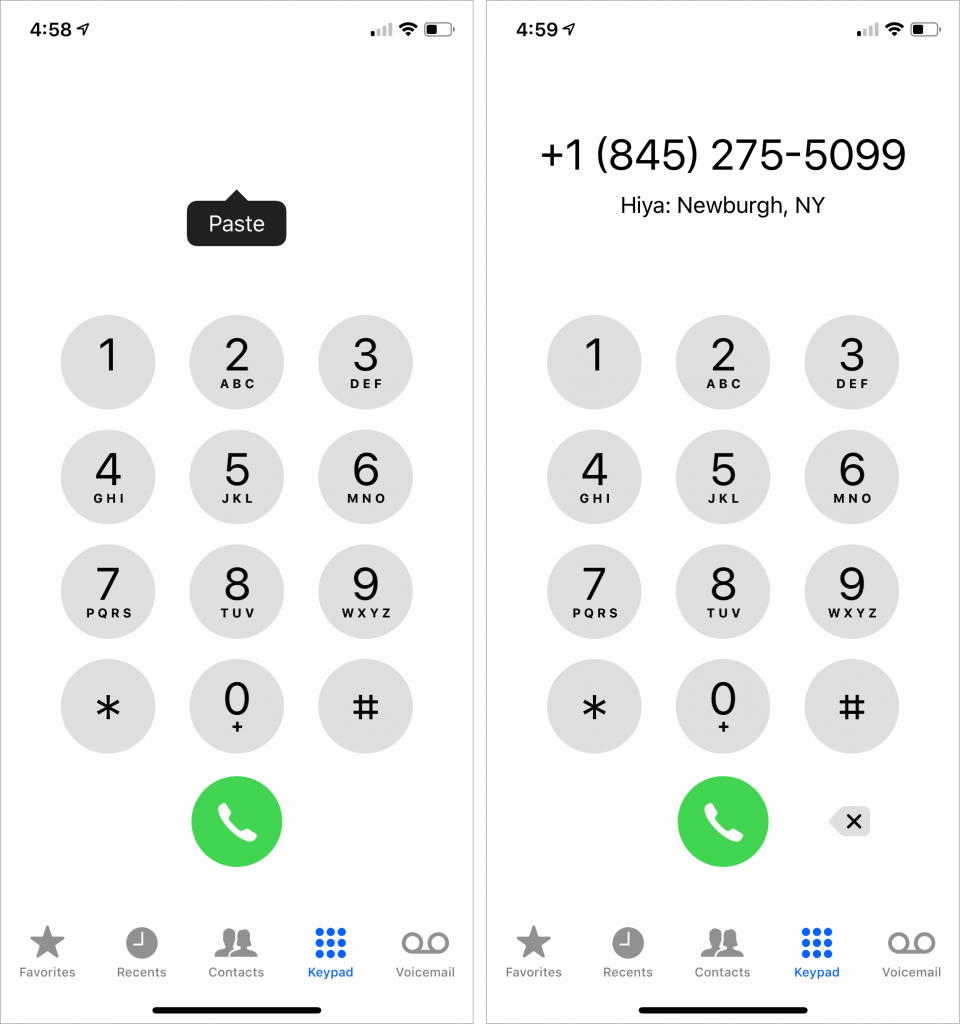
Most iOS apps and many Web sites make phone numbers “hot” so you can tap them to call. But it’s not uncommon to run across a number that’s formatted oddly or broken across a line of text such that it can’t be recognized. Just because iOS can’t recognize it doesn’t mean you have to memorize the number temporarily or flip back and forth to the Phone app to type it in it. Here’s a workaround. Double-tap the start of the phone number to select it, and then drag the rightmost blue handle to extend the selection to the entire number. Tap Copy in the popover that appears to copy it. Then switch to the Phone app, tap Keypad at the bottom, and then tap in the blank white area at the top where typed numbers would appear. When a Paste button appears, tap it, and if the Phone app recognizes the number correctly, tap the green Call button to place the call.
(Featured image by Markus Spiske temporausch.com from Pexels)
Our tips are better than queso on a corn dog.
More great tips from the archives…
- Two Secret Key Combos for Forward Delete on the Magic and MacBook Keyboards
- iCloud Photo Library Users: Do NOT Turn Off iCloud
- Ever Wondered Which Words to Capitalize in a Title? Use Capitalize My Title!
- Tips for Setting Up a Comfortable and Effective Home Work Space
- Tips for Better Videoconferencing
- Set Your Preferred Name and Photo for Messages on iOS
- The Fastest Way to Change Wi-Fi Networks in iOS
- What to Put at the End of Your Emails
- Apple Business Manager Is a Win for Apple-Driven Workplaces
- Find Wasted Space with Storage Management
- Forrester Research and IBM Studies Show Macs Are Cheaper than PCs
- Being an Apple User Means You’re Not the Product
- How to Ask for Tech Support So You Get Good Answers Quickly
- Apple Business Manager Is a Win for Apple-Driven Workplaces
- The Hidden Dangers of Shadow IT on your business
- Need to Stay in Touch? Try One of These Videoconferencing Apps
- Never Send Someone a Password in Mail or Messages: Do This Instead!
- What Are All These New Privacy Request Dialogs in Mojave?
- The Importance of Productivity Tech for Your Road Warriors

Here’s How to See Full URLs in Safari’s Smart Search Field
Here’s How to See Full URLs in Safari’s Smart Search Field
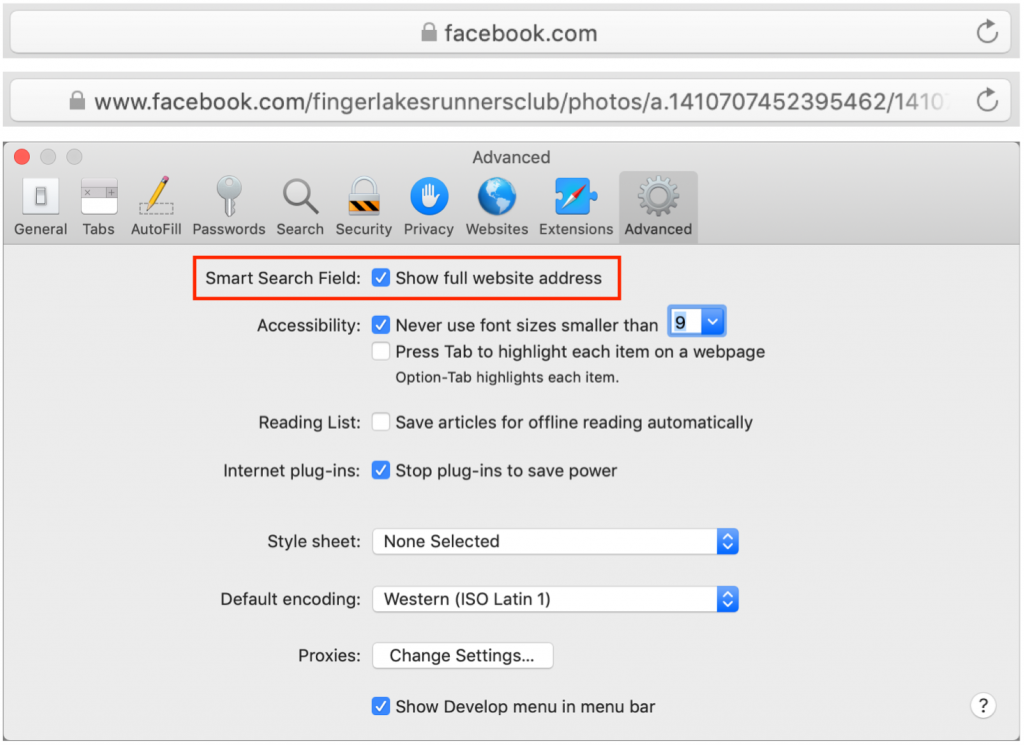
By default, Safari on the Mac hides full Web addresses—technically known as URLs—from you, showing just the site name in the Smart Search field at the top of the window. If you click in the field or press Command-L, the full URL appears, which is good for checking that you’re really where you think you should be and not on some dodgy site. It’s also useful if you need to copy just a portion of the URL to share or otherwise work with. To make that check easier, go to Safari > Preferences > Advanced and next to Smart Search Field, select “Show full website address.” Then you can verify that the URL looks right with a glance.
(Featured image by Matthew T Rader from Pexels)
Tips to help you keep security top of mind…
More great tips from the archives…
- Two Secret Key Combos for Forward Delete on the Magic and MacBook Keyboards
- iCloud Photo Library Users: Do NOT Turn Off iCloud
- Ever Wondered Which Words to Capitalize in a Title? Use Capitalize My Title!
- Tips for Setting Up a Comfortable and Effective Home Work Space
- Tips for Better Videoconferencing
- Set Your Preferred Name and Photo for Messages on iOS
- The Fastest Way to Change Wi-Fi Networks in iOS
- What to Put at the End of Your Emails
- Apple Business Manager Is a Win for Apple-Driven Workplaces
- Find Wasted Space with Storage Management
- Forrester Research and IBM Studies Show Macs Are Cheaper than PCs
- Being an Apple User Means You’re Not the Product
- How to Ask for Tech Support So You Get Good Answers Quickly
- Apple Business Manager Is a Win for Apple-Driven Workplaces
- The Hidden Dangers of Shadow IT on your business
- Need to Stay in Touch? Try One of These Videoconferencing Apps
- Never Send Someone a Password in Mail or Messages: Do This Instead!
- What Are All These New Privacy Request Dialogs in Mojave?
- The Importance of Productivity Tech for Your Road Warriors
Never Send Someone a Password in Mail or Messages: Do This Instead!
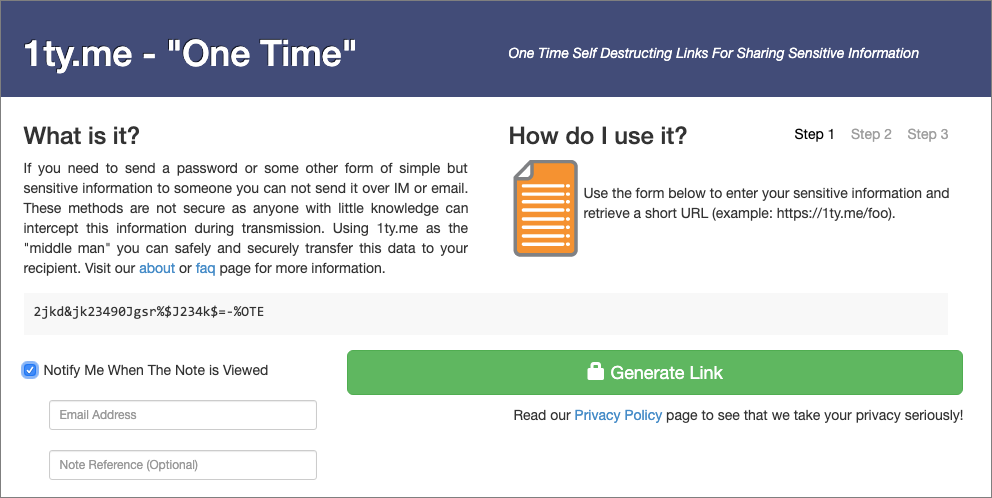
One of the big no-nos with passwords is sending them to other people as plain text in email or a text message conversation. You presumably trust your recipient with the password, but what if their email was hacked or phone stolen? Instead, always use a site like 1ty.me or One-Time Secret, which lets you turn a password into a Web link that can be opened only once. (Not sure about those sites, we have built our very own password sharing site, secret.creativetechs.com that you can use.) Send that link to the recipient, and when they get the password out, they can store it in a secure password manager like 1Password or LastPass.
(Featured image by Kristina Flour on Unsplash)

Some May Like It Hot… But Your Technology Prefers to Stay Cool

Use Dropbox’s Selective Sync to Save Space on Small Drives
Use Dropbox’s Selective Sync to Save Space on Small Drives
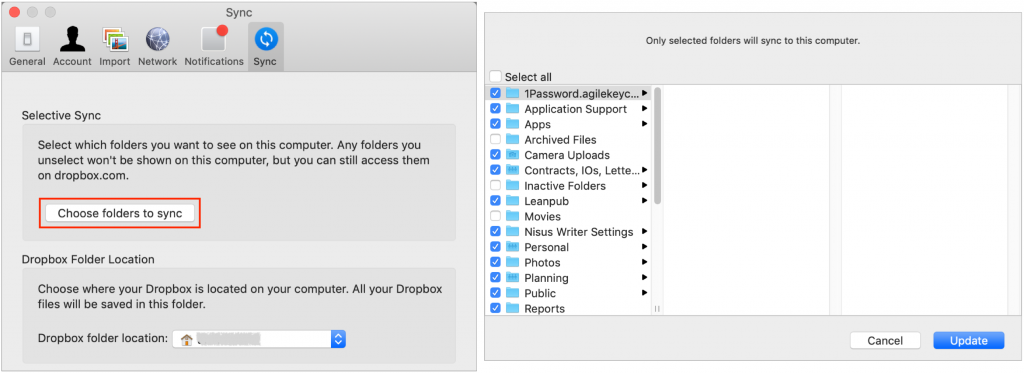
If you’re like many of our clients who use Dropbox intensively, you have a desktop Mac with a large drive and a MacBook with much less drive space. How do you prevent your large Dropbox account from overwhelming the laptop Mac’s available storage? The answer is Dropbox’s Selective Sync feature. On the MacBook, click the Dropbox icon in the menu bar, click your avatar in the upper-right corner, and choose Preferences. In the Preferences window, click Sync and then click the Choose Folders to Sync button. Deselect the folders you want to prevent from syncing to the MacBook and click Update. If you need to access any files in those folders from the MacBook, go to dropbox.com in your Web browser instead, or adjust your Sync preferences to bring in the needed folder.
(Featured image based on a photo by Daniele Levis Pelusi on Unsplash)
How about some other tips while you are here?
- Is Your Photos Library Too Big? Here’s How to Move It to an External Hard Drive
- Running Low on Space on Your Mac? Here’s How to Clear Unnecessary Data
- Six Tips for Writing Better Email
- What to Do If You Run Low on iCloud Storage Space