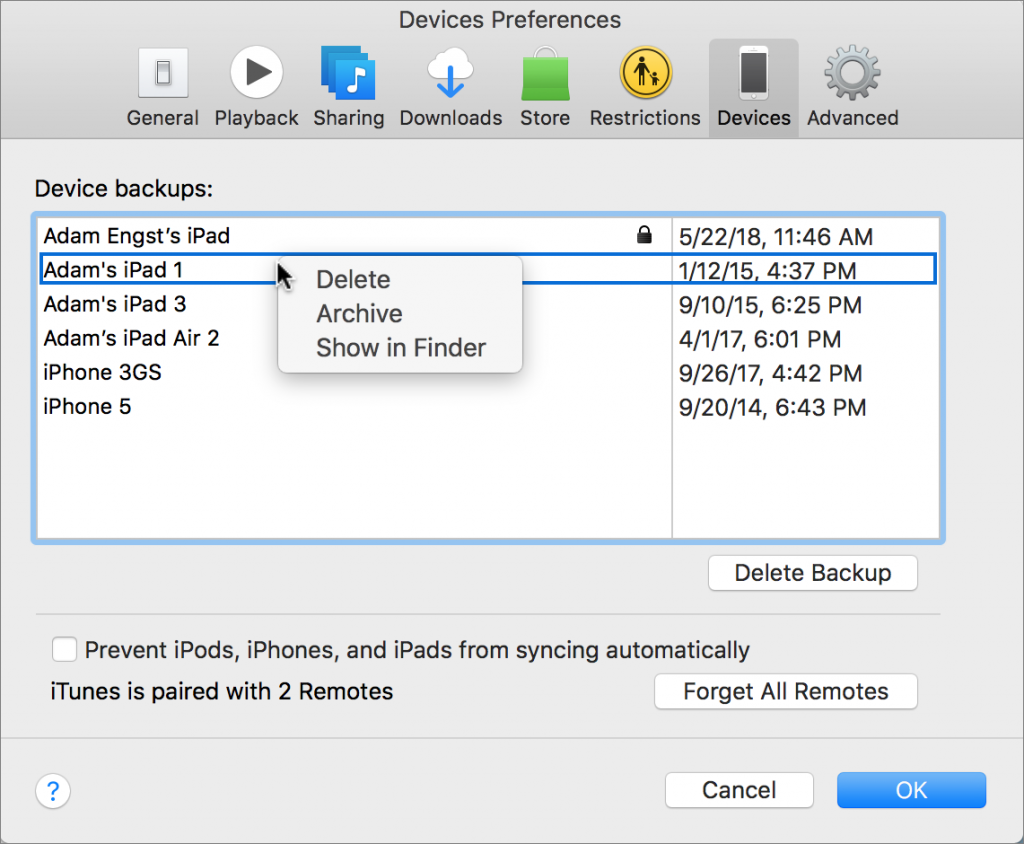
If you’ve been good about backing up your iOS devices to iTunes on your Mac or to iCloud, give yourself a gold star! Both backup destinations are fine, but there’s one potential downside to iTunes backups: they can consume a lot of space on your Mac’s drive. In iTunes, go to iTunes > Preferences > Devices, where you’ll see all the iOS device backups that iTunes has stored. If there are multiple older backups or any for devices you no longer own, you can get rid of them. Control-click the offending backup, and choose Delete. Or, if you want to check how large a backup is first, instead choose Show In Finder, and then in the Finder, choose File > Get Info. When you’re ready, move the selected backup folder to the Trash.
Three Ways to Tell If You Should Get a New iPhone Battery before 2019
Are you happy with your iPhone’s battery life? If your iPhone regularly ends up in Low Power Mode or doesn’t always make it to the end of the day without extra juice, read on to learn how to determine when it’s time for a new battery.
It may be important to get to this soon because people with an iPhone 6, SE, 6s, 7, 8, or X can likely get Apple to replace the battery for just $29 through December 31st, 2018—the price will go up in 2019. (The cost is $79 for even older iPhones; non-Apple repair shops may be less expensive, but it’s generally better to stick with Apple’s parts and service providers.) That $29 price is thanks to a discount program Apple instituted in January 2018 as an apology for silently reducing the performance of the iPhone 6 and later in an effort to prevent them from shutting down due to weak batteries. See Apple’s A Message to Our Customers about iPhone Batteries and Performance for details.
Here are the top three signs that you need a new battery right away.
1. Your iPhone Is Bulging
This one is obvious and possibly dangerous. If the lithium-ion battery in your iPhone is defective or damaged, it can swell due to outgassing or other chemical reactions. In the worst case, a swollen battery can catch fire or explode—it’s why airlines are concerned about batteries in luggage.
If you notice your iPhone is swelling, you need to deal with it immediately. Power it off and place it in a fireproof container. Then take it to a repair professional or an Apple store right away, or call us for advice on how best to proceed.
2. Your Older iPhone Has Lousy Battery Life or Shuts Down Unexpectedly
Generally speaking, iPhone batteries last a few years without losing too much capacity. However, if your iPhone’s battery drains well before the end of the day, or if it shuts off unexpectedly, that’s a sign that you may need to replace the battery.
Before you do that, go to Settings > Battery and look at battery usage by app, which shows which apps have consumed the most power for the last 24 hours or the last 10 days. Tap Show Activity to see how many minutes the app was in use.
If anything near the top of that list seems odd—it’s not an app you use much or its background activity is excessive—consider force-quitting the app. (Open the app switcher by double-pressing the Home button on a Touch ID iPhone or swiping up and slightly right on a Face ID iPhone, then swipe up on the app’s thumbnail.) You might also disable that app’s switch in Settings > General > Background App Refresh.
But if your iPhone is more than a few years old, it’s probably time for a new battery. Batteries are consumable items, and Apple designs the iPhone to retain up to 80% of its original capacity after 500 complete charge cycles (from 0% to 100%, even if that comes over the course of several charging sessions). Don’t suffer with a weak battery—just get it replaced.
3. An iPhone 6 or Later Feels Sluggish
Starting with iOS 10.2.1, Apple changed things so the iPhone 6 and later would reduce performance to avoid peak power demands that could overwhelm an older battery and cause the iPhone to shut down unexpectedly. Not shutting down is good, but reducing performance is bad.
So if you have an iPhone 6 or later that feels poky, it may be iOS throttling performance to work around a weak battery. With iOS 11.3 or later on these iPhone models, you can go to Settings > Battery > Battery Health to learn more about your battery. iOS displays your maximum battery capacity and, under Peak Performance Capability, tells you if it has enabled performance management to avoid shutdowns. That’s a hint you need a new battery, and we’d be concerned about any maximum capacity under 90%.
iOS lets you disable performance management to avoid the throttling, but it’s nuts to do that and risk unexpected shutdowns. Just replace the battery and your performance will return to normal.
Apple will replace an iPhone battery for free under warranty only if its maximum capacity is under 80% and it has had fewer than 500 charge cycles. However, as previously noted, the company will replace an out-of-warranty battery in the iPhone 6 and later for $29 (plus $6.95 if shipping is required) through the end of 2018, so it’s worth taking advantage of the deal this month. In 2019, the price will go up to $49 for most iPhones and $69 for the iPhone X.
So hey, don’t suffer with an iPhone that’s working poorly due to the battery!
Don’t Freak Out If You Get Blackmail Spam Containing an Old Password
Have you gotten an email message whose Subject line says something like “Change your password immediately! Your account has been hacked.”? If not, it may be only a matter of time before you do. It’s a scary message, especially because it contains one of your passwords, some threats, and a demand for money. Worse, the password is likely one you’ve used in the past—how could the hacker have discovered it? Has your Mac really been taken over?
Relax. There’s nothing to worry about.
This “blackmail spam” has been making the rounds on the Internet recently—we’ve heard from several clients who have received it, and we’ve gotten copies too. The message purports to be from a hacker who has taken over your Mac and installed spyware that has recorded you visiting Web sites that aren’t exactly G-rated. The hacker also claims to have used your Mac’s camera to photograph you while you’re browsing said non-G-rated sites and threatens to share those pictures with your contacts and erase your drive unless you pay a ransom using Bitcoin.
This blackmail spam has raised so many pulses because it backs up its claims by showing a password that you’ve used in the past. Hopefully, it’s not one that you’re still using, because it was extracted from one of the hundreds of password breaches that have occurred over the past decade. Impacted Web sites include big names such as Yahoo, LinkedIn, Adobe, Dropbox, Disqus, and Tumblr—thieves have collectively stolen over 5.5 billion accounts. It’s all too likely that some old password of yours was caught up in one of those thefts.
Concerning as the message sounds, all the details other than your email address and password are completely fabricated. Your Mac has not been hacked. There is no malware spying on your every move. No pictures of you have been uploaded to a remote server. Your hard drive will not be erased. In short, you have nothing to worry about, and you should just mark the message as spam.
However, if you’re still using the password that appeared in the message, that is cause for concern. It means that any automated hacking software could break into the associated account, and it must be a weak password if the bad guys were able to decrypt it from the stolen password files. Go to Have I Been Pwned and search for your email address. If it shows up for any breaches, make sure you’ve changed your password for those accounts.
As always, we recommend that you create a strong, unique password for each of your Web accounts. The easiest way to do this is to rely on a password manager like 1Password or LastPass to generate a random password. Then, when you want to go back to that site, the password manager can log you in automatically. It’s easier and more secure.
If you’re still concerned about your passwords, call us and we can help you get started with stronger security practices.
The Best Apple-Related Gifts for 2018
Black Friday and the start of the holiday shopping seasons are nearly upon us. If you’re looking for gift ideas for your Apple-using loved ones, we have a few suggestions that are guaranteed to be popular.
Apple Watch
The new Apple Watch Series 4 may be the gift hit of the season as adult children buy it for aging parents. That’s happening due to the Apple Watch’s health monitoring capabilities, which include fall detection, atrial fibrillation detection, and (soon) the capability to record electrocardiograms. It may seem expensive at $399 for the Wi-Fi version or $499 for the cellular version that can call emergency services even if its companion iPhone isn’t nearby, but the cost pales in comparison with the price of any medical event.
For those who are more interested in the Apple Watch’s fitness and communication features, last year’s Apple Watch Series 3 now starts at just $279 for Wi-Fi and $379 for cellular. It lacks the health monitoring features of the Series 4, but those are overkill for most young, healthy people. The cellular version is worthwhile only if you’re certain the recipient will make use of the watch while out and about without the iPhone, since its data plan costs $10 extra per month.
And, if someone on your gift list already has an Apple Watch, a new band would make a great present—Apple offers a wide variety of attractive and comfortable bands.
HomePod
Apple’s smart speaker may not be as popular as the Amazon Echo and Google Home, but it sounds way better than its cheaper competition. Apple designed it to work with the $9.99 per month Apple Music service so if your recipient doesn’t already subscribe to Apple Music, you could include a subscription as part of the gift. The HomePod is available in black or white, and it’s super simple to set up and use via Siri for music, podcasts, speakerphone calls, kitchen timers, and a whole lot more.
Stocking Stuffer Accessories
You might not get the same “Wow!” factor with these gifts, but Apple’s focus on minimalist design has created a situation where many users find themselves frustrated by the lack of the right cable or adapter.
iPhone users might appreciate an extra Lightning charging cable or a Lightning-to-headphone adapter to take advantage of inexpensive earbuds. And those who rely on a MacBook with USB-C or a MacBook Pro with Thunderbolt 3 are usually desperate for USB-C or Thunderbolt 3 cables and adapters. Some of the most popular convert USB-C to USB-A for many devices, USB-C to HDMI for large-screen displays, and Thunderbolt 2 to Thunderbolt 3 for older Thunderbolt hard drives. Ask first to find out what they find most annoying!
Plus, a second iPhone, Mac, or Apple Watch charger can help reduce battery anxiety and make it easier to pack one for trips.
AirPods
One of the most popular Apple products of late has been the AirPods, svelte wireless earbuds that pair quickly and seamlessly to all Apple devices logged in to the same iCloud account. They’re light, stay in the ear well, and are comfortable even for many people who can’t wear the wired EarPods. At $159, they’re not cheap, but they’re less expensive than many competing wireless earbuds.
Apple TV
Despite its age, the $149 fourth-generation Apple TV still makes a good present for anyone who watches TV shows and movies from Netflix, iTunes, Hulu, and other Internet streaming video services. It’s also great for sharing photos or videos from an iPhone or iPad on the big screen via AirPlay. Unless your recipient has or is likely to get a compatible 4K HDR TV, skip the $179 Apple TV 4K since it provides no benefits on older TV screens.
For the friend or family member who already has an Apple TV, search for silicone cases that protect the brittle Siri Remote and make it easier to orient in the dark.
iPad
Last, but far from least, if someone in your family has never tried an iPad or is limping along with an early model, the current sixth-generation iPad combines good performance and a gorgeous screen starting at just $329.
It’s also compatible with the original $99 Apple Pencil, so if your recipient has an artistic bent, consider adding Apple’s stylus and maybe a painting app.
Of course, particularly if you’re buying an iPad for a child, a protective case is a must, and even for adults, a good case can provide peace of mind and hold the iPad in convenient positions for reading books or watching movies.
Social Media: Looking for the perfect gift for that special Apple user in your life? Here are our choices for the best gifts.
Here’s How to Make Screenshots and Screen Recordings with Mojave’s New Interface
You probably fall into one of two camps: people who haven’t the foggiest idea what pressing Command-Shift-3 or Command-Shift-4 do on the Mac, and those who use those keyboard shortcuts regularly to take screenshots. Either way, macOS 10.14 Mojave makes it easier than ever to create a still image of what’s on your Mac’s screen and to record a video of actions you take on the screen. (And don’t worry, the old shortcuts still work just as they always have.)
For those who aren’t screenshot takers, why would you want to? The big reason is to share something you’re looking at, perhaps to send a friend a map to where in a park you want to meet or to tell tech support about the error dialog you keep getting. And a screen recording is a great way to show an employee how to perform a task without having to write it all up.
To start with Mojave’s new tools, press Command-Shift-5 and look at the controls that appear in a floating control bar. (If you open it accidentally, click the X button or press Escape to close it.)
Screenshots
The first three buttons help you take screenshots, with a few welcome enhancements over the Mac’s longstanding screenshot capabilities. The resulting screenshot will always be in PNG format.
- Capture Entire Screen: Click the first button and then click anywhere to make a screenshot of the entire screen. If you have a second monitor attached to your Mac, you can click anywhere on that screen to capture it instead.
- Capture Selected Window: To focus on a particular window, click the second button and then click the camera pointer on the desired window. This also works with dialogs and menus; make sure they’re visible before invoking the screenshot controls. A tip: press the Option key when clicking the camera pointer to capture the object without its drop shadow.
- Capture Selected Portion: What if neither of those is quite right? Click the third button, drag out, position, and resize the selection rectangle over the spot you want, and click Capture on the control bar. Note how the rectangle shows the dimensions of the image it will create as you resize—that can be useful.
There’s also an Options menu on the control bar. Click it to choose which folder or app should receive the screenshot and if you need a 5- or 10-second timer to get the screen looking right first. You can also choose to show a floating thumbnail of the screenshot in the lower-right corner of the screen for quick markup or trashing, remember the size and location of the selection rectangle, and show the pointer in the screenshot.
Screen Recordings
The fourth and fifth buttons are for creating screen recordings, and they’re similar to the screen capture choices. When you select one of them, the contents of the Options menu change, and the Capture button changes to Record. The movie will always be a QuickTime movie using the H.264 codec.
- Record Entire Screen: Click the fourth button and then Record to start recording actions on the entire screen.
- Record Selected Portion: The problem with recording the entire screen is that the resulting file can get big. To focus on a small area of the screen, click the fifth button. Then drag out, position, and resize the rectangle in which the recording will take place, and finally, click Record.
However you start a recording, you can stop it in one of two ways. A stop button always appears on the menu bar; click it to finish and save the recording. On a smaller laptop screen, it’s possible for the menu bar button to be obscured, so here’s an alternative method: press Command-Shift-5 again, and the recording controls are replaced by a stop button.
You can record yourself speaking while you make a movie of what’s happening on the screen. To do that, open the Options menu and choose Built-in Microphone. Another special movie recording option is Show Mouse Clicks, which puts a dark circle around the pointer in the recording whenever you click.
That’s it! Mojave’s new screenshot and screen recording controls offer more options and are easier to use than the previous techniques, as long as you remember the Command-Shift-5 keyboard shortcut to bring them up. Practice that a few times, and you’ll be ready the next time you want to capture a funny dialog or strange occurrence on your Mac.
Need to Limit How Much Your Kids Use Their Devices? Use Screen Time in iOS 12
It’s a constant refrain in many homes—a kid clamoring to use an iPad or iPhone to play games, watch videos, or chat with friends. As a parent, you know too much screen time is bad, especially when it affects homework or family dinners. At the same time, an iOS device may be essential for communication and schoolwork.
In iOS 12, Apple introduced Screen Time, which shows how much time you spend on your own device, and helps you control your usage—see our recent article for details. But Screen Time also has parental controls. They’re best managed with Family Sharing from your own iOS device, so if you haven’t already done so, tap Settings > YourName > Set Up Family Sharing and follow the instructions. (You can also set up Screen Time directly on the child’s device—tap Use Screen Time Passcode to set a passcode that prevents the child from overriding limits.)
With Family Sharing set up, go to Settings > Screen Time and notice your children’s names in the new Family section. Tap a child’s name to set Screen Time limitations and restrictions on their iOS devices. Initially, Screen Time walks you through an assistant that explains the main features and helps you set some basic limitations. It also prompts you to create a four-digit parent passcode, which you’ll need to adjust settings in the future or override time limits.
Subsequently, when you tap your child’s name, you’ll see Screen Time’s standard sections for Downtime, App Limits, Always Allowed, and Content & Privacy Restrictions. For a full explanation of the first three, see our previous article; we’ll focus on what’s different for children and on Content & Privacy Restrictions here.
Downtime
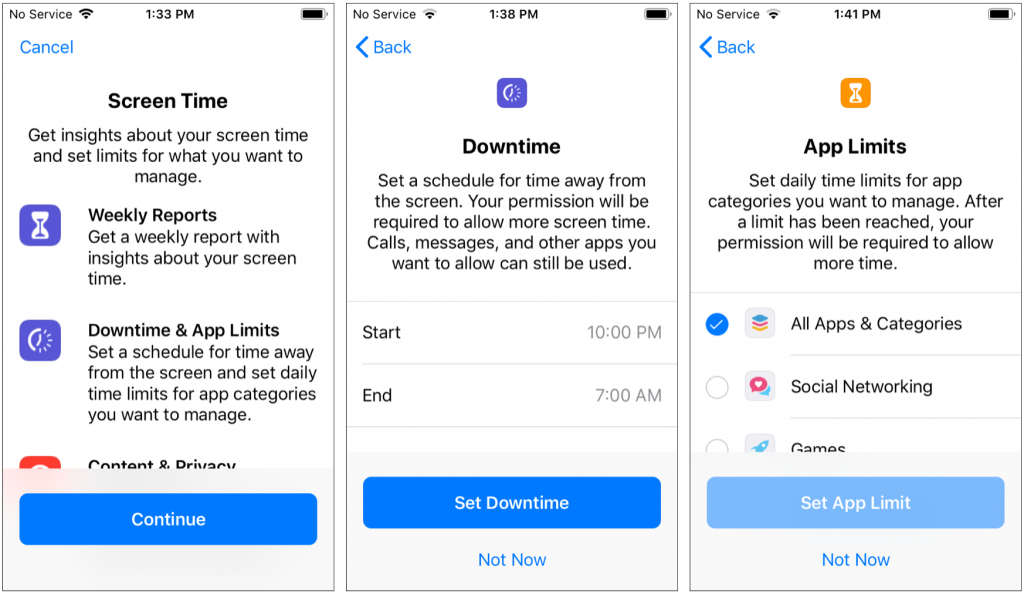
Downtime is useful for blocking all device usage during a time when your child should be sleeping, doing homework, or just not using the screen. You can set only one time period, so if you want to control usage on a more complex schedule, you’ll need to do that in another way.
For a child, the Downtime screen has a Block at Downtime option that you must enable to actually block access to the device during the scheduled time. If it’s off, and the child tries to use the device during that time, they’ll be able to tap Ignore Limit just like an adult can. That might be appropriate for a teenager who may need to check email late at night to find details for tomorrow’s sports practice. With Block at Downtime on, however, the only override is with the parent passcode.
App Limits
As our previous article noted, App Limits specify how long a category of apps—or a specific app—may be used each day, with the time resetting at midnight. For children, you might want to try restricting nothing for a week, and see what apps they’re using and for how long. Then have “the talk” about appropriate use of digital devices and agree on limits.
You can tap Customize Days to allow more time on weekends, for instance, and you can exempt an app from all limitations in the Always Allowed screen.
Once your child hits an app limit, Screen Time will block them from using the app, with the only override being your parent passcode.
Content & Privacy Restrictions
Here’s where you’ll find all the previous parental controls, which let you turn on a wide variety of restrictions. To get started, enable the Content & Privacy Restrictions switch. There are three basic sections here:
- Store and Content Restrictions: Use these to control app downloading and deletion, what sort of content can be downloaded from Apple’s online stores, whether or not Web content should be filtered, and more.
- Privacy Restrictions: The entries here depend on what apps are installed, but the main question is if you want to allow location sharing.
- Allow Changes: These items relate to settings on the iOS device itself. You might want to disallow passcode and account changes, and volume limit changes, if you’ve set a maximum volume in Settings > Music > Volume Limit.
Reports
At the top of its main screen for the child, Screen Time reports on usage for both the current day and the last 7 days, showing a graph of screen time by hour or day, with color coding to indicate which app categories were in use. Review this report regularly to see if you need to adjust the Downtime or App Limit settings. Your child can also check the same report directly on their device in Settings > Screen Time.
Screen Time’s controls are good but not perfect. Enterprising kids have discovered workarounds such as changing the device’s time setting and deleting and redownloading apps. So don’t see Screen Time as a guaranteed technological solution—it’s just another tool in your parenting toolkit.
What Are All These New Privacy Request Dialogs in Mojave?
With macOS 10.14 Mojave, Apple has beefed up the Mac’s privacy so it more closely resembles privacy in iOS. You’ve noticed that when you launch a new app on your iPhone or iPad, it often prompts for access to your photos or contacts, the camera or microphone, and more. The idea behind those prompts is that you should always be aware of how a particular app can access your personal data or features of your device. You might not want to let some new game thumb through your photos or record your voice.
macOS has been heading in this direction, but Mojave makes apps play this “Mother, May I?” game in more ways. As a result, particularly after you first upgrade, you may be bombarded with dialogs asking for various permissions. For instance, when you first make a video call with Skype, it’s going to ask for access to the camera and the microphone. Grant permission and Skype won’t have to ask again.
Skype’s requests are entirely reasonable—it wouldn’t be able to do its job without such access. That applies more generally, too. In most cases, apps will ask for access for a good reason, and if you want the app to function properly, you should give it access.
However, be wary if a permission dialog appears when:
- You haven’t just launched a new app
- You aren’t doing anything related to the request
- You don’t recognize the app making the request
There’s no harm in denying access; the worst that can happen is that the app won’t work. (And if it’s malicious, you don’t want it to work!) You can always grant permission later.
To see which permissions you’ve granted or denied, open System Preferences > Security & Privacy > Privacy. A list of categories appears on the left; click one to see which apps have requested access. If you’ve granted access, the checkbox next to the app will be selected; otherwise it will be empty.
You’ll notice that the lock in the lower-left corner is closed. To make changes, click it and sign in as an administrator when prompted.
Most of these categories are self-explanatory, but it might not always be obvious why an app wants permission. In the screenshot above, for instance, Google Chrome has been granted access to the Mac’s camera. Why? So Google Hangouts and other Web-based video-conferencing services can work.
There are five categories (including three not showing above) that could use additional explanation:
- Accessibility: Apps that request accessibility access want to control your Mac. In essence, they want to be able to pretend to click the mouse, type on the keyboard, and generally act like a user. Utility and automation software often needs such access.
- Full Disk Access: This category is a catch-all for access to areas on your drive that aren’t normally available to apps, such as data in Mail, Messages, Safari, Home, and more, including Time Machine backups and some admin settings. Backup and synchronization utilities may need full disk access, in particular. An app can’t request full disk access in the normal way; you must add it manually by clicking the + button under the list and navigating to the app in the Applications folder.
- Automation: The Mac has long had a way for apps to communicate with and control one another: Apple events. An app could theoretically steal information from another via Apple events, so Mojave added the Automation category to give you control over which apps can control which other apps. You’ll see normal permission requests, but they’ll explain both sides of the communication.
- Analytics: The Analytics privacy settings are completely different—they let you specify whether or not you want to share information about how you use apps with Apple and the developers of the apps you use. For most people, it’s fine to allow this sharing.
- Advertising: Finally, the Advertising options give you some control over the ads that you may see in Apple apps. In general, we recommend selecting Limit Ad Tracking, and if you click Reset Advertising Identifier, any future connection between you and the ads you’ve seen will be severed from past data. There’s no harm in doing it. It’s worth clicking the View Ad Information and About Advertising and Privacy buttons to learn more about what Apple does with ads.
So if you’ve been seeing repeated requests for permission after you upgraded to Mojave, now you know why these dialogs keep popping up. They’re a bit annoying at first, but the added privacy is worthwhile, and once you’ve granted permission to an app, you shouldn’t hear from it again.
So What Are All Those Stacks of Notifications in iOS 12?
It can be easy to become overwhelmed by iOS notifications, particularly if you have chatty friends or apps. In iOS 12, Apple corralled notifications by grouping them into stacks so you no longer see an endless screen of alerts. To expand a stack of notifications on either the Lock screen or in Notification Center (swipe down from the top of the screen), tap the stack. Once you’ve expanded a stack, you can tap Show Less to restack it, tap the X button to remove the entire stack, or tap any individual notification to open it. By default, iOS 12 groups notifications intelligently, which might entail separate stacks for different Messages conversations, for instance. If that’s still too much, you can go to Settings > Notifications > App Name > Notification Grouping and tap By App to collect every notification from the app into the same stack.
Did You Know iOS 12 Lets You Add a Second Person to Face ID?
Touch ID lets users register up to five fingers that can unlock an iPhone, which has long been a boon for those who share access to their iPhone with trusted family members. However, users of the iPhone X haven’t been able to give a second person Face ID-based access, forcing those people to wait for Face ID to fail and then tap in a passcode manually. iOS 12 lifts that limitation, allowing a second person to register their face with Face ID on the iPhone X and the new iPhone XR, XS, and XS Max. To set this up, go to Settings > Face ID & Passcode. Enter your passcode and tap Set Up an Alternate Appearance. Then give your iPhone to the person who should have access and have them follow the simple setup directions.