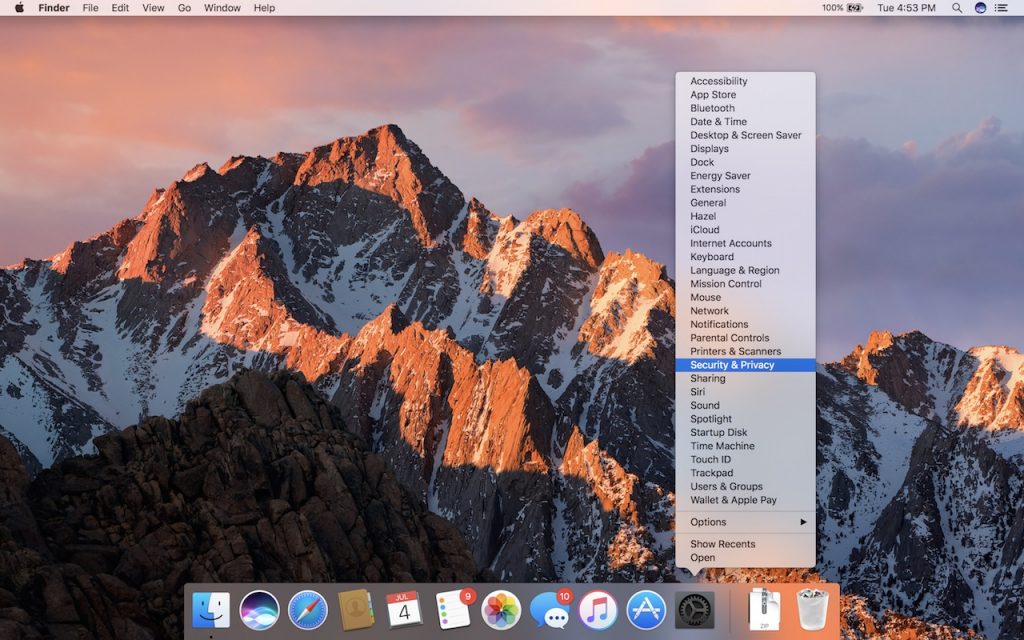
The Mac’s Dock gives you quick access to frequently used apps, documents, and folders, and makes it easy to switch to a running app. In macOS 10.14 Mojave, the Dock has another feature: a list of apps you’ve used recently that aren’t on your default Dock. Icons for these apps appear between your Dock’s default apps and any documents or folders that you’ve added—look closely and you’ll notice subtle lines in the Dock that delineate this area. It always holds at least three apps, but expands to hold as many launched apps (note the subtle dot under the icon) as necessary; as you quit apps, their icons disappear until you’re back down to three. If you don’t like this change, turn off “Show recent applications in Dock” in System Preferences > Dock.
iCloud Photo Library Users: Do NOT Turn Off iCloud
File this warning under “unless it’s absolutely necessary.” If you use iCloud Photo Library on your Mac, don’t sign out from iCloud. Also, don’t deselect the iCloud Photo Library checkbox in either the Photos options of the iCloud pane of System Preferences or in the iCloud preferences in Photos itself. Why not? Because, when you re-enable iCloud or iCloud Photo Library, Photos will re-upload all your photos, which could take days. (It’s not really re-uploading all of them, but even just resyncing will take a long time.) Worse, if you don’t have enough space in iCloud for your entire Photos library again, you’ll have to upgrade to a larger plan temporarily, resync, and then downgrade to your previous plan. Apple will refund you the cost of the upgrade, but you’ll have to work with support to get reimbursed. Read more at TidBITS.
Bye, Bye Server App! How to Run A Secure File Storage Server Without macOS Server VPN.
It’s been coming since 2010—That’s when Steve Jobs announced that Apple was going to kill XServe, its enterprise-level server hardware solution.
Ever since that time, Apple has been slowly backing away from the server market.
This slow death of Apple server ambitions has now come full circle for individuals and small businesses with the release of an Apple support memo that states, “A number of services will be deprecated, and will be hidden on new installations of an update to macOS Server coming in spring 2018.”
What does this mean?
Apple is getting rid of many of the functions that individuals, small businesses, educational institutions, and software developers currently rely on to get things done.
But they aren’t just hitting the “delete” button.
If you already have these functions set up, you’ll still be able to use them with the spring 2018 release. Apple’s just going to make it difficult for you by hiding the “deprecated services.”
Basically, Apple wants us to forget that this functionality was once available, and wean the public off the macOS Server. Eventually, as fewer and fewer users are tied to the functions of the macOS Server, they will be discontinued entirely.
What is the rationale for getting rid of macOS Server functionality?
In its support memo, Apple tells us that they are going to “focus more on the management of computers, devices, and storage on your network.”
Apple ran the numbers and realizes that the money lies in selling and serving the iPhone, iPad, and Apple computers – not in server functionality.
The functionalities that are going by the wayside with the new macOS update are as follows:
- Calendar
- Contacts
- DHCP – Dynamic Host Configuration Protocol
- DNS
- Instant Messaging
- NetInstall
- VPN
- Website Hosting
- Wiki
Apple provided a list of “potential replacements” in their support memo.
But the BIG question is: How can we get secure file access without the macOS Server VPN?
These macOS Server changes impact system admins who will lose some or all of the macOS Server tools they depend on, and the businesses they serve could be negatively affected.
At one time, Apple claimed that the macOS Server was, “so easy to use, you don’t need your own IT department.”
Now you’re going to need an outsourced IT professional, like those at {company}, to help you figure out your next steps and how to allow secure file access.
To help us out, Apple has provided three options for VPN alternatives to the macOS Server VPN function:
This network tunneling VPN software option is compatible with iOS, Windows, Mac, Android, and Linux. Regarding security, it allows for granular remote access and connects to either your cloud assets or your company’s internal network. One of the prominent features of this VPN option is the onboard, fine-grained access control.
This open source VPN option works across platforms (FreeBSD, Solaris Windows, Linux, and Mac) to deliver multi-protocol VPN functionality. SoftEther gives you mobile device compatibility through L2TP/IPsec server function. Part of the attraction of this VPN option is the low latency, fast throughput, and Nat-traversal firewall resistance.
This software is used to encrypt traffic to and from high volume servers. It protects the user against passive attacks where criminals are eavesdropping on communications. Part of the attraction of Tcpcrypt is that they claim it, “requires no configuration…has no NAT issues…has very high performance (up to 25x faster than SSL).”
So, how do you run a secure file storage server without macOS Server VPN?
Apple certainly hasn’t given us much to go on in its recent support memo. The third-party VPN and encrypted traffic software options provided by Apple are certainly useful to the IT professional and systems administrator, but not to the home-based business owner or individual user who was enjoying the macOS Server VPN capabilities.
With Apple’s announcement to phase out macOS Server functionality, it leaves us with the question of file collaboration for small to mid-size businesses.
There are several ways that an IT professional – such as the IT support team at {company} – can enable the Mac users in your business to access and edit documents, spreadsheets, presentations, and databases in-house or on the move. Here are just a few of those alternatives:
- Cloud-Based File Sharing Applications – These applications have become increasingly popular. You likely already use a home version of at least one of them – like DropBox, Google Drive, or com.
- Office 365 – Office 365 is compatible across platforms and was built with secure file collaboration in mind. No need to go to the office to get your data – it’s all there at the touch of a button. Businesses worldwide have moved away from VPN and now rely solely on Office 365.
- Remote Access Models – These popular cloud-based applications allow access to your home or office computer through a web interface. Options include companies like GoToMyPC, RemotePC, and LogMeIn.
As Apple takes its final walk away from server offerings, we realize that it is no longer a competitor in enterprise-level computing. Sure, Apple devices will always be used, but for now, they are peripheral to the server and cloud assets that are at the core of enterprise computing. However, Apple still holds the market share – and the hearts – of creative individuals and industries that have relied on Macs for years.
The experts at {company} will show you how to store data securely, access it freely, and collaborate instantly with colleagues. Enjoy the freedom of mobility while having everything you need at your fingertips – wherever you go. Contact us at {phone} or send an email to {email} to get started.
Swipe Back and Forth between Web Pages for Easier Navigation
For navigation, every Web browser offers back and forward buttons, generally represented by arrows in the upper left of the toolbar. You can also navigate by choosing menu commands and typing keyboard shortcuts—did you know that Command-Left arrow and Command-Right arrow work too? But if you’re using a Mac with a trackpad, you can move back and forth between Web pages—in Safari, Chrome, and Firefox—with a two-fingered swipe left (for back) or right (for forward). If you prefer, you can switch to a three-fingered swipe in System Preferences > Trackpad > More Gestures. Or, if it’s difficult for you to keep exactly two or precisely three fingers on the trackpad, you can choose to swipe with two or three fingers.
Trading Faces: Picking a Better Face for People Photos Recognizes
Apple’s Photos app is remarkably good at identifying people in your snapshots and collecting all the pictures that contain a particular person into a group in its People view. At its top level, the People view shows a thumbnail photo for each person, picking one automatically from all the available photos. Needless to say, it doesn’t always pick the photo you want, so if you dislike what’s there, you can change it easily on the Mac. In Photos, click People in the sidebar and double-click the thumbnail of the person you want to change. If necessary, click Show More to see all their photos, then Control-click the desired photo and choose Make Key Photo from the contextual menu.
Create and Name Reminders Lists to Use Them Via Siri
Do you create reminders with Siri on the iPhone? Those reminders are automatically added to your default list, which you set in Settings > Reminders > Default List. That’s great generally—“Hey Siri, remind me to update watchOS tonight at 11 PM”—but less good when you want to maintain different shopping lists. For instance, create a list called “Grocery,” and then you can tell Siri, “Put chocolate-covered bacon on my Grocery list.” Want to get fancy? Make a list called “Hardware,” and then tell Siri, “Add birdseed to my Hardware list, and remind me when I arrive at Home Depot.” You may have to pick the correct Home Depot location from a list, but then you’ll receive an alert reminding you to buy birdseed when you pull into the parking lot. To look at any list via Siri, just say something like “Show my Grocery list.”
Find the Battery Percentage Indicator on the iPhone X
Wondering what happened to the numeric battery percentage indicator on the iPhone X? The notch takes up enough space at the top of the screen that there was room only for the battery icon, which can be hard to interpret. If you want to see precisely what percentage of your battery is left, swipe down slightly from the top-right corner of the screen. That gives you the full set of indicators, including battery percentage. You don’t have to keep swiping down enough to show Control Center, but if you do, all the indicators will be there too.
Is Microsoft Office 365 a Cloud or Software as a Service?
This is a question that comes up all the time—Is Microsoft Office 365 considered a cloud solution or Software As A Service?
I guess it all comes down to interpretation. Cloud technologies are all the rage these days. Businesses now have many options when it comes to their computing environment. They can elect to go 100% and put all of their technical resources in a cloud environment, either shared or dedicated. Or, they can store protected data on a private cloud while retaining the ability to use resources from the public cloud. We call this a “hybrid cloud” in our techy circles. Or, they can elect use shared resources like Microsoft Office 365.
So, is Microsoft Office 365 a cloud solution or a Software as a Service solution? Maybe it’s a bit of both.
Many companies are making the move to Office 365. More are now benefitting from its benefits. Microsoft Office 365 provides any-sized organization the ability to use email, work on projects, share information with coworkers in the office, or with partners outside the organization. It’s now mainstream and used by businesses of all types.
However, sometimes there’s a bit confusion about where Office 365 fits in. Is it the same thing as the Cloud, or is it something else?
To understand where Microsoft Office 365 stands, it’s important to know the difference between the Cloud and Software as a Service (SaaS). The Cloud is part of the larger titled Cloud Computing. Cloud Computing is an information technology (IT) paradigm that provides users access to shared pools of system resources and higher-level services that can be rapidly provisioned with minimal management. Cloud Computing involves the sharing of resources, similar to Microsoft Office 365. For this reason, many think Office 365 is the same thing as the Cloud.
Microsoft Office 365 does allow you to access files and information in an easy-to-use, shared pool. It makes emailing and working with others easy, much like the Cloud. However, the Cloud is more than just sharing files and information. Cloud technologies can be confusing. But to keep it simple, when using the Cloud, businesses shift their onsite technologies to the Internet (either private or shared).
The Cloud frees businesses from the maintaining of servers, telephone equipment, and other IT solutions. With the Cloud, computing resources are housed online so they can be accessed from anywhere with an internet connection. With a private cloud, resources can only be used by your authorized users.
In contrast, SaaS is a licensing and delivery model where the software is provided on a subscription basis and is centrally hosted. SaaS is typically accessed by users via a web browser. When looking at Office 365, this seems like a much better fit as far as categorization goes. In other words, SaaS is an application that’s not housed on premise.
Microsoft Office 365 is a subscription-based service that’s accessed through the Internet on a web browser. It’s not stored on your computer—You must launch it through a web browser each time you use it. SaaS applications can be run in the Cloud, but this doesn’t make them a Cloud.
The confusion surrounding Microsoft Office 365 stems from the fact that it’s accessed via a web-based system -similar to the way cloud computing allows you to share and work on various projects regardless of your physical location. It’s important to remember that it’s not stored on your computer. You can access Office 365 from wherever you are, on any computing device, as long as you have a subscription and an internet connection. It’s the same with any SaaS solution.
There’s a huge difference between cloud computing and SaaS. The Cloud’s focus revolves around virtual computers/servers, data storage capacity, communications, messaging, networks, and development environments. This isn’t the case with SaaS. SaaS is an application. SaaS is better suited for our purposes, than is the Cloud is.
When comparing the two systems, look at services they offer and how they can benefit your business. This will help you understand how Office 365 can work for your business purposes. The Cloud is better suited to large enterprises, that are involved in software development or other complicated computing processes. SaaS is for those who depend on software applications, which include all of us. Office 365 is simple to use, as exemplified by its widespread use ranging from company executives to college students. For these reasons, it would be considered a Software as a Service.
Does this mean that you can only use one or the other?—That you must decide between the Cloud or various SaaS applications such as Microsoft Office 365? No, it does not. The great thing about Microsoft Office 365 is that, because it’s more like an application, it can be run on both cloud servers and physical servers.
Microsoft Office 365 is a versatile tool that offers a multitude of functions that will make your work life much easier. To understand Microsoft Office 365 just remember, it’s a web- based system that allows you to access pools of files and information, not a server focused on data storage and capacity.
Learn How You Can Adjust Web Site Behavior with Safari’s Site-Specific Settings
Although macOS 10.13 High Sierra was light on new features, it did bring one welcome addition to Safari—site-specific settings. Imagine that you regularly visit a blog that you prefer to read using Safari’s Reader view. Rather than invoke it each time you visit, you can now set Safari to use Reader automatically on that site. Similarly, if there’s a site whose text is too small, Safari can remember your page zoom setting for that site. Neat, eh?
Here’s how to make the most of Safari’s site-specific settings. First, load a site whose settings you’d like to customize. Then, choose Safari > Preferences and click Websites in the toolbar. You see a list of general settings in the sidebar at the left, followed by any plug-ins you’ve installed. For each setting or plug-in, you can set what happens when you visit the site you just loaded—or, if you have a bunch of sites open in different tabs, you can customize the behavior for any open site. Here are your options.
Reader
Reader view displays an article as a single page that’s formatted for easy reading, without ads, navigation, or other distractions. It’s such a significant change that it’s off by default—you enable it by clicking the Reader button to the left of the URL in the address bar. To turn it on for all of a site’s articles, in Safari’s Websites preferences, select Reader and choose On from the pop-up menu next to the site name.
Content Blockers
Another way of seeing fewer Web ads is to install a Safari content blocker. Choose Safari > Safari Extensions to open Safari’s Extension Gallery, and then scroll down slightly to find the page’s Search field, where you can search for blocker. There are lots—look for one like Adguard AdBlocker that supports Safari’s content blocking API. Once you’ve installed one, select Content Blockers in the Websites preferences. By default, Safari blocks ads on all sites, so choose Off from the pop-up menus for sites whose ad content you want to see.
Auto-Play
Little is more annoying than sites that play a video when a page loads, distracting you from the text you want to read. Even worse are those sites—Macworld, we’re looking at you—that auto-play videos that aren’t even related to the page. Safari squelches auto-playing videos by default, but for sites like YouTube, you might want to allow videos to play. You can also choose to stop only videos that have sound.
Page Zoom
It’s easy to hit Command-Plus to zoom in on a page, increasing the text and graphics proportionally, but who wants to do that every time you visit a page sporting barely readable words? With the Page Zoom setting, Safari will use your preferred zoom every time you visit a particular site. In fact, you don’t have to do anything other than set a zoom level with Command-Plus when you’re viewing a site because Safari remembers it automatically, as you can see in the Configured Websites section for Page Zoom. To tweak it manually, choose a zoom level from the site’s pop-up menu.
Camera & Microphone
Apart from Web conferencing services, you’re unlikely to run across many sites that want to access your Mac’s camera and microphone. That’s why the Camera and Microphone settings default to asking you whenever a site wants permission to record you. If you find it irritating to be asked constantly by a site you use often, choose Allow from the pop-up menu for that site. And if a site asks repeatedly but you never want to allow it, choose Deny to stop the prompts.
Location
Most Web sites that ask for your location want to determine how close you are to particular stores. If that’s information you’re interested in sharing, let them see where you are, by all means. And if you’re using a mapping service that wants your location, it’s entirely reasonable to set its pop-up menu to Allow. But if a site keeps asking and it feels creepy, set it to Deny.
Notifications
Are there sites whose new posts you’d like to know about right away? If they support Web notifications and you give them permission, they can post push notifications that appear on-screen and in Notification Center, just your other notifications.
The Notifications preferences look different from the others because they show only sites that have asked for permission in the past. Safari remembers your choice, and if the site gets annoying later, you can always take back permission by changing the Allow pop-up menu to Deny. And if you never want to be prompted for push notifications—they can be distracting—uncheck the “Allow websites to ask for permission to send push notifications” checkbox at the bottom of the pane.
Plug-ins
It’s impossible to know what plug-ins you’ve installed, but Safari is configured to make sites ask for permission to use a plug-in each time you visit. That’s the safest setting, but for any given site and plug-in, you can use the pop-up menu to give the site access (choose On) or not (choose Off). And if you can’t even remember what a plug-in does, you can deselect its checkbox to disable it.
That’s it! Some of Safari’s site-specific settings work without any interaction from you, such as your page zoom and notification preferences. Others require a tiny bit of configuration, but that’s a small price to pay for the Web working more the way you want.
Social Media: Tired of Web sites with auto-playing videos, too-small text, and intrusive ads? Safari’s new site-specific settings let you customize how you browse individual sites—learn how here:
How to Split Restaurant Checks with Apple Pay Cash
You’re out to lunch with tech-savvy friends, one of whom picks up the check and says, “Just send me your share via Apple Pay Cash.” Say what?
Apple Pay Cash is Apple’s new person-to-person payment service, designed to make it easy for individuals to send and receive money. It’s perfect for repaying a friend who buys concert tickets or a relative who picks up some groceries for you. Or rather, it’s perfect if your friends and relatives use iPhones with iOS 11.2 or later—for green-bubble Android acquaintances, you can instead rely on cross-platform services like Venmo, Circle, and Square Cash. Here’s how to start using Apple Pay Cash.
First, if you haven’t yet enabled Apple Pay, go to Settings > Wallet & Apple Pay > Add Credit or Debit Card, and follow the prompts to add at least a debit card. You’ll also need two-factor authentication turned on in Settings > Your Name > Password & Security—regardless of Apple Pay, two-factor authentication is essential for security. With Apple Pay enabled, tap Settings > Wallet & Apple Pay > Apple Pay Cash and run through the setup process. You might also be asked to verify your identity after setup—it’s necessary to send or receive more than $500 in total.
When you’re done, you’ll end up with a new Apple Pay Cash card in the Wallet app. It’s a virtual card that stores money you receive and works like any other debit card for payments. If it doesn’t have enough money on it to cover a payment, you can choose any other debit or credit card you’ve added to Apple Pay. You can also add money to it or withdraw money to a linked bank account. You’ll want to use a debit card when adding money or paying beyond your balance with Apple Pay Cash, since then there is no transaction fee. A credit card incurs a 3% fee.
To send or request money via Apple Pay Cash, you use its Messages app, which is installed automatically. While in an iMessage thread (blue bubbles) with the person with whom you want to exchange money, make sure the app drawer is showing (tap the app button if necessary) and then tap the Apple Pay button in the drawer.
A panel appears with a dollar amount, + and – buttons, and buttons for Request and Pay. Use the + and – buttons to set the amount, or tap the dollar amount to show a keypad where you can enter an exact amount, with cents if necessary. Then tap Request or Pay to insert the transaction into the message. It won’t be sent until you tap the black send button, so if you change your mind, you can tap the little x to delete. Lastly, you’ll be prompted to verify the transaction in the usual Apple Pay fashion, which means authenticating with Face ID on the iPhone X or Touch ID on all other iPhones.
You can even use Siri to initiate transfers—“Send my mother $15.” or “Ask my sister for $4.99.” And if you have an Apple Watch with watchOS 4.2 or later, you can also send money from the Messages app, or send or request money via Siri. On the watch, double-press the side button to confirm the transaction.
Frankly, the only downside to Apple Pay Cash is that it works only within the Apple world. But as long as you want to exchange money with Apple-using friends and relatives, it’s fast, easy, reliable, and one less reason to visit the ATM.
Social Media: Need to pay a friend back for lunch, or get reimbursed for picking up groceries for a relative? As long as you both use an iPhone with iOS 11.2, the new Apple Pay Cash is the fastest and easiest way for individuals to exchange money.