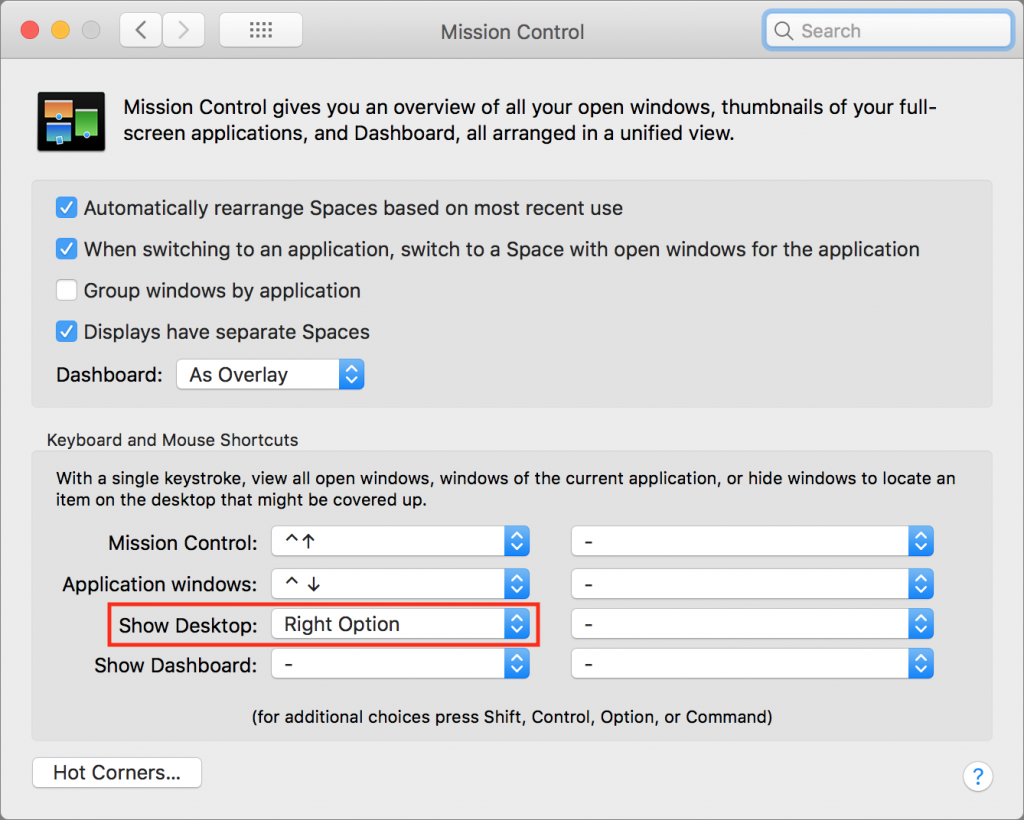
If your Mac is anything like ours, you end up with lots of apps open, each with one or more windows that obscure the Desktop. For those people who like to save in-progress documents to the Desktop and keep current project folders there, all those windows get in the way. macOS has a solution. Open System Preferences > Mission Control, and in the Keyboard and Mouse Shortcuts section, from the Show Desktop pop-up menu, choose a keyboard shortcut. Try the right-hand modifier keys—we’re fond of Right Option—because they’re easy to press and aren’t likely to be used for other purposes. Then, whenever you want to see and work with the icons on your Desktop, hit that key, and do what you want. If you like, you can press that key again to bring the windows back.
Teach Siri How to Pronounce Names Properly
Siri is supposed to be a competent voice assistant, but sometimes Siri can’t even pronounce your own name correctly! Luckily, it’s easy to fix Siri’s pronunciation for any name. Just say to Siri, “Learn how to pronounce Jill Kresock.” (Siri defaults to “krehsock” rather than the correct “kreesock” in this case.) Siri first asks you to say the person’s first name and then presents a list of options for the best pronunciation. Tap the play button next to each option to hear it, and tap Select for the one you like best. If none are good, tap Tell Siri Again and say the name again, perhaps changing your enunciation slightly. Once you’ve set up the first name, Siri will ask you to say the person’s last name, after which you can pick the best pronunciation for the last name.
View Notes in Their Own Windows, and Float Them Over Everything Else
Here’s one for those who use Apple’s Notes app for storing bits of information. By default, Notes in macOS gives you a single window, with each note listed in a sidebar. But what if you want to see two notes at once? Or keep one always available no matter what else you’re doing? Select the desired notes in the sidebar by Command-clicking them, and then choose Window > Float Selected Notes to open them in their own windows. Or, just double-click them in the sidebar! Then, to make sure one or more of those windows is never obscured by another app, make it active and then choose Window > Float on Top. It’s still a normal window that you can move and resize and close, but no other app will appear over it. See how Safari is the frontmost app below, but the Notes window is on top?
There’s a Hidden Keyboard Shortcut Cheat Sheet in Your iPad
If you’re working on an iPad with a physical keyboard—either a Bluetooth keyboard or an iPad Pro with Apple’s Smart Keyboard—there are quite a few keyboard shortcuts you can use to work faster. Many are what you’d guess if you have Mac experience; for instance, Command-F generally maps to Find. But to see a list of supported keyboard shortcuts in an app, simply press and hold the Command key on the keyboard until an information panel appears. Some apps, like Calendar (shown below), even have multiple pages of shortcuts; swipe to see them all. Not all apps will display the cheat sheet, but most of Apple’s productivity apps do.
Use Modifier Keys to Do More—a Lot More—with Mouse Drags
Dragging files and folders around is core to the Mac experience—drag a file from one folder to another to move it, drag a folder from one drive to another to copy it. But did you know that if you hold down the Option key while dragging a file in the Finder, you’ll get a green + pointer and it will make a copy in the destination? That’s easier than duplicating, moving, and renaming the file. Similarly, if you want to move a large folder from one drive to another, hold down the Command key during the drag to do in one step what would otherwise require copying, trashing, and emptying the Trash. Finally, if you want an alias, hold down the Command and Option keys while dragging, and presto, the original stays put and an alias appears in the destination.
10 Things You Need to Know about Apple’s New HomePod Speaker
After months of anticipation, Apple’s new HomePod smart speaker finally shipped in mid-February. Reviews of its audio quality have been positive, and for the most part, it works both as advertised and as you’d expect. However, there were some surprises, most good but some bad. Whether you have a HomePod on your credenza (which may be a bad spot for it!) or you’re still deciding if you want to buy one, here are ten things you should know:
- Furniture rings. Let’s get this one out of the way. The HomePod can leave rings on oil-finished wood furniture because the silicone base can react with certain wooden surfaces. That has to be embarrassing for a company that prides itself on materials expertise like Apple. The solution is easy—just put something under it.
- Single user. Anyone in the room can give Siri commands, but when it comes to account-based connections, the HomePod is a single-user device. So if you set it up, which is astonishingly easy, it will connect to your Apple Music account, your iMessage account, your iCloud account for Reminders, and so on. That’s fine for you, but your family members won’t be able to access their Apple Music playlists, for instance.
- Speakerphone. The HomePod may be the best speakerphone you’ve ever used. Alas, you can’t initiate a call on it, but once you start one on your iPhone, you can transfer the call by tapping the new Audio button that replaced the Speaker button in iOS 11.2.5 and selecting the HomePod.
- Apple Music. The HomePod can act as an AirPlay speaker, and can thus play audio from your other Apple devices. But when you control it via Siri, the music must come from Apple Music, your iTunes Store purchases, or be matched in your iCloud Music Library. To send Mac audio from apps other than iTunes to the HomePod, get Rogue Amoeba’s Airfoil.
- Audio power. It may be small, but the HomePod has plenty of power. At 6 feet, we measured the sound output at 100% volume at 80 decibels, which is louder than is comfortable.
- Volume control. Speaking of volume, you control it by percentages, as in “Hey Siri, set the volume to 15 percent.” You can also tap the + and – buttons on the top of the HomePod to adjust the volume in 5% increments.
- Electrical usage. The HomePod may be turned on all the time—it has no power switch—but it uses very little electricity. In our testing, it used 2.5 to 3 watts when it was idle but has been used recently, and 4 to 7 watts when playing. Leave it alone in a quiet room for a while, and its power usage drops to 0 watts with just an occasional 1.5-watt spike.
- Good listener. The HomePod hears your commands remarkably well, even when it’s playing music at a high volume. You shouldn’t have to shout at it.
- Hey Siri. If you’re within earshot of a HomePod and want to give Siri a command on your iPhone or Apple Watch, don’t say “Hey Siri” right away. Instead, to use your iPhone, unlock it first. Or, to use your Apple Watch, raise your wrist. Apple has an explanation of how Hey Siri works with multiple devices.
- Apple TV. You can play audio from your Apple TV through your HomePod. On the main screen of the Apple TV, press and hold the Play/Pause button on the Siri Remote, and then select the HomePod before playing a show. Or, while playing video, swipe down on the Siri Remote, swipe right to select Audio, and then select your HomePod in the Speaker list.
Once you’ve transferred audio to the HomePod, you can use Hey Siri commands to pause and play the Apple TV content, change volume, and even rewind and fast-forward by a certain amount of time (“Hey Siri, rewind 10 seconds”). However, other things that Siri on the Apple TV can do, like tell you who stars in a movie, work only when you press and hold the Siri button on the Siri Remote.
Much as the HomePod works well right now, it stands to improve in the coming year. Apple plans to release software updates that will enable two HomePods in the same room to provide true stereo sound, and that will let you control multiple HomePods simultaneously for multi-room audio.
Need to Do Some Simple Math? Get Siri to Do It!
If you’re reading this, chances are good that you’re not in elementary school, but it’s still easy to end up with a bunch of numbers you need to calculate. Perhaps you’re trying to total receipts for an expense report, average your kid’s report card grades, or split a restaurant bill. Either way, instead of launching the Calculator app on your iPhone (it’s oddly missing from the iPad), get Siri to do the math for you. For each the above examples, try the following, making sure to speak the decimal point as “point” or “dot.” “What is 113.25 plus 67.29 plus 89.16?” “What is the average of 92 and 96 and 82 and 91?” “What is 235.79 divided by 6?” Siri always shows you the calculation, so you can verify that it heard you correctly, just in case you’re doing this in a loud restaurant.
Wondering Where Your Past Events in the iOS Calendar App Have Gone?
When it comes to calendars, we’re mostly concerned with the future. But sometimes you want to travel back in time too, to see when you had that doctor appointment or last went to the gym. If you scroll back in the Calendar app in iOS, you might discover, to your consternation, that after 2 weeks back, the only items in your calendar are old repeating events. What gives? Weirdly, since calendar events consume almost no storage space, iOS lets you select how far back to sync events from your master calendar. Choose a time period in Settings > Calendar > Sync, or to eliminate any possibility of confusion, just select All Events.
Solving the Mystery of Missing Messages Notifications
A client got in touch recently with a maddening problem. When he received texts on his iPhone, Messages displayed notifications for messages from everyone…except his wife! Needless to say, this was a problem. Since notifications appeared correctly for other people, it wasn’t related to overall settings. It turned out that he—or someone else, or iOS gremlins—had inadvertently enabled the Hide Alerts switch for the Messages conversation with his wife. To fix it, all he had to do was display the conversation in Messages, tap the i button at the upper right, and disable Hide Alerts. (In the Mac version of Messages, click the Details button and look for the Do Not Disturb checkbox.) It’s a good feature designed to let you mute a chatty group conversation, but it can cause stress if applied to the wrong conversation accidentally.
Apple Pay Is Faster, Easier, More Secure, and More Private Than Using Credit Cards
You’ve probably heard of Apple Pay, but have you set it up so you can use it to pay for purchases at checkout? If not, give it a try, since it’s one of those living-in-the future Apple technologies that feels like science fiction every time you use it. Simply put your iPhone, iPad, or Apple Watch within an inch or so of a compatible payment terminal (look for an Apple Pay or contactless payment
logo), put your finger on the Home button to use Touch ID (or double-press the iPhone X’s side button and authenticate via Face ID, or double-press the Apple Watch’s side button), and you’re done. The entire transaction takes less time than opening your wallet, although you may still need to sign a receipt.
What happens behind the scenes when you use Apple Pay? The good news is that Apple Pay is significantly more secure than a magnetic-strip credit card and has advantages over chip-embedded cards too. First, theft prevention is baked in. A typical thief can’t use Apple Pay from your device because they can’t get past Touch ID or Face ID, or provide your Apple Watch passcode.
Also, the store where you shop gets no data about you—they don’t know who you are, where you live, what your card number is, or anything else unless you showed a rewards card or provided your phone number. Most importantly, you don’t have to worry about your credit card number being jotted down, scanned, or skimmed.
How does this seemingly magical process work? When you set up Apple Pay, the Wallet app sends your encrypted credit card details to Apple, after which they’re passed along to your card’s payment network. What comes back is an encrypted Device Account Number—a long number that’s stored in the Secure Enclave chip on your device. That chip is protected by a digital moat, keeping it isolated from nearly all activity on your device. The Device Account Number is unique to your device and card, so nobody else can use it.
When you pay with Apple Pay, the Secure Enclave chip transmits the Device Account Number, along with a few other details, including a one-time transaction code. Everything is encrypted, so even if an attacker were listening to the traffic, no transaction details would be revealed. The information remains encrypted until it reaches the appropriate party, at which point, if all goes well, your transaction is approved and processed.
Millions of payment terminals in the United States accept Apple Pay, including those found in most major national chains, so you shouldn’t have to look far to find one. You can also use Apple Pay in some iOS apps and some Web-based shopping carts when checking out in Safari.
To set up Apple Pay, on your iPhone or iPad, tap Settings > Wallet & Apple Pay > Add Credit or Debit Card and follow the easy instructions—it’s fine to let the device scan your card so that you don’t have to type your credit card number; the image is discarded immediately after setup.
After adding a card, find it in the Wallet app and tap the card’s info button at the lower right to explore the Info and Transactions screens. Notice that four digits from the card’s Digital Account Number appear on the Info screen—if you want to return an Apple Pay purchase, you’ll give these digits to the merchant instead of sharing your credit card number.
Finally, starting in iOS 11.2, Apple introduced Apple Pay Cash, which lets you make person-to-person payments within the Messages app. It’s great for splitting restaurant checks!
The bottom line is that Apple Pay is easy to use, preserves your privacy, and enhances your financial security. And you get to feel like you’re living in the future!